Instructions for the Installer

5. ADAPTING TO DIFFERENT TYPES OF GAS

Before carrying out the operations described below, disconnect the appliance from the electricity supply.

The appliance is tested with G20 (2H) natural gas at the pressure of 20 mbar. If it is to be used with other types of gas, the burner nozzle has to be changed and the gas valve adjusted. To replace the nozzle, proceed as described below.

5.1 Adjusting the oven burner

To adjust the oven burner, open the oven door and proceed as follows:

remove all accessories (pans, shelves and any steel runners);

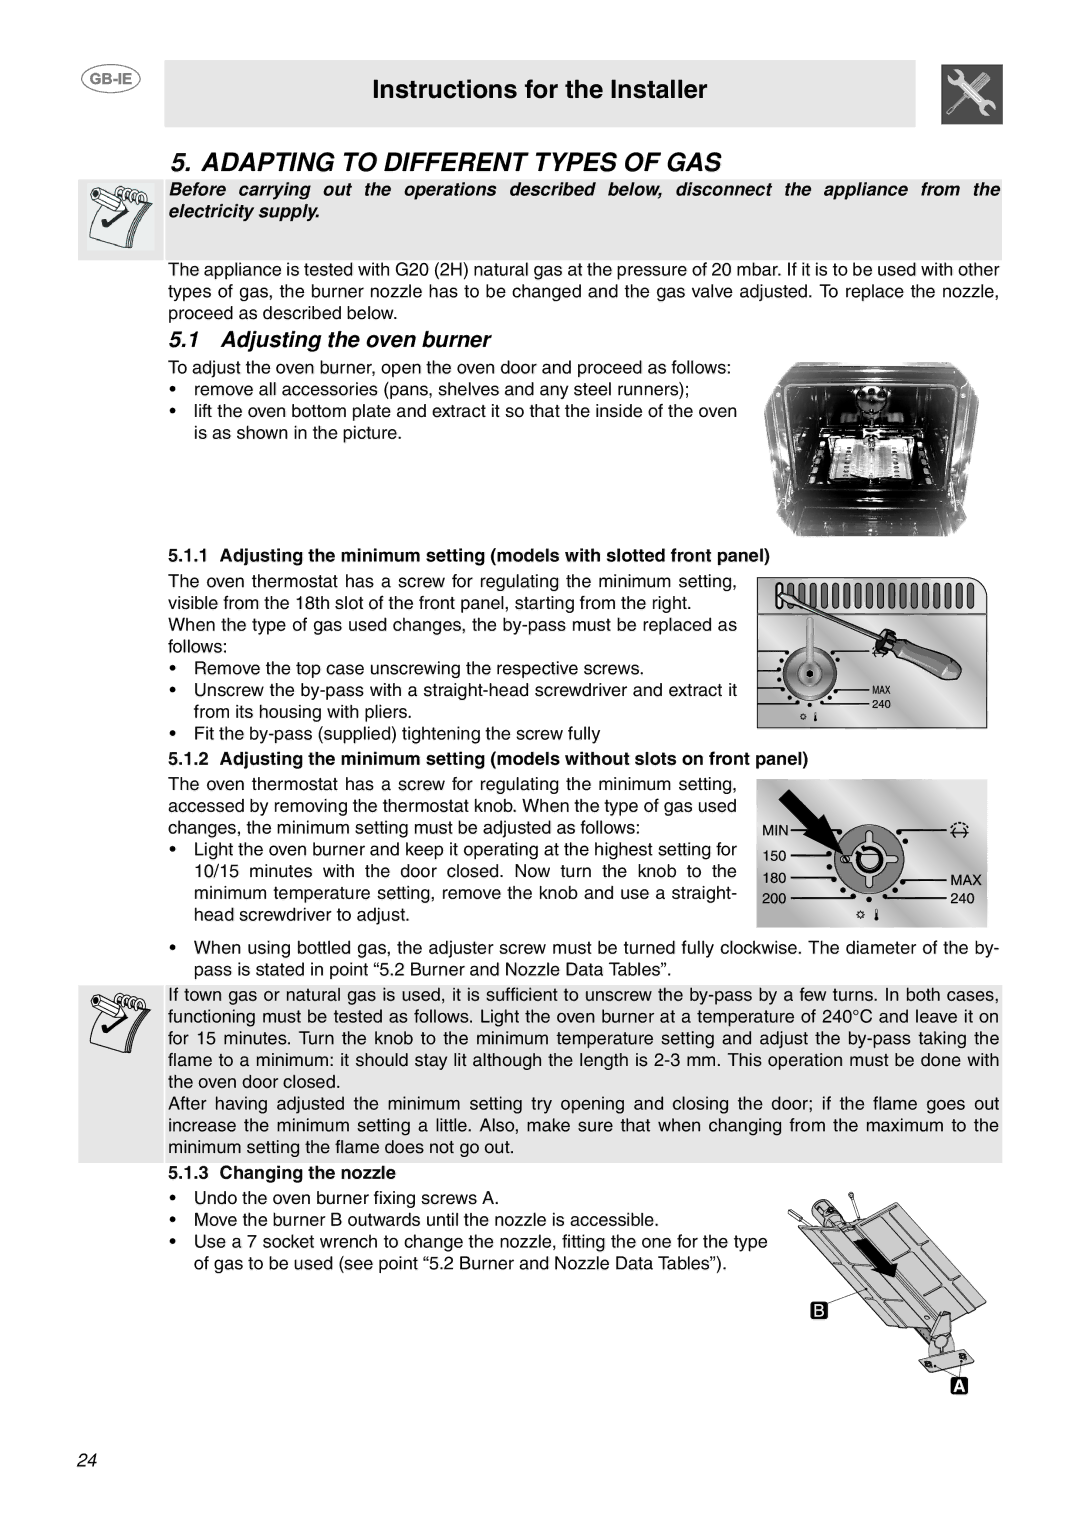
lift the oven bottom plate and extract it so that the inside of the oven is as shown in the picture.

5.1.1 Adjusting the minimum setting (models with slotted front panel)

The oven thermostat has a screw for regulating the minimum setting, visible from the 18th slot of the front panel, starting from the right. When the type of gas used changes, the by-pass must be replaced as follows:

• Remove the top case unscrewing the respective screws.

• Unscrew the by-pass with a straight-head screwdriver and extract it from its housing with pliers.

Fit the by-pass (supplied) tightening the screw fully

5.1.2 Adjusting the minimum setting (models without slots on front panel)

The oven thermostat has a screw for regulating the minimum setting, accessed by removing the thermostat knob. When the type of gas used changes, the minimum setting must be adjusted as follows:

• Light the oven burner and keep it operating at the highest setting for 10/15 minutes with the door closed. Now turn the knob to the minimum temperature setting, remove the knob and use a straight- head screwdriver to adjust.

When using bottled gas, the adjuster screw must be turned fully clockwise. The diameter of the by- pass is stated in point “5.2 Burner and Nozzle Data Tables”.

If town gas or natural gas is used, it is sufficient to unscrew the by-pass by a few turns. In both cases, functioning must be tested as follows. Light the oven burner at a temperature of 240°C and leave it on for 15 minutes. Turn the knob to the minimum temperature setting and adjust the by-pass taking the flame to a minimum: it should stay lit although the length is 2-3 mm. This operation must be done with the oven door closed.

After having adjusted the minimum setting try opening and closing the door; if the flame goes out increase the minimum setting a little. Also, make sure that when changing from the maximum to the minimum setting the flame does not go out.

5.1.3 Changing the nozzle

Undo the oven burner fixing screws A.

Move the burner B outwards until the nozzle is accessible.

Use a 7 socket wrench to change the nozzle, fitting the one for the type of gas to be used (see point “5.2 Burner and Nozzle Data Tables”).

24

Page 8
Image 8
Smeg S340G manual Adapting to Different Types of GAS, Adjusting the oven burner, Changing the nozzle

S340G specifications

The Smeg S340G is an exceptional kitchen appliance that combines style, performance, and innovation. Known for its distinctive retro design, this gas hob stands out in the modern kitchen while delivering advanced cooking capabilities.

One of the main features of the S340G is its four gas burners, which provide a variety of cooking options, from simmering delicate sauces to quickly boiling pasta. The burners are strategically placed to maximize cooking space, allowing the use of larger pots and pans simultaneously. Each burner is equipped with a robust cast iron support, ensuring stability and support for your cookware.

Safety is a top priority for Smeg, and the S340G comes with automatic electronic ignition and a flame failure device. The ignition system allows users to light the burners quickly and safely with just a push of a button. The flame failure device is a crucial safety feature that automatically shuts off the gas supply if the flame accidentally goes out, preventing potential hazards.

The S340G also incorporates advanced technology for precise temperature control. The burners are designed with different heat output levels, allowing for finely-tuned cooking that can adapt to your culinary needs. The high-efficiency burners provide responsive heat adjustments, making it easy to achieve perfect results every time.

In terms of build quality, the S340G features a stainless-steel surface that not only looks elegant but is also durable and easy to clean. The sleek design is complemented by minimalist knobs that add to its retro charm. The hob fits seamlessly into various kitchen styles, making it an ideal choice for both contemporary and traditional settings.

Additionally, the S340G is designed for ease of installation. It comes with a user-friendly manual that guides you through the setup process, ensuring that you can plug it in and start cooking in no time.

Overall, the Smeg S340G is more than just a gas hob - it’s a combination of high-quality materials, advanced safety technology, and superior performance. Whether you're an experienced chef or a casual home cook, this appliance is sure to elevate your culinary experience while adding a touch of elegance to your kitchen. With its unique design and practical features, the S340G stands out as a top choice for anyone looking to enhance their cooking space.