Maintenance
Maintenance (Continued)
! | WARNING | ! | 1. Visually check the engine drive belt for cracking, fraying, | ||||
severed or belt strands exposed. Replace the belt before | |||||||
DO NOT attempt any maintenance, adjustments or service | operating the mower. | ||||||
with engine and blade running. STOP engine and blade. | 2. Check for proper drive belt tension: | ||||||
Disconnect spark plug wire and secure away from spark | STOP the engine. | ||||||
plug. Engine and components are HOT. Avoid serious |
| Shift the ground speed control to 1st and engage | |||||
burns, allow sufficient time for all components to cool. |
| the wheel drive control. | |||||
Wear heavy leather gloves when handling or working |
| With the wheel drive control (A, Figure 14) | |||||
around cutting blades. Blades are extremely sharp and can | engaged, pull the mower handles, moving the | ||||||
cause severe injury. |
|
|
|
| mower rearward. | ||
|
|
|
|
|
| Observe the rear wheels. If the rear wheels slide | |
|
|
|
|
|
| ||
Blade Sharpening (Continued) |
| on the surface (no rotation) the belt is properly | |||||
| tensioned and the control does not require | ||||||
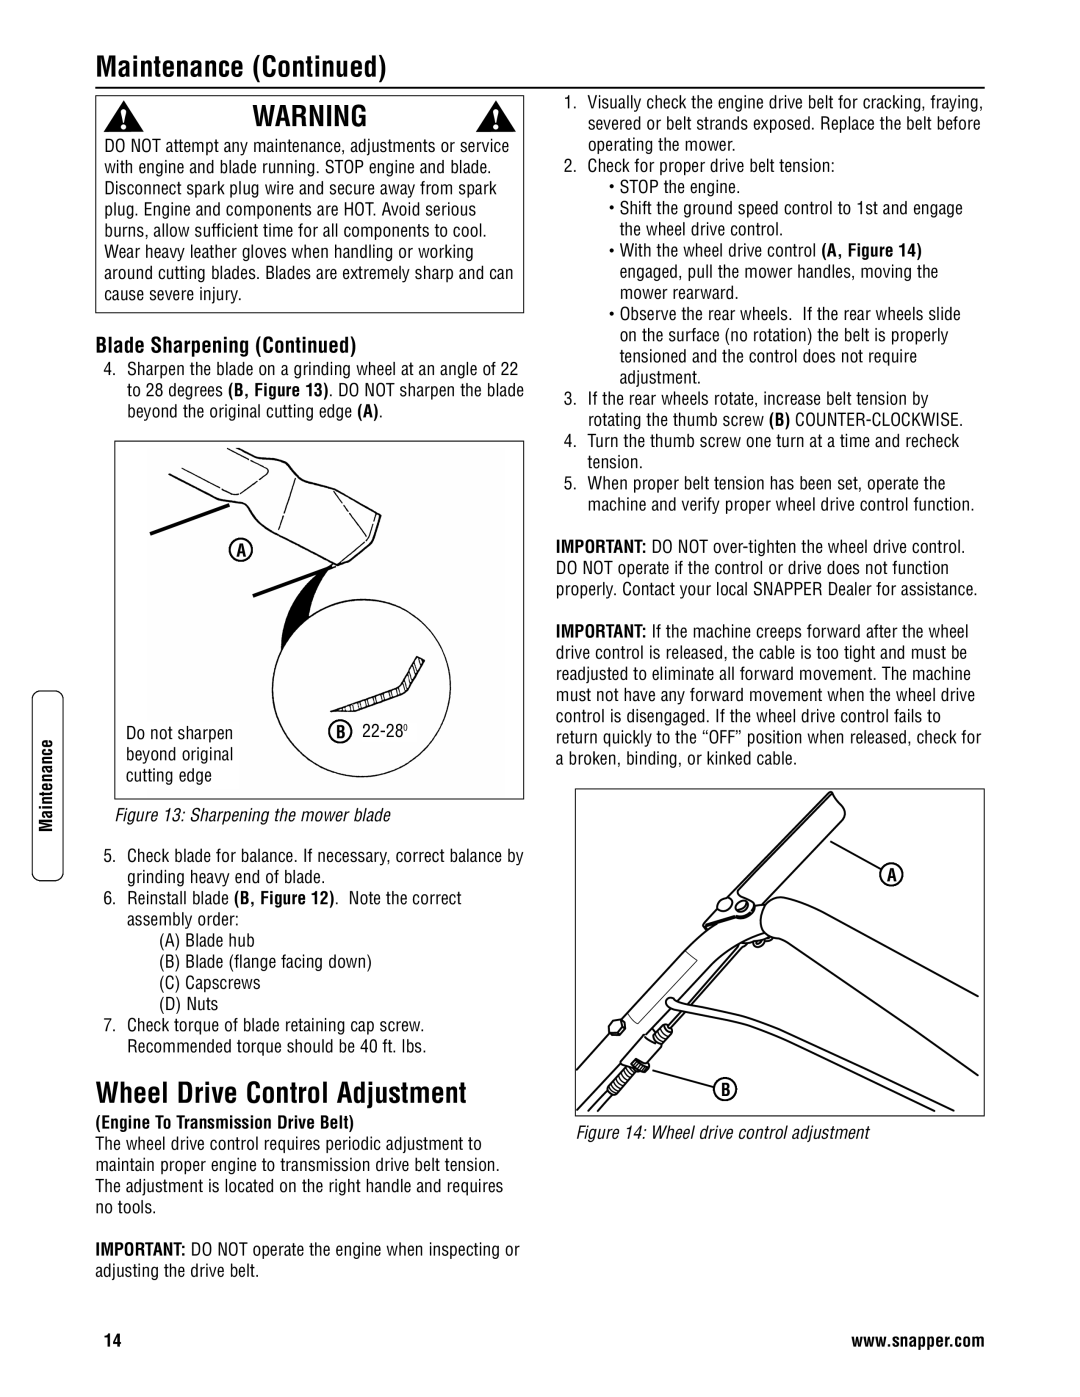
4. Sharpen the blade on a grinding wheel at an angle of 22 | |||||||
adjustment. | |||||||
| to 28 degrees (B, Figure 13). DO NOT sharpen the blade | ||||||
| 3. If the rear wheels rotate, increase belt tension by | ||||||
| beyond the original cutting edge (A). |
| |||||
|
| rotating the thumb screw (B) | |||||
|
|
|
|
|
| ||
|
|
|
|
|
| 4. Turn the thumb screw one turn at a time and recheck | |
|
|
|
|
|
| ||
|
|
|
|
|
| tension. | |
|
|
|
|
|
| 5. When proper belt tension has been set, operate the | |
|
|
|
|
|
| machine and verify proper wheel drive control function. | |
| A |
|
|
|
| IMPORTANT: DO NOT | |
|
|
|
|
|
| DO NOT operate if the control or drive does not function | |
|
|
|
|
|
| properly. Contact your local SNAPPER Dealer for assistance. | |
|
|
|
|
|
| IMPORTANT: If the machine creeps forward after the wheel | |
|
|
|
|
|
| drive control is released, the cable is too tight and must be | |
|
|
|
|
|
| readjusted to eliminate all forward movement. The machine | |
|
|
|
|
|
| must not have any forward movement when the wheel drive | |
| Do not sharpen | B |
|
|
| control is disengaged. If the wheel drive control fails to | |
|
|
| return quickly to the “OFF” position when released, check for | ||||
|
|
| |||||
| beyond original |
|
|
|
| a broken, binding, or kinked cable. | |
| cutting edge |
|
|
|
|
| |
Figure 13: Sharpening the mower blade |
| |
5. Check blade for balance. If necessary, correct balance by | A | |
grinding heavy end of blade. | ||
6. Reinstall blade (B, Figure 12). Note the correct |
| |
assembly order: |
| |
(A) Blade hub |
| |
(B) Blade (flange facing down) |
| |
(C) Capscrews |
| |
(D) Nuts |
| |
7. Check torque of blade retaining cap screw. |
| |
Recommended torque should be 40 ft. lbs. |
| |
Wheel Drive Control Adjustment | B | |
(Engine To Transmission Drive Belt) | Figure 14: Wheel drive control adjustment | |
The wheel drive control requires periodic adjustment to | ||
| ||
maintain proper engine to transmission drive belt tension. |
| |
The adjustment is located on the right handle and requires |
| |
no tools. |
|
IMPORTANT: DO NOT operate the engine when inspecting or adjusting the drive belt.
14 | www.snapper.com |
