Maintenance

!

WARNING

!

DO NOT attempt any maintenance, adjustments or service with engine and blade running. STOP engine and blade. Disconnect spark plug wire and secure away from spark plug. Engine and components are HOT. Avoid serious burns, allow sufficient time for all components to cool.

Battery Service

New Battery Preparation

1.Remove the battery from the carton.

2.Place the battery in a well ventilated area on a level non-concrete surface.

3.Test the battery. Refer to the Section entitled “Battery Testing”. If the battery needs charging, charge the battery. Refer to the Section entitled “Battery Charging”.

4.Connect the positive (+) lead (red) first, from the battery harness to the positive terminal (+) on the battery using the bolt and nut plate supplied with the battery. Connect the negative (-) lead (black) last, to the negative terminal (-) on the battery using the bolt and nut plate. Apply a small amount of grease over the terminals to prevent

corrosion.

NOTE: The battery may come with the harness already connected. If so, simply check to be sure the terminal hardware is securely tightened.

5.Install the battery onto the power unit.

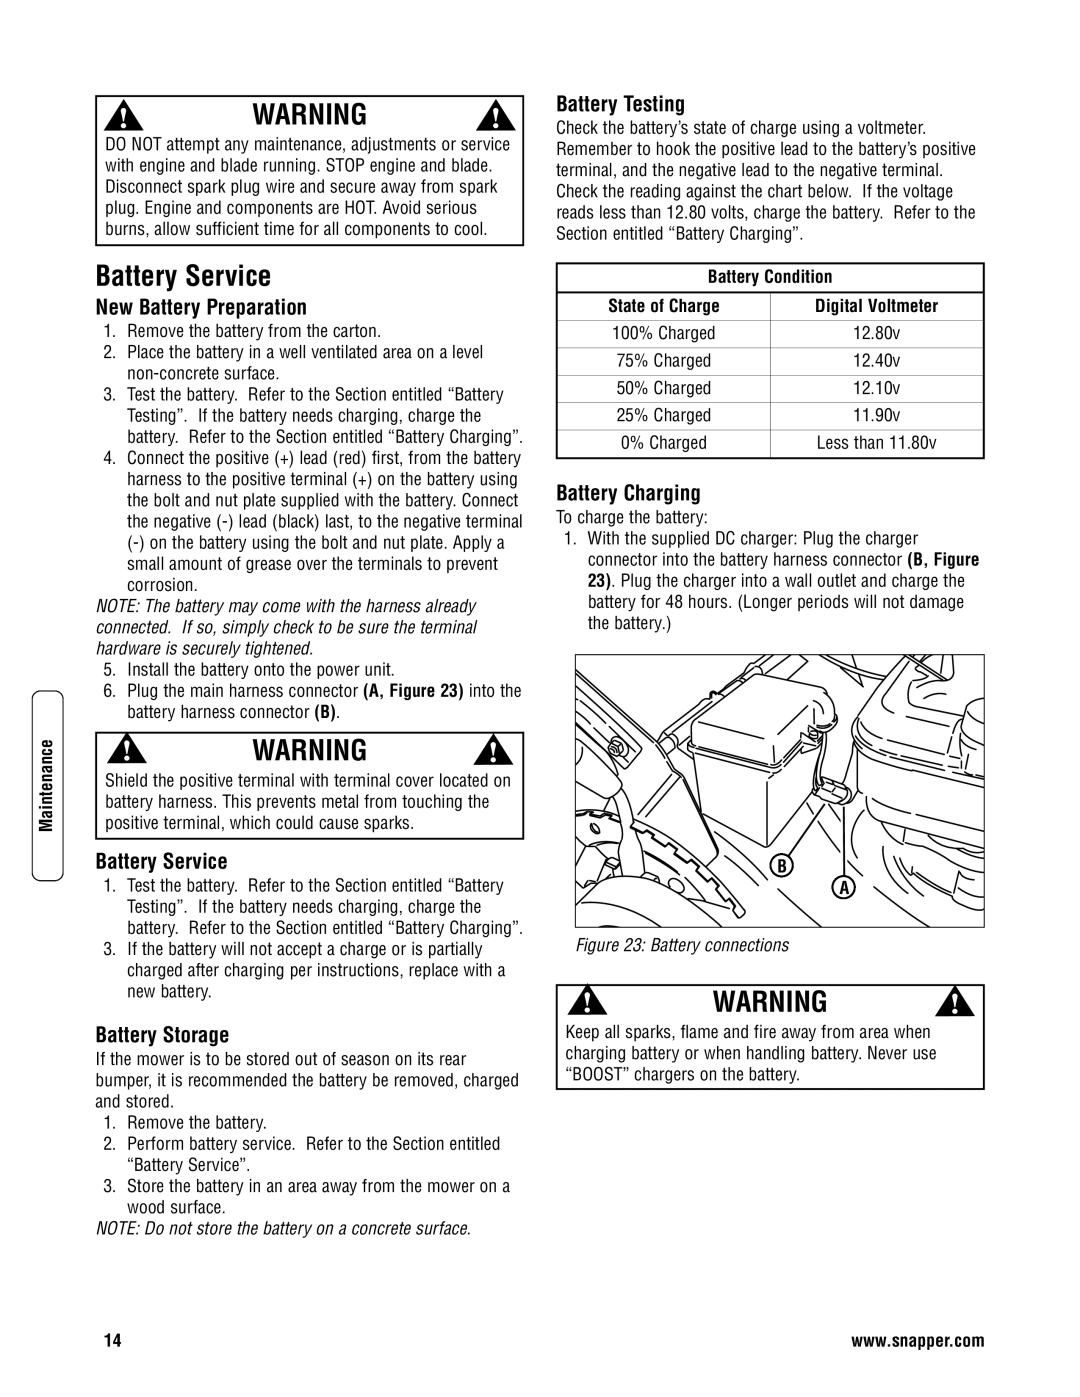
6.Plug the main harness connector (A, Figure 23) into the battery harness connector (B).

!

WARNING

!

Shield the positive terminal with terminal cover located on battery harness. This prevents metal from touching the positive terminal, which could cause sparks.

Battery Service

1.Test the battery. Refer to the Section entitled “Battery Testing”. If the battery needs charging, charge the battery. Refer to the Section entitled “Battery Charging”.

3.If the battery will not accept a charge or is partially charged after charging per instructions, replace with a new battery.

Battery Storage

If the mower is to be stored out of season on its rear bumper, it is recommended the battery be removed, charged and stored.

1.Remove the battery.

2.Perform battery service. Refer to the Section entitled “Battery Service”.

3.Store the battery in an area away from the mower on a

wood surface.

NOTE: Do not store the battery on a concrete surface.

Battery Testing

Check the battery’s state of charge using a voltmeter. Remember to hook the positive lead to the battery’s positive terminal, and the negative lead to the negative terminal. Check the reading against the chart below. If the voltage reads less than 12.80 volts, charge the battery. Refer to the Section entitled “Battery Charging”.

Battery Condition


State of Charge

Digital Voltmeter


100% Charged

12.80v


75% Charged

12.40v


50% Charged

12.10v


25% Charged

11.90v


0% Charged

Less than 11.80v


Battery Charging

To charge the battery:

1.With the supplied DC charger: Plug the charger connector into the battery harness connector (B, Figure 23). Plug the charger into a wall outlet and charge the battery for 48 hours. (Longer periods will not damage the battery.)

B

A

Figure 23: Battery connections

!

WARNING

!

Keep all sparks, flame and fire away from area when charging battery or when handling battery. Never use “BOOST” chargers on the battery.

14

www.snapper.com

Page 16
Image 16
Snapper SPV21675FC, SPV21675EFC, SPV21675EFC (7800266), SPV21675FC (7800265) specifications Battery Service

SPV21675FC, SPV21675EFC, SPV21675EFC (7800266), SPV21675FC (7800265) specifications

The Snapper SPV21675EFC and SPV21675FC are remarkable additions to the lineup of professional-grade lawn care equipment designed for homeowners and landscapers who value efficiency and precision. These models showcase an array of innovative features and cutting-edge technologies, empowering users to maintain immaculate lawns and gardens with ease.

The SPV21675EFC and SPV21675FC are equipped with a robust 21-inch steel cutting deck, ensuring a durable and reliable performance. This size strikes a perfect balance, making it suitable for both small and medium-sized yards. The steel construction not only enhances the mower's durability but also contributes to a clean and consistent cut across various grass types.

One of the standout features of these mowers is the Smart Choke technology, which simplifies starting the engine. This user-friendly system automatically adjusts the choke position, reducing the need for manual adjustments by the operator. As a result, both novice and seasoned lawn care enthusiasts can enjoy hassle-free starts with minimal effort.

Powered by a reliable 163cc engine, the Snapper SPV21675EFC and SPV21675FC deliver impressive cutting power. This engine is designed for efficiency, providing sufficient torque to handle thick grass and uneven terrain without sacrificing performance. The mowers come with a variable speed self-propulsion system, allowing users to adjust the speed according to their comfort level and mowing conditions.

Another key characteristic is the versatile cutting height adjustment feature. With six different height positions, users can easily tailor the cutting length to suit their lawn's specific needs. This flexibility is essential for achieving the desired appearance and health of the grass.

The Snapper SPV21675 series also features an integrated rear bagging system, allowing for efficient grass collection as you mow. This system promotes a cleaner lawn by minimizing clippings left behind and reducing the need for additional raking or clean-up after mowing.

In summary, the Snapper SPV21675EFC and SPV21675FC mowers offer exceptional features, including a durable steel cutting deck, user-friendly Smart Choke technology, a powerful engine, variable speed capabilities, adjustable cutting heights, and an effective bagging system. These characteristics make them ideal choices for anyone seeking a reliable and efficient lawn care solution. Whether you're a homeowner looking to maintain your yard or a professional landscaper managing multiple properties, the Snapper SPV21675 series will undoubtedly meet and exceed expectations.