DXC-D30WS/P(E)/V1

Setup Files

Changing File Settings

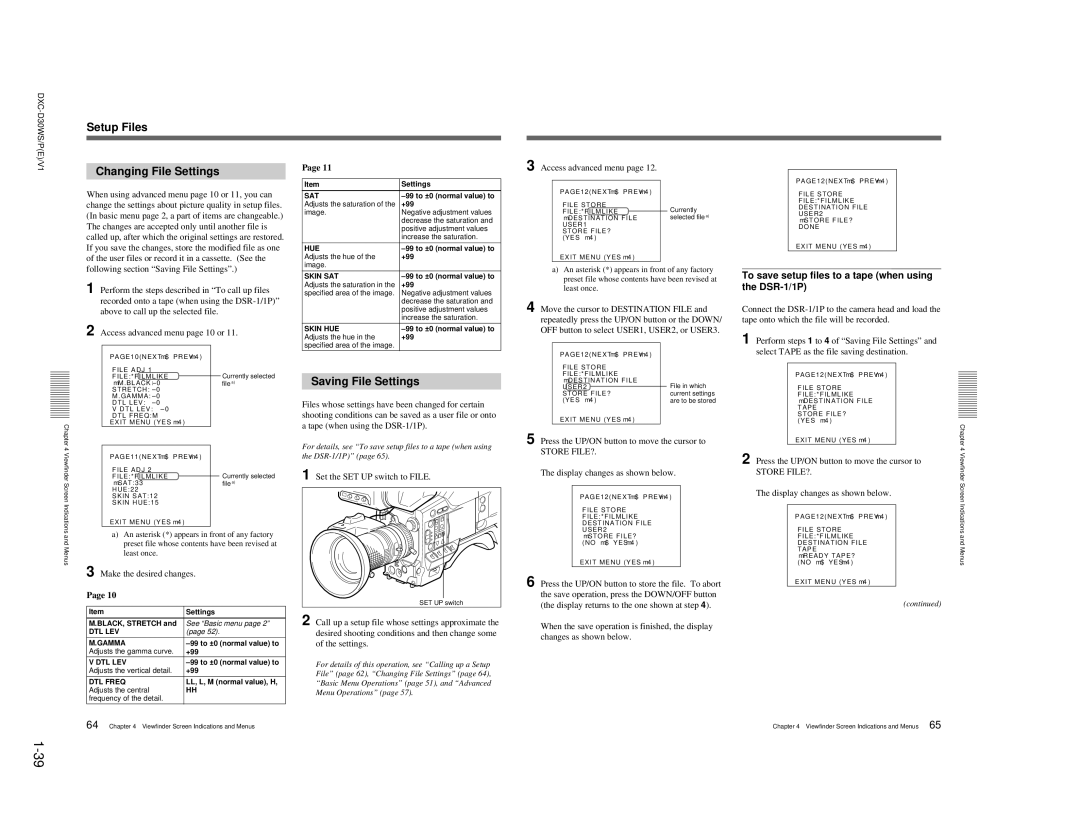
When using advanced menu page 10 or 11, you can change the settings about picture quality in setup files. (In basic menu page 2, a part of items are changeable.) The changes are accepted only until another file is called up, after which the original settings are restored. If you save the changes, store the modified file as one of the user files or record it in a cassette. (See the following section “Saving File Settings”.)

1 Perform the steps described in “To call up files recorded onto a tape (when using the DSR-1/1P)” above to call up the selected file.

2 Access advanced menu page 10 or 11.

Page 11

Item

Settings

SAT

–99 to ±0 (normal value) to

Adjusts the saturation of the

+99

image.

Negative adjustment values


decrease the saturation and


positive adjustment values


increase the saturation.

HUE

–99 to ±0 (normal value) to

Adjusts the hue of the

+99

image.


SKIN SAT

–99 to ±0 (normal value) to

Adjusts the saturation in the

+99

specified area of the image.

Negative adjustment values


decrease the saturation and


positive adjustment values


increase the saturation.

SKIN HUE

–99 to ±0 (normal value) to

Adjusts the hue in the

+99

specified area of the image.


3 Access advanced menu page 12.

PAGE12(NEXTm$ PREVm4)


FILE STORE

Currently

FILE:*FILMLIKE

mDESTINATION FILE

selected file a)

USER1


STORE FILE?


(YESm4)


EXIT MENU (YESm4)

a)An asterisk (*) appears in front of any factory preset file whose contents have been revised at least once.

4 Move the cursor to DESTINATION FILE and repeatedly press the UP/ON button or the DOWN/ OFF button to select USER1, USER2, or USER3.

PAGE12(NEXTm$ PREVm4)

FILE STORE FILE:*FILMLIKE DESTINATION FILE USER2

mSTORE FILE?

DONE

EXIT MENU (YESm4)

To save setup files to a tape (when using the DSR-1/1P)

Connect the DSR-1/1P to the camera head and load the tape onto which the file will be recorded.

1 Perform steps 1 to 4 of “Saving File Settings” and

Chapter 4 Viewfinder Screen Indications

PAGE10(NEXTm$ PREVm4)

FILE ADJ 1 FILE:*FILMLIKE

mM.BLACK:± 0

STRETCH:± 0

M.GAMMA:± 0

DTL LEV:± 0

VDTL LEV:± 0

DTL FREQ:M

EXIT MENU (YESm4)

PAGE11(NEXTm$ PREVm4)

FILE ADJ 2 FILE:*FILMLIKE

mSAT:33 HUE:22 SKIN SAT:12 SKIN HUE:15

EXIT MENU (YESm4)

Currently selected file a)

Currently selected file a)

Saving File Settings

Files whose settings have been changed for certain shooting conditions can be saved as a user file or onto a tape (when using the DSR-1/1P).

For details, see “To save setup files to a tape (when using the DSR-1/1P)” (page 65).

1 Set the SET UP switch to FILE.

PAGE12(NEXTm$ PREVm4)

FILE STORE


FILE:*FILMLIKE

mDESTINATION

FILE

USER2

File in

which

STORE FILE?

current settings

(YESm4)

are to be stored

EXIT MENU (YESm4)

5 Press the UP/ON button to move the cursor to

STORE FILE?.

The display changes as shown below.

PAGE12(NEXTm$ PREVm4)

FILE STORE

FILE:*FILMLIKE

DESTINATION FILE

select TAPE as the file saving destination.

PAGE12(NEXTm$ PREVm4)

FILE

STORE


FILE:*FILMLIKE


mDESTINATION FILE


TAPE


STORE

FILE?


(YESm4)

Chapter 4

EXIT MENU (YESm4)

2 Press the UP/ON button to move the cursor to

Viewfinder

STORE FILE?.


The display changes as shown below.

Screen


PAGE12(NEXTm$ PREVm4)

Indications


and Menus

a)An asterisk (*) appears in front of any factory preset file whose contents have been revised at least once.

3 Make the desired changes.

Page 10

Item

Settings

M.BLACK, STRETCH and

See “Basic menu page 2”

DTL LEV

(page 52).

M.GAMMA

–99 to ±0 (normal value) to

Adjusts the gamma curve.

+99

V DTL LEV

–99 to ±0 (normal value) to

Adjusts the vertical detail.

+99

DTL FREQ

LL, L, M (normal value), H,

Adjusts the central

HH

frequency of the detail.


64 Chapter 4 Viewfinder Screen Indications and Menus

SET UP switch

2 Call up a setup file whose settings approximate the desired shooting conditions and then change some of the settings.

For details of this operation, see “Calling up a Setup File” (page 62), “Changing File Settings” (page 64), “Basic Menu Operations” (page 51), and “Advanced Menu Operations” (page 57).

USER2 mSTORE FILE?

(NOm$ YESm4)

EXIT MENU (YESm4)

6 Press the UP/ON button to store the file. To abort the save operation, press the DOWN/OFF button (the display returns to the one shown at step 4).

When the save operation is finished, the display changes as shown below.

FILE STORE


FILE:*FILMLIKE

and

DESTINATION FILE

TAPE

Menus

mREADY TAPE?

(NOm$ YESm4)

EXIT MENU (YESm4)

(continued)

Chapter 4 Viewfinder Screen Indications and Menus 65

1-39

Page 43
Image 43
Sony DXC-D30WSP service manual Setup Files Changing File Settings, Saving File Settings

DXC-D30WS, DXC-D30WSP specifications

The Sony DXC-D30WSP and DXC-D30WS are professional broadcast cameras known for delivering exceptional image quality, reliability, and versatility. Both models are part of Sony's renowned lineup of 3-chip CCD cameras, designed to meet the high demands of television production and video broadcasting.

At the heart of the DXC-D30WSP and DXC-D30WS is a high-resolution 3CCD image sensor system. This technology allows for accurate color reproduction and enhanced sensitivity, making it suitable for various lighting conditions. The cameras produce vibrant images with low noise levels, ensuring that footage remains clear and detailed, even in challenging environments.

One of the standout features of these cameras is their adaptability. The DXC-D30WSP model is equipped with a wide range of interchangeable lenses, allowing operators to select the appropriate lens for their specific shooting needs. This flexibility is crucial for cinematographers and videographers who work on diverse projects, from documentaries to commercials.

The DXC-D30WS, which is similar in many ways to its counterpart, emphasizes ease of use with its ergonomic design and intuitive controls. This model is particularly well-suited for field work, as it is lightweight and portable, enabling easy transport without sacrificing performance. Both cameras have comprehensive connectivity options, including SDI and analog outputs, making them compatible with various production environments.

In terms of performance, the Sony DXC-D30WSP and DXC-D30WS feature enhanced digital signal processing. This technology optimizes image quality by improving sharpness, contrast, and color fidelity. In addition to standard recording formats, these cameras support multiple aspect ratios, making them versatile tools for filmmakers who want to achieve specific artistic visions.

Furthermore, both models include advanced white balance and exposure control features, allowing operators to fine-tune settings for optimal results. This precision is critical for maintaining consistent visual quality throughout a production.

In conclusion, the Sony DXC-D30WSP and DXC-D30WS are distinguished by their robust build quality, advanced imaging technologies, and user-friendly designs. They are ideal choices for professionals seeking reliable, high-performance cameras that can adapt to a wide range of shooting situations. Whether for broadcast television or independent filmmaking, these cameras remain a valuable asset in any production setup, ensuring that creators can capture stunning visuals with ease.