Impreso EN EE.UU Imprimé AUX ÉTATS-UNIS
English
Important Information
Turn the power off when not in use
Information Regarding Convergence
FCC Information
Table of Contents
Specifications
Care and Cleaning
Feature Chart
Congratulations
Installation
Rqqhfwlrq
DEOH%R&RQQHFWLRQ
5DQG&DEOH%R&RQQHFWLRQ
VCR and Cable Box Connection
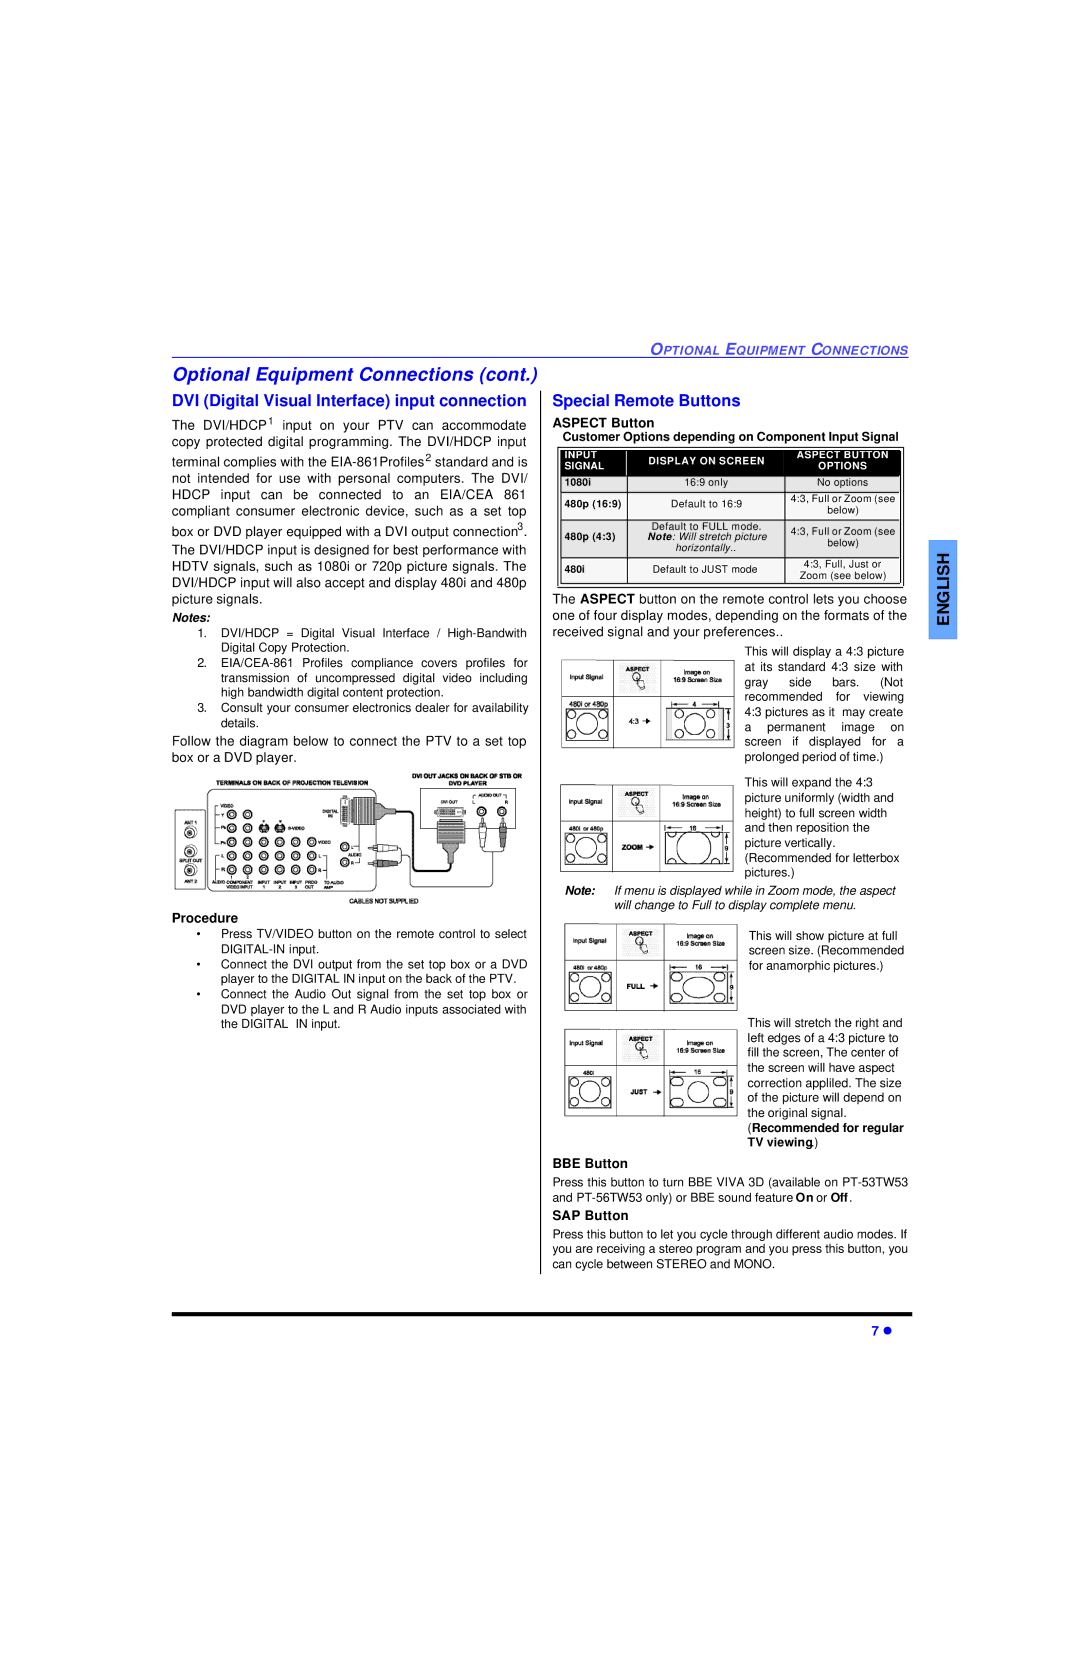
Optional Equipment Connections
Amplifier Connection to Audio AMP
Digital TV Set-Top Box DTV-STB or DVD Connection
Special Remote Buttons
DVI Digital Visual Interface input connection
Aspect Button
BBE Button
PIP Operation
Picture In Picture and Split Operation
Split Operation
PIP and Split Operation With a Cable Box
PIP, Split and Freeze Mode Buttons Operational chart
Procedure Main Picture Freeze Feature
Move Button PIP only
PIP MIN and PIP MAX Buttons
Remote Control Operation models PT-47WXC43 and PT-47WX33
Battery Installation
Use two AA batteries Precautions
Operating a DBS
Operating Components with Remote Control
Operating a VCR
Operating a DVD Operating a Cable BOX
Programming Without a Code
Programming The Remote
VCR Cable DVD DBS
Seconds
Codes For DBS
Component Codes
Aspect
BBE Menu
TV/VIDEO
Light
Operating a DVD
Operating a VCR Operating a DBS
Operating a PVR Personal Video Recorder
Operating a DTV Set Top Box
Operating a Cassette Deck
Operating a Receiver
Press and Power together, for at least 5 seconds
Default Modes for Remote Control
Programming the Remote Programming without a Code
Programming with a Code
DBX
Aiwa 223, 224 Denon 231 Fisher 203 Jensen 214
Basic Menu Navigation
Picture
Icon Menus Operation
Audio
Other ADJ
Input Label Chart
Timer
Audio
Channels
TV Programs
Lock
Press VOL u to select 12 Hours, 24 Hours, 48 Hours or
Press To return to Main Menu, then press CH p To exit
Lock
Movies
Canadian English
Canadian French
Canadian English Procedure
Canadian English Rating Description
Canadian French Rating Description
Converge Procedure
SET UP
Main and Split Blocking Message
PIP Blocking Message
Converge
SET UP
Convergence ADJ
Nine Point Convergence Correction
Intermittent Remote Control Operation
Troubleshooting Chart
Noisy Audio No Audio Normal Audio Wrong Audio
Hours of viewing No Color Normal Video Black Box on Screen
Numerics
Index
English
English
Otros componentes que contienen plomo. El desecho de estos
Materiales puede estar regulado en su comunidad debido a
Consideraciones ambientales. Para información de desecho o
Información sobre la Convergencia
Información Importante
Información de la FCC
Imágen con mala convergencia Imágen correctamente ajustada
Tabla de Contenido
Tabla de Características
Felicidades
Registro del Usuario
Cuidado y Limpieza
Menú de Auto Programación
Instalación
Conexión de la Videocasetera
Conexiones de Equipo Opcional
Conexión del Decodificador de Cable
Conexiones del Decodificador de Cable y Videocasetera
Panel de Control Frontal
Conexión del Amplificador de Sonido
Grabando un canal de cable premium codificado Procedimiento
Ajustes de Sonido Audio
Botones especiales del control remoto
Conexión de entrada Interface Visual Digital
Botón Aspect
Botón BBE
Operación de IDI
Operación de IDI y Pantalla de Split
Operación de Split
Operación de IDI y Split con un Decodificador de Cable
Botóes PIP MIN y PIP MAX
Botón Move sólo IDI
Función de congelamiento de imagen principal
Tabla operacional de los botones en modo IDI ó Split
Instalación de Pilas en el Control Remoto
Operación del Control Remoto modelos PT-47WXC43 y PT-47WX33
Use dos pilas AA
Precauciones
Operación de DBS
Operación de Componentes con el control remoto
Operación de una Videocasetera
Operación de DVD Operación de decodificador de Cable
Programación del Control Remoto
Programación Sin Código
Códigos de Componentes
Códigos para DBS
Códigos para Componentes
No intente cargar, hacer cortocircuito, desarmar
Use dos pilas AA Precauciones
Operación de DVD
Operación de una Videocasetera Operación de DBS
Operación de PVR
Operación de DTV
Operación de reproductor de casetes
Operación de receptor de audio
Modos De Default Para El Control Remoto
Programando El Control Remoto
DVD DVD CD AUX VCR2 AUX Tape Receptor Cable DBS
Código
Marca Código
Navegación básica del menu
Nota Para salir de menu
Nota Para Sub-menu con Otros AJ
Operación del Menu de Iconos
Imagen
Otros AJ
Cronómetro
Canales
Tabla de etiquetas de entrada
Seleccionar el canal deseado hacer referencia a
Cronómetro
Bloqueo
Programas de Eeuu
Tabla De Programas De Eeuu
Bloqueo
Peliculas de Eeuu
Principal, despues presione CH p para salir
Francés de Canada
Inglés de Canada
Tabla De Ingles De Canada
Al Menu Principal, despues presione CH p para salir
Ajuste
Mensaje de Bloqueo de Imagen Principal y Split
Mensaje de Bloqueo IDI
CONVERGE.cont
Ajuste
Fije Convergencia
Corrección de convergencia en nueve puntos
Sonido Ruidoso Sin Sonido Normal Audio Sonido Erróneo
Cuadro de Localización de Fallas
Sin Color Imagen Normal Caja Negra en Pantalla
Operación Intermitente del Control Remoto
Numerales
Indice
Notas
Español
Français
Information importante
Propos de la convergence
Mauvais alignement de l’image Alignement correct de l’image
Table des matières
Table des caractéristiques
Félicitations
Dossier du client
Entretien et nettoyage
Branchement de sources auxiliaires
Emplacement du téléprojecteur
Cordon d’alimentation
Câble / antenne
Branchement à un magnétoscope
Branchement d’appareils auxiliaires
Branchement à un câblosélecteur
Branchement à un magnétoscope et un câblosélecteur
Branchement à un magnétoscope et un câblosélecteur suite
Panneau avant des commandes
Branchement à un amplificateur audio to
Audio AMP
Réglages disponibles selon le signal d’entrée composant
Touches spéciales de la télécommande
Touche de format de l’image Aspect
Touche de rendu sonore BBE
Fonctionnement de l’image sur image
Fonction image sur image et partage d’écran
Fonctionnement du partage d’écran
Sélecteur télé/vidéo TV/VIDEO
Touche de déplacement Move image sur image seulement
Arrêt sur image principale
Touches PIP MIN et PIP MAX
Mode image Médaillon
Installation des piles
Utiliser deux piles AA
Précautions à prendre
Utilisation d’un récepteur DBS
Utilisation par télécommande
Utilisation d’un magnétoscope
Utilisation d’un lecteur DVD
Codes des appareils
Programmation de la télécommande
Sans code
Pendant au moins 5secondes
Codes pour lecteurs DVD Marque
Codes des appareils suite
Remplacer les 2 piles à la fois
Retirer le couvercle du logement des piles en appuyant près
Ne pas recharger
Démonter
Utilisation d’un magnétoscope Utilisation d’un récepteur DBS
Utilisation d’un récepteur
Utilisation d’un décodeur de télévision numérique
AUX
Avec code
Dimensia Emerson Fisher Funai Goldstar
Admiral 120 Aiwa 125 Denon 134, 135 Fisher 104 Garrard 113
Navigation au menu de base
Nota Pour un sous-menu avec Autres RÉG
Nota Pour quitter les menus
Fonctionnement avec menus à icônes
Image
Autres Réglages
Canaux
Audio suite
Minuterie
Autres Réglages suite
Blocage
Minuterie suite
Émissions Télé USA
VOL u
Émissions Télé USA suite
Blocage suite
Tableau des cotes Émissions Télé USA
Films USA
Canada Anglais
Films USA suite
Canada-Québec
Appuyer sur la touche Pour retourner au menu
Canada-Québec suite Marche à suivre
Réglage
Message de verrouillage de l’image sur image PIP
Aux enfants de moins de
Réglage suite
Convergence
Réglage Convergence
Réglage de la convergence sur neuf points
Guide de dépannage
Fonctionnement intermittent de la télécommande
Présence de bruit Absence de son Son normal Son erroné
Absence de couleur Image normale Boîte noire à l’écran
Search
ALL Projection TV
Limited Warranty on next
Limited Warranty Limits And Exclusions
Limited Warranty from previous
Accessory Purchases
If YOU Ship the Product to a Servicentre
Warranty Service
Television
Limitations and Exclusions
Téléviseurs
Expédition de lappareil à un centre de service
Limitations ET Exclusions
Réparation Sous Garantie
Page
Panasonic Canada Inc