Sony Corporation
HDR-CX300/CX350/CX350V CX370/XR350/XR350V
Operating Guide Guía de operaciones
171-504-121
Owner’s Record
Important Safety Instructions
Countries/regions Voltage Frequency Hz
Countries/regions Voltage
Countries/regions
Central America
Read this first
Battery pack
For the customers in the U.S.A
Menu items, LCD panel, and lens
Using the camcorder
Shoe cover LCD Screen Battery pack
Supplied items
Save all your recorded image data
About language setting
On recording
Discs recorded with HD image quality high definition
Confirm the model name of your camcorder
When the camcoder is connected to a computer or accessories
If you cannot record/play back images, perform Media Format
About this manual, illustrations and on-screen displays
On the drop sensor HDR-XR350 XR350V
Shooting photos p
Prepare the power source and memory card
Operation flow
Recording movies p
Table of contents
Saving images with an external device
CHG flash/charge lamp
Charging the battery pack
Lamp
Getting started
To remove the battery pack
Push battery release button
Turn off your camcorder by closing the LCD screen
To use a wall outlet wall socket as a power source
Charging the battery pack abroad
Your camcorder is turned on and the lens cover is opened
Turning the power on, and setting the date and time
Open the LCD screen of your camcorder
Set DST SET or SUMMERTIME, date and time, then touch
To turn off the power
Changing the language setting
Touch the desired recording media Touch YES
Preparing the recording media
Selecting the recording media for movies
Selecting the recording media for photos
Recording media icon
To check the recording media settings
Inserting a memory card
Types of memory card you can use with your camcorder
Touch Menu Show others
Access lamp
To eject the memory card
Open the cover and lightly push the memory card in once
Recording/Playback
Fasten the grip belt Open the LCD screen of your camcorder
Rec & zoom buttons on LCD About 3sec After
Recording movies
Press START/STOP to start recording
To stop recording, press START/STOP again
Degrees max Degrees to Camcorder
Data code during recording
Press Mode to turn on the Photo lamp
Flashes Lights up When disappears, the photo is recorded
Shooting photos
Subject Particles dust, pollen, etc. in the air
If white circular spots appear on photos
Visual Index screen appears after some seconds
Press View Images
To fast-forward To pause/play
Volume adjustment Previous To stop To fast-reverse Next
Playing movies
Your camcorder starts playing the selected movie
Your camcorder displays the selected photo
To adjust the sound volume of movies
While playing back movies, touch Adjust with
Viewing photos
Hdmi OUT jack
Connecting a TV using TV Connect Guide
Playing images on a TV
Connect your camcorder to
Play back movies and photos on your camcorder p
When connecting to your TV via a VCR
When you connect with component A/V cable
When you connect with Hdmi cable
On Photo TV HD
When you connect with A/V connecting cable with S Video
Others Delete under Edit category
Deleting movies and photos
Touch Menu Show
To delete movies, touch
Touch YES
, touch
Delete by date
By date
Checking the computer System
Preparing a computer
Installing the supplied Software PMB
When using a Macintosh
Click Continue on the computer screen
Follow the on-screen instructions to install the software
Double-click the PMB short-cut icon on the computer screen
Starting PMB Picture
Reading PMB Help
To disconnect your camcorder from the computer
Characteristics of each type of disc
Selecting the method for creating a disc computer
Player
Rewritable
Disc type Features
Discs you can use with PMB
Unrewritable
One Touch Disc Burn
Creating a disc with one touch
Movies and photos with a computer
Click Import
USB Select screen appears on the camcorder screen
Window for import appears on the computer screen
Window used to select movies appears
Creating an Avchd disc
Playing an Avchd disc on a computer
Follow the instructions on the screen to create a disc
Creating a Blu-ray disc
Editing movies
Copying a disc
Capturing photos from a movie
Saving images with an external device
Saving images in external media
Remaining external media capacity
When connecting an external media
To save desired movies and photos
Camcorder screen
Selecting the method for creating Disc
To play back images in the external media on the camcorder
To finish the external media connection
Ordinary DVD device Player
Press Disc Burn on the DVD writer
Touch , then disconnect the USB cable
To customize a disc with Disc Burn Option
Touch YES on the camcorder Screen
To play back a disc on the DVD writer
Device
Contains the images on
Touch the recording media that
Camcorder screen
Signal flow
Connecting cable supplied
Connecting cable with S Video sold separately
Remote Connector Input
Output V-OUT/PANEL
Using menus
Setting menus
Touch Menu Touch Show others on the MY Menu screen
Using MY Menu
Example deleting Spot MTR/FCS and registering
Customizing your camcorder
Menu item
Using the Option Menu
Manual Settings category
Menu lists
Shooting SET category
Photo Settings category
Playback category
Edit category
Manage Media category
Others category
SOUND/DISP SET
General SET category
Click Exit Exit, then remove the CD-ROM from your computer
Getting detailed information from the Handycam Handbook
Troubleshooting
Self-diagnosis display/Warning Indicators
On use and care
Precautions
LCD screen
When not using your camcorder for a long time
To clean the LCD screen
On charging the pre-installed rechargeable battery
Tab
Specifications
To change the battery of the Wireless Remote Commander
System
Input/Output connectors
General
AC Adaptor AC-L200C/AC-L200D
Image quality
Rechargeable battery pack NP-FV50
Recording mode Recording time
High definition image quality HD in h hour and m minute
Mode
For 4 GB capacity
On trademarks
Upper right
Screen indicators
Upper left
Center
Lens G lens Flash
IndicatorMeaning
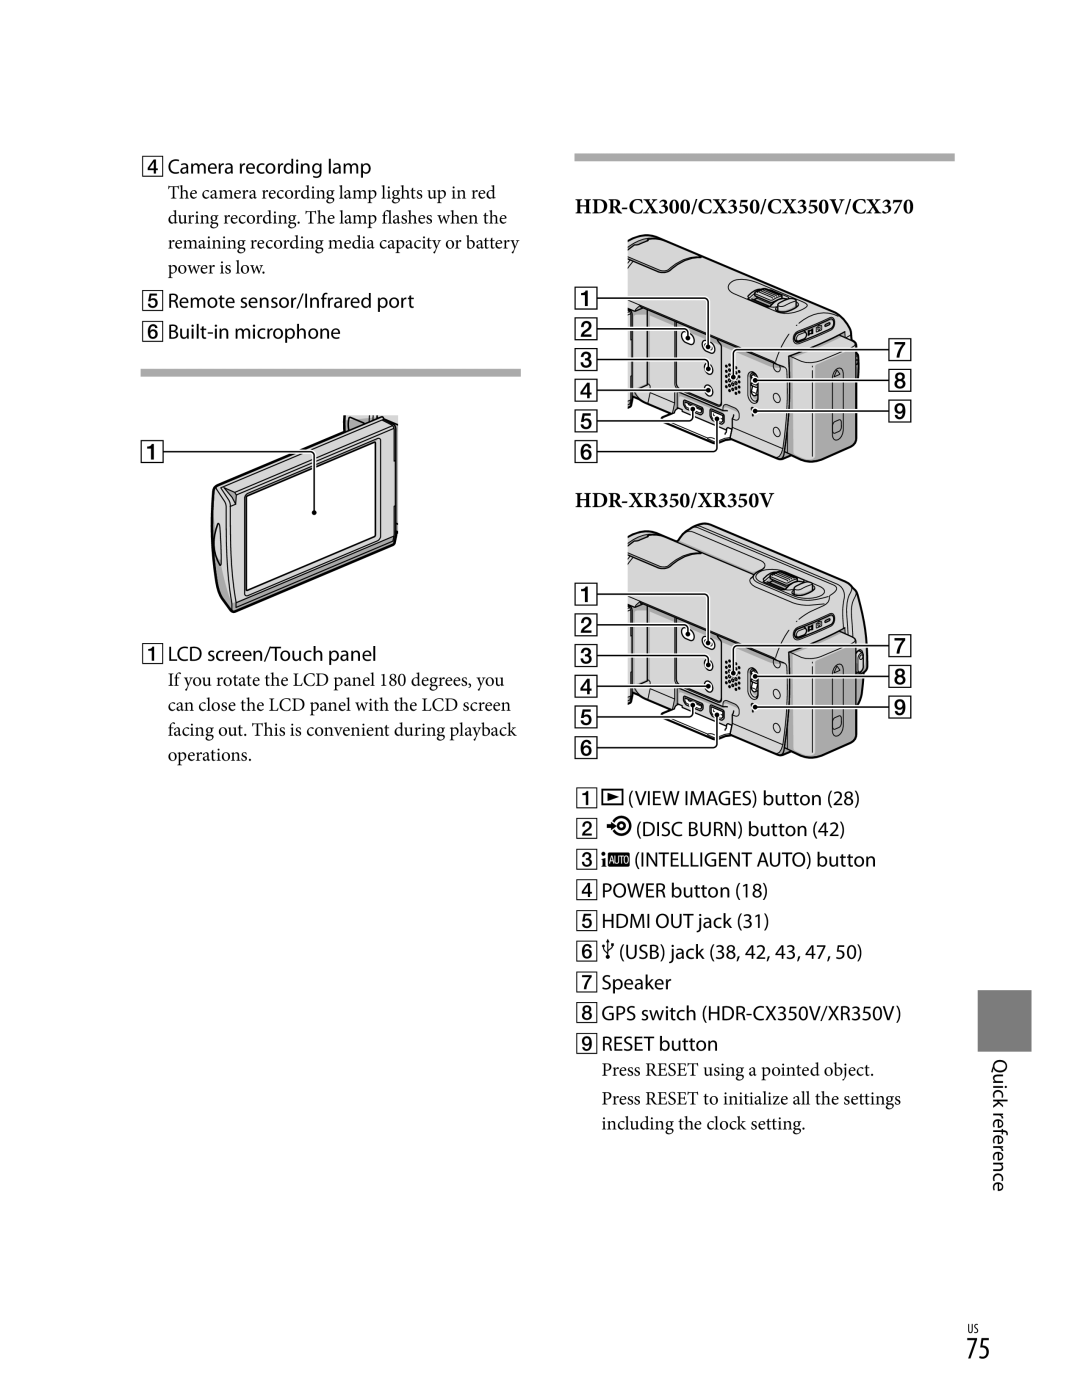
Parts and controls
Active Interface Shoe
Quick reference
Camera recording lamp
Push battery release button
Power zoom lever Photo button 26 Mode button
Memory card slot 22 Memory card Access lamp
Capturing photos from
Index
Page
171-501-111
Table of contents Getting started
Recording/Playback
112
Read this first
About language setting
Show others
On the drop sensor HDR-XR350E XR350VE
Recording movies
Shooting photos
Playback on the camcorder Playing images on a TV
To get good results in recording
Advice for successful recording
Useful recording techniques
Dual Rec27 Smile Shutter
Prioritizing the subject26
Selecting high definition image quality HD
With a recorder, etc
Creating a standard definition image quality STD disc
Additional information
HDR-CX300E/CX305E/CX350E/CX350VE/CX370E
DC in jack Battery pack
Charging time
Charging the battery pack abroad
Set SUMMERTIME, date and time, then touch
Category Language SET a desired language
Changing the language setting
HDR-XR350E/XR350VE
Types of Memory Stick media you can use with your camcorder
To eject the memory card
Recording
To stop recording, press START/STOP again
Show others Playback SET under Playback category
Desired setting
Lights up
Flashes
Wider range of view Close view Wide angle Telephoto
Useful functions for recording movies and photos
Zooming
Recording better images Automatically Intelligent Auto
Show Others SET under Shooting SET category
Selecting the recording mode
To cancel Intelligent Auto
Touch
Show
Media is changed depending on recording mode
Touch the face with the double-lined frame again to cancel
Prioritizing the subject
Capturing smiles automatically Smile Shutter
Recording in mirror mode
Photo
Desired photo to view a photo
Desired movie to playback a movie
Touch
Playing movies
To adjust the sound volume of movies
Press
Useful functions for playing movies and photos
Searching for desired images by Date Date Index
Searching for desired scene by Pinpoint Film Roll Index
Touch Face
Searching for desired scene by face Face Index
Playing back a digest of your Movies Highlight Playback
Press View Images
To play back a saved Highlight Playback scenario
To change the settings for Highlight Playback
To stop Highlight Playback
To save a scenario for Highlight Playback
Using PB zoom with photos
Adjust the magnification with W Wide angle/T Telephoto
To erase the saved Highlight Playback scenario
To restart the slide show
Playing back a series of photos Slide show
Touch on the photo playback screen
To stop the slide show
Under Others category on the LCD screen
Connect your camcorder to the TV
TV Connect Guide
When you connect with component
When you connect with A/V Connecting cable with S Video
Cable
Using Bravia Sync
If your TV/VCR has a 21-pin adaptor
TV/VCR
Others Delete under Edit category To delete movies, touch
Show
, touch Delete Delete by date/ Delete by date
Protect movies and photos to avoid deleting them by mistake
Edit category To protect movies, touch
Touch the movies and photos to be protected
Protect under
To undo the protection of movies and photos
Dividing a movie
Touch the movie to be captured
Touch at the point where you want to capture
Touch Menu Show Others
Under Edit category
Good
Dubbing movies
Show Others Movie DUB under Edit category
Movie DUB screen appears
Touch the type of copying
Copying photos
Touch the type of dubbing
Select the movie to be dubbed
Creating the Playlist
Using the Playlist of movies
To add all the movies recorded on the same day at one time
Playing the Playlist
Others Playlist under
Touch the movie you want to play back
To change the order within the Playlist
What is GPS?
GPS reception status
Setting the GPS function
To close the map screen
Acquiring the current location Information
Touch MAP
Touch Your Location on the recording screen
Data Code under
Displaying the coordinate Information Coordinates
Touch the desired movie or photo
Playback category
Auto Area ADJ
Under
Category
USB Adaptor Cable sold Separately
Touch Copy. on the camcorder screen
When connecting an external media
Avchd disc high definition image quality HD
Wall outlet wall socket
Power cord mains lead to
Connect the AC Adaptor
DC in jack of your camcorder
Touch the movie you want to burn on the disc Appears
Insert a created disc into the DVD Writer
After the operation is completed, touch
END on the camcorder
Screen Disconnect the USB cable from your camcorder
Displayed recording media differ depending on the model
External
Insert the recording media
Recording device
Recording device a disc recorder
Data Code
Operating menus
Using MY Menu
Tab
Menu lists
Your Location USB Connect Disc Burn
Beach
Scene Selection
Fader
Portrait Soft portrait
Out
White BAL. White balance
Exposure
Spot MTR/FCS Spot meter/ focus
Spot Meter Flexible spot meter
Spot Focus
Divides 2 seconds of fast movement into
Focus
Tele Macro
Golf Shot
Smth SLW REC Smooth slow rec
To change the setting
Touch OPTION, then select the setting you want to change
Point when START/STOP is pressed
Steadyshot
REC Mode Recording mode
SET
Guideframe
Smile Detection
Priority Setting
LOW LUX
Face Detection
BLT-IN Zoom MIC Built-in zoom microphone
Smile Sensitivity
Audio REC SET
Other REC SET
You can select a photo size to be shot
SELF-TIMER
Image Size
Wide
High
Flash Mode
Flash Level
Redeye Reduc Redeye reduction
Highlight
Visual Index
View Images
Playlist
Movie Photo
Camera Data
Protect
Battery Info
Delete
Scenario Erase
To turn off the display
Media Settings
Media Info
Media Format
Repair IMG.DB F
SOUND/DISP SET
LCD BL Level LCD backlight level
169
Output Settings
You can adjust the color of the LCD screen By touching
Recorded in 169 recorded in 43 mode Wide mode
Disp Output Display output
CLOCK/ Lang
You can select the language to be used on the LCD screen
Power Settings
Other Settings
Shut OFF Auto shut off
Remote Ctrl Remote control
Ctrl for Hdmi Control for Hdmi
REC Lamp Recording lamp
Overall operations/Wireless Remote Commander
Using a pointed object. If you press
Extremely high. Turn off your camcorder
+/- marks p
Batteries/power sources
Menu settings have changed automatically
Supplied Wireless Remote Commander does not function
LCD screen
Memory card
Recording
Camcorder stops operating
Photos cannot be recorded
Imaging field looks different
Flash does not work
Playback
Playing back images stored on Memory card on other devices
Editing movies/photos on your Camcorder
Playback on the TV
Examples of functions that cannot Be used simultaneously
Dubbing/Connecting to other Devices
Connecting to a Computer
GPS HDR-CX350VE/XR350VE
Cor E
Battery level warning
High temperature warning
Low temperature warning
IMG.DB F. under Manage Media
Show others Repair
Recording media
Description of warning messages
Other
Playing time
Expected time of recording Playback with each battery pack
Expected recording time of movies
Recording time
Internal hard disk
Recording mode
High definition image quality HD
Expected number of recordable Photos
Memory card
Internal recording media
Additional information
100
Using your camcorder abroad
World time difference
Setting to the local time
Time-zone Area setting Differences
101
About GPS HDR-CX350VE XR350VE
Maintenance and precautions
102
About the Avchd format
103
About the Memory Stick media
104
About the InfoLITHIUM battery
105
Pack
106
Moisture condensation
107
About x.v.Color
About handling of your camcorder
108
On adjustment of the touch panel
109
How to charge the pre-installed rechargeable battery
110
On GNU GPL/LGPL applied software
111
Color
112
Flash
LOW LUX Manual focus
113
Option button View Images button Slide show button
Location button Data file name Protected image Index button
Remote sensor/Infrared port
Speaker GPS switch HDR-CX350VE/XR350VE Reset button
114
Lens G lens Flash Camera recording lamp
Data Code button
Power zoom lever 24, 34 Photo button 23 Mode button
Memory card slot Memory card Access lamp
115
116
Enter buttons
Insulation sheet
117
Charging the battery pack
Self-diagnosis display/Warning
118
Page
SON~
Sony
Page
Page
Page
Method I Automatic USB Registration
Con ent
ActiFORCEN
Power
AdJus s Irom 24 7/81065 7/8
Tripods
Shooting Grip
Os 0 ,t
Kits
LS oupo 1 77
Cases
Sports Pack
Water Housing/Microphones
\\.~
Lenses
Filters
Lights
Cables/Media
DVDirect Recorders
DVDirecto·Recorders
I1111111111
557-156-13
Limited Warranty US Only