Manuals
/
Stovax
/
Household Appliance
/
Indoor Fireplace
Stovax
8455
manual
Installation Instructions, Replacing Parts, Mag Unit, Main Injector, Section
Models:
8455
1
23
26
26
Download
26 pages
56.52 Kb
19
20
21
22
23
24
25
26
Specifications
Install
Replacing Parts
Parts list
See “NO SPARK” chart
Cleaning The Fire
Safety Precautions
Service Records
With upgradeable control valve
Page 23
Image 23
Page 22
Page 24
Page 23
Image 23
Page 22
Page 24
Contents
VFC Radiant & Convector Fire Range
For use in GB, IE Great Britain and Eire
Instructions for Use Installation and Servicing
With upgradeable control valve
Servicing Instructions
CONTENTS
user instructions instaLlation Instructions
IMPORTaNT NOTICE
APPLIANCE COMMISSIONING CHECKLIST
DEALER AND INSTALLER INFORMATION
3.TURNING THE FIRE OFF
USER INSTRUCTIONS
1.general
2.LIGHTING THE FIRE
7.ARRANGEMENT OF FUEL BED COMPONENTS
6.CLEANING THE FIRE
USER INSTRUCTIONS
5.UPGRADING YOUR FIRE
18” COAL LAYOUT
USER INSTRUCTIONS
16” AND REDUCED DRAUGHT COAL LAYOUT
AR1122
USER INSTRUCTIONS
22” COAL LAYOUT
AR1121
9. THE FLAME FAILURE DEVICE
13. INSTALLATION DETAILS
USER INSTRUCTIONS
8. OXYGEN DEPLETION SENSOR
VFC CONVECTOR
TECHNICAL SPECIFICATION
tHESE INSTRUCTIONS COVER THE FOLLOWING MODELS
VFC RADIANT
SITE REQUIREMENTS
INSTALLATION INSTRUCTIONS
1A VFC Radiant 1B VFC Convector
INSTALLATION INSTRUCTIONS
SITE REQUIREMENTS
2.SAFETY PRECAUTIONS
INSTALLATION
INSTALLATION INSTRUCTIONS
1.CONTROL UPGRADE
5.INSTALLATION - CONVECTOR FIRES
INSTALLATION INSTRUCTIONS
INSTALLATION
6.ARRANGEMENT OF FUELBED COMPONENTS
INSTALLATION INSTRUCTIONS
INSTALLATION
ADVICE ON HANDLING AND DISPOSAL OF FIRE CERAMICS
NOTE CERAMIC PARTS ARE FRAGILE
INSTALLATION INSTRUCTIONS
INSTALLATION
16” AND REDUCED DRAUGHT COAL LAYOUT
18” COAL LAYOUT
INSTALLATION INSTRUCTIONS
INSTALLATION
6.9Curved fronts Holyrood- Place 6 large coals onto the front coal moulding ensuring that they rest against the front. Place 2 small coals onto the front coal, 1 at each end. See Diagram
7.LIGHTING
INSTALLATION INSTRUCTIONS
INSTALLATION
1.COMMISSIONING
COMMISSIONING
INSTALLATION INSTRUCTIONS
SERVICING REQUIREMENTS
SERVICING INSTRUCTIONS
IGNITION FUNCTIONAL CHECK NO SPARK
FAULT FINDING
See “NO SPARK” chart
IGNITION FUNCTIONAL CHECK PILOT WILL NOT LIGHT
3.PIEZO
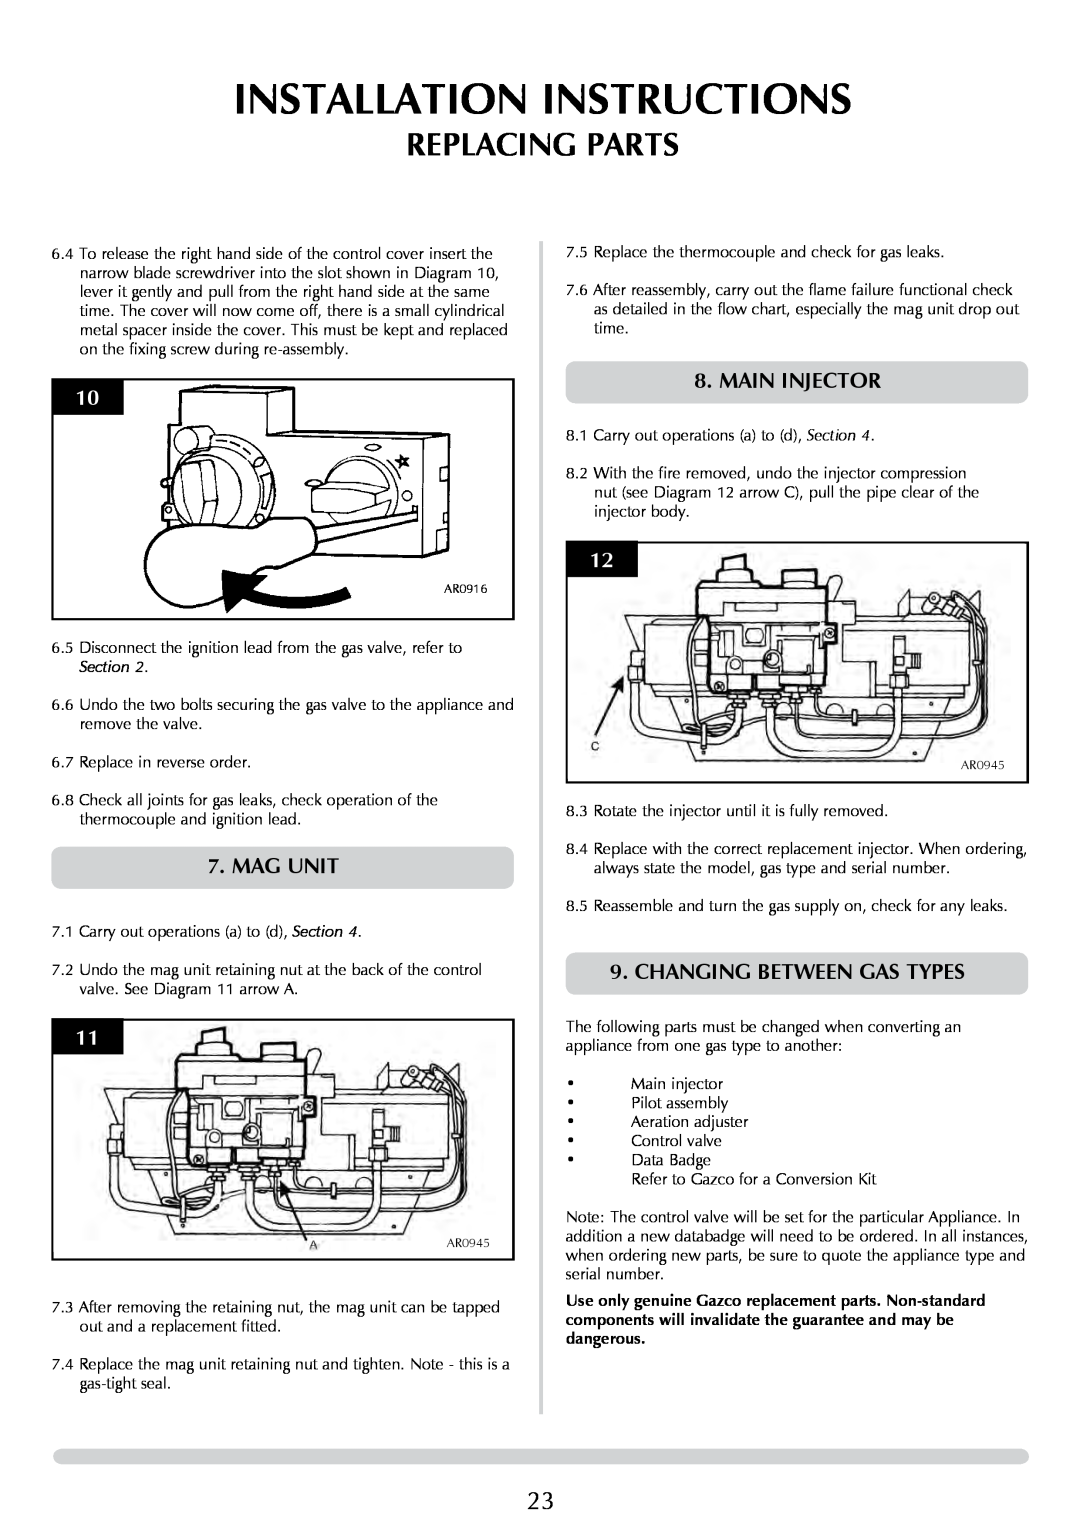
REPLACING PARTS
SERVICING INSTRUCTIONS
2.IGNITION LEAD
6.GAS VALVE
REPLACING PARTS
SERVICING INSTRUCTIONS
5. ODS PILOT UNIT
8.MAIN INJECTOR
INSTALLATION INSTRUCTIONS
REPLACING PARTS
7.MAG UNIT
Natural Gas Parts
SPARES PARTS LIST
MANUAL FIRES
SERVICE RECORDS
Top
Page
Image
Contents