CHARGING AND USING BATTERY PACK

WARNING!

Charge only MILWAUKEE 12, 14.4 and 18 Volt Power Plus battery packs in Power Plus chargers. Other types of batteries may ex- plode causing personal injury and damage.

Charge your battery pack before using your tool for the first time and when your tool no longer performs with the power and torque needed for the job. Full loading capacity of battery pack is only reached after 4 - 5 chargings. Never completely discharge the battery pack. Standard charging time will vary according to the type of charger you use. The charging time will also vary depending on the supply voltage and charge needed. For example, if your battery pack does not require a full charge, charging time will be less.

FOR SPECIFIC CHARGING INSTRUCTIONS, PLEASE READ THE CHARGER INSTRUCTION SHEET SUPPLIED WITH YOUR CHARGER.

Battery packs are affected by temperature. Your battery pack will perform best and have longest life if it is charged when the temperature is between 60°-80°F (15°-27°C). Do not charge in temperatures below 40°F (5°C) or above 105°F (40°C). Under these conditions, capacity will be reduced. See “Maintenance”.

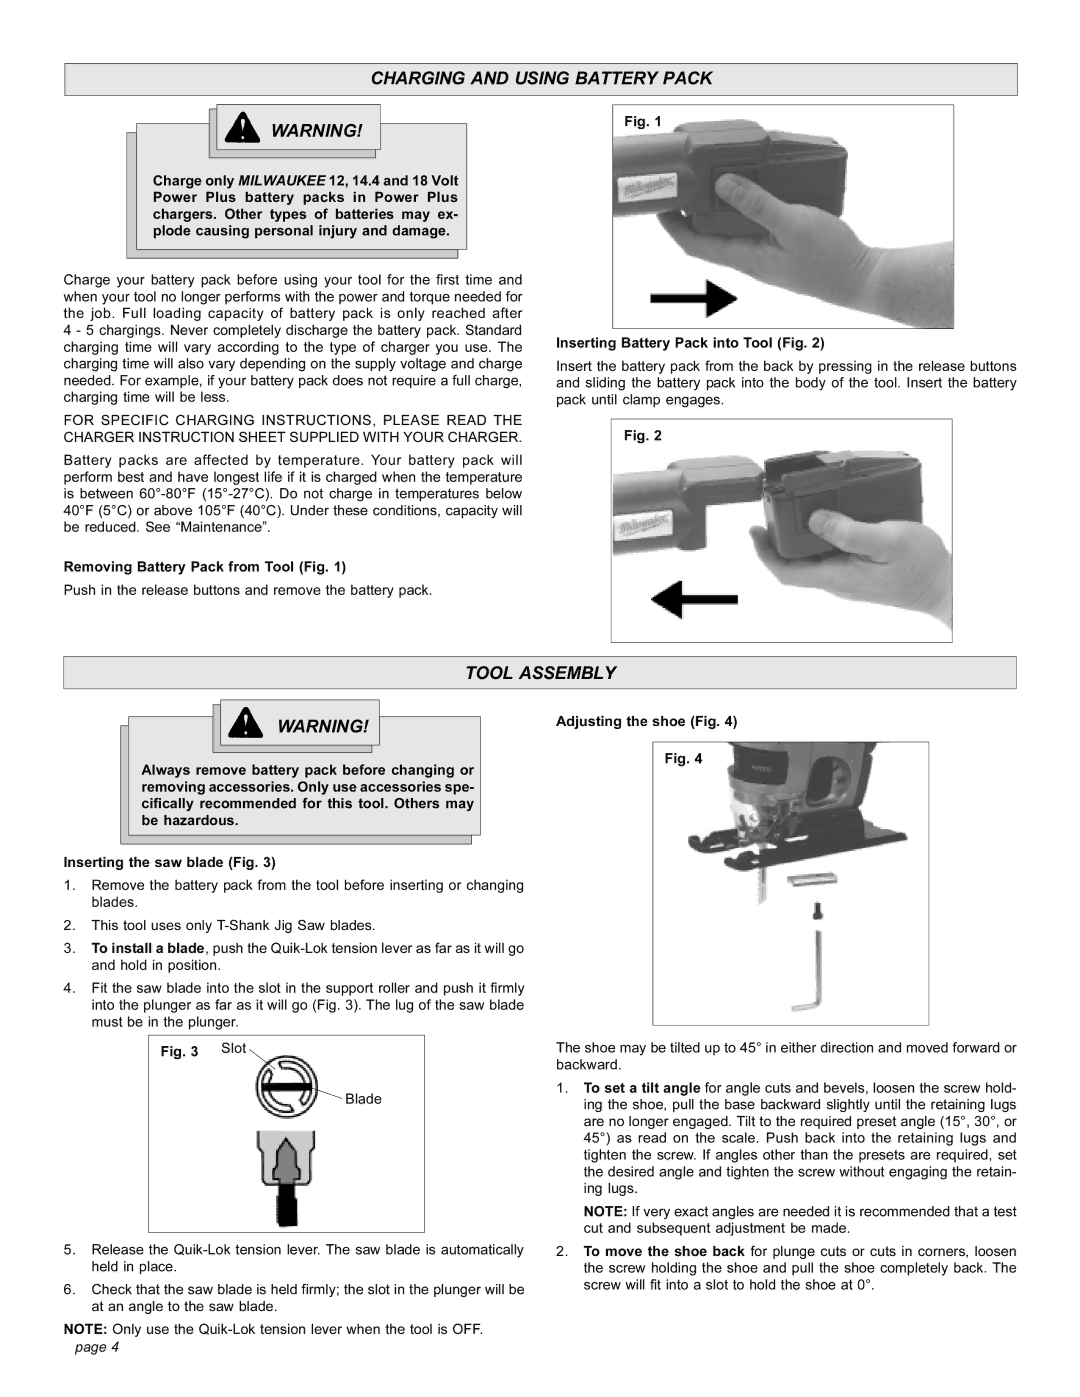
Removing Battery Pack from Tool (Fig. 1)

Push in the release buttons and remove the battery pack.

Fig. 1

Inserting Battery Pack into Tool (Fig. 2)

Insert the battery pack from the back by pressing in the release buttons and sliding the battery pack into the body of the tool. Insert the battery pack until clamp engages.

Fig. 2

TOOL ASSEMBLY

WARNING!

Always remove battery pack before changing or removing accessories. Only use accessories spe- cifically recommended for this tool. Others may be hazardous.

Inserting the saw blade (Fig. 3)

1.Remove the battery pack from the tool before inserting or changing blades.

2.This tool uses only T-Shank Jig Saw blades.

3.To install a blade, push the Quik-Lok tension lever as far as it will go and hold in position.

4.Fit the saw blade into the slot in the support roller and push it firmly into the plunger as far as it will go (Fig. 3). The lug of the saw blade must be in the plunger.

Adjusting the shoe (Fig. 4)

Fig. 4

Fig. 3 Slot

Blade

5.Release the Quik-Lok tension lever. The saw blade is automatically held in place.

6.Check that the saw blade is held firmly; the slot in the plunger will be at an angle to the saw blade.

NOTE: Only use the Quik-Lok tension lever when the tool is OFF. page 4

The shoe may be tilted up to 45° in either direction and moved forward or backward.

1.To set a tilt angle for angle cuts and bevels, loosen the screw hold- ing the shoe, pull the base backward slightly until the retaining lugs are no longer engaged. Tilt to the required preset angle (15°, 30°, or 45°) as read on the scale. Push back into the retaining lugs and tighten the screw. If angles other than the presets are required, set the desired angle and tighten the screw without engaging the retain- ing lugs.

NOTE: If very exact angles are needed it is recommended that a test cut and subsequent adjustment be made.

2.To move the shoe back for plunge cuts or cuts in corners, loosen the screw holding the shoe and pull the shoe completely back. The screw will fit into a slot to hold the shoe at 0°.

Page 4
Image 4
StreamLight 6267-20 manual Charging and Using Battery Pack, Tool Assembly

6267-20 specifications

The StreamLight 6267-20 is a robust and versatile tactical flashlight designed primarily for law enforcement, military personnel, and outdoor enthusiasts. With its combination of advanced technology, practical features, and durable construction, it stands out as a reliable tool for any situation where high-performance illumination is required.

One of the main features of the StreamLight 6267-20 is its impressive lumen output. With a maximum brightness of 800 lumens, this flashlight provides a powerful beam that can reach distances of up to 600 feet, making it ideal for long-range visibility in dark environments. The light also has multiple brightness settings, allowing users to adjust the output according to their specific needs. In addition to the high setting, it includes a medium and low setting, as well as a strobe function for signaling or disorienting potential threats.

The StreamLight 6267-20 utilizes C4 LED technology, known for its exceptional efficiency and longevity. This LED technology ensures that the flashlight operates for extended periods without sacrificing brightness. The lens is made from toughened glass, providing excellent protection against impacts and scratches while ensuring a clear and focused beam.

Durability is one of the defining characteristics of the StreamLight 6267-20. Constructed from high-quality aluminum with an anodized finish, this flashlight is both lightweight and sturdy. It is designed to withstand harsh conditions, featuring an IPX4 rating for water resistance and a drop-resistant design that can endure falls from significant heights.

The user-friendly design of the StreamLight 6267-20 is another highlight. It features a tactical tail switch that allows for quick and easy operation, even in stressful situations. The flashlight can be easily activated with one hand, facilitating seamless transitions between different lighting modes.

Additionally, the StreamLight 6267-20 is equipped with a rechargeable battery, eliminating the need for frequent battery replacements and ensuring that users are always prepared. The included charging cradle offers a convenient solution for maintaining battery life.

In conclusion, the StreamLight 6267-20 is an outstanding flashlight that excels in performance, durability, and versatility. Its powerful illumination, sturdy construction, and user-friendly features make it an excellent choice for professionals and outdoor enthusiasts alike, ensuring reliability in moments that count.