4.Insert the Filter Holder into the machine by holding the handle to the far left and lifting up until it is seated in its groove. Then turn the handle to the right until it shifts into the LOCK position.

5.Place the lidded Glass Carafe under the Filter Holder.

6.Rotate the Control Knob to the BREW position. The Indicator Light will activate to indicate that the machine is on.

7.Once the coffee has finished brewing (3 – 5 minutes), turn the Control Knob to the “OFF” position, and unplug the power cord. NOTE: Steaming and noise are a normal part of the brewing process.

8.Pour each serving into a small cup and enjoy your Espresso!

NOTE: Please DO NOT remove Reservoir Cap or Filter Holder at any time while the appliance is under pressure or until the appliance has cooled down.

TO CLEAN: To clean Frothing Aid and release the pressure, hold a pitcher with a small amount of water under the Frothing Aid slowly turn the Control Knob to the STEAM position and release the steam. When the Frothing Aid stops releasing steam, turn the Control Knob to the “OFF” position and unplug the power cord.

how to make cappuccino

Ingredients and Measuring Guide


Fine Espresso


Milk (Skim or 2%

Serving Size

Ground Coffee

Water (Cold)

froths more easily)

1 cup

2 cup mark on Filter

2 oz.

4 oz.


2 cups

4 cup mark on Filter

Fill to top of Metal

8 oz.


band of Glass Carafe


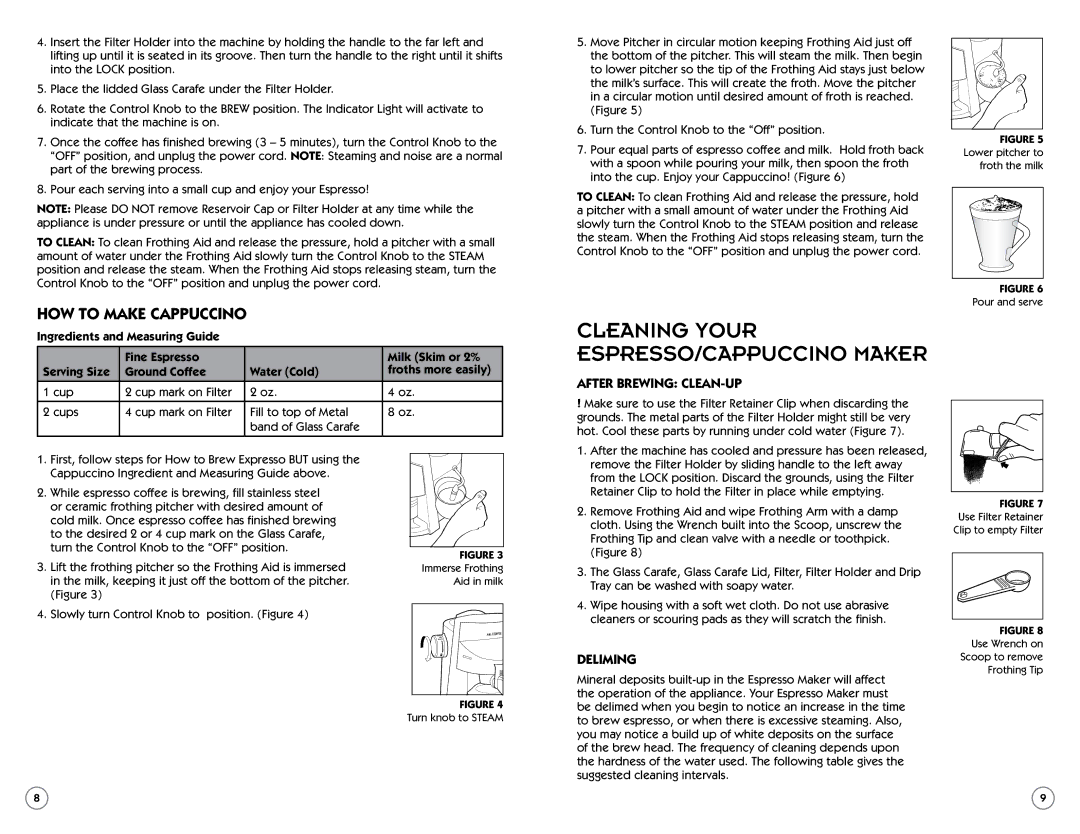
5.Move Pitcher in circular motion keeping Frothing Aid just off the bottom of the pitcher. This will steam the milk. Then begin to lower pitcher so the tip of the Frothing Aid stays just below the milk’s surface. This will create the froth. Move the pitcher in a circular motion until desired amount of froth is reached. (Figure 5)

6.Turn the Control Knob to the “Off” position.

7.Pour equal parts of espresso coffee and milk. Hold froth back with a spoon while pouring your milk, then spoon the froth into the cup. Enjoy your Cappuccino! (Figure 6)

TO CLEAN: To clean Frothing Aid and release the pressure, hold a pitcher with a small amount of water under the Frothing Aid slowly turn the Control Knob to the STEAM position and release the steam. When the Frothing Aid stops releasing steam, turn the Control Knob to the “OFF” position and unplug the power cord.

cleaning your espresso/cappuccino maker

after brewing: clean-up

!Make sure to use the Filter Retainer Clip when discarding the grounds. The metal parts of the Filter Holder might still be very hot. Cool these parts by running under cold water (Figure 7).

FIGURE 5 Lower pitcher to froth the milk

FIGURE 6 Pour and serve

1.First, follow steps for How to Brew Expresso BUT using the Cappuccino Ingredient and Measuring Guide above.

2.While espresso coffee is brewing, fill stainless steel or ceramic frothing pitcher with desired amount of cold milk. Once espresso coffee has finished brewing to the desired 2 or 4 cup mark on the Glass Carafe, turn the Control Knob to the “OFF” position.

3.Lift the frothing pitcher so the Frothing Aid is immersed in the milk, keeping it just off the bottom of the pitcher. (Figure 3)

4.Slowly turn Control Knob to position. (Figure 4)

FIGURE 3

Immerse Frothing Aid in milk

1.After the machine has cooled and pressure has been released, remove the Filter Holder by sliding handle to the left away from the LOCK position. Discard the grounds, using the Filter Retainer Clip to hold the Filter in place while emptying.

2.Remove Frothing Aid and wipe Frothing Arm with a damp cloth. Using the Wrench built into the Scoop, unscrew the Frothing Tip and clean valve with a needle or toothpick.

(Figure 8)

3.The Glass Carafe, Glass Carafe Lid, Filter, Filter Holder and Drip Tray can be washed with soapy water.

4.Wipe housing with a soft wet cloth. Do not use abrasive cleaners or scouring pads as they will scratch the finish.

deliming

FIGURE 7 Use Filter Retainer Clip to empty Filter

FIGURE 8 Use Wrench on Scoop to remove Frothing Tip

FIGURE 4

Turn knob to STEAM

Mineral deposits built-up in the Espresso Maker will affect the operation of the appliance. Your Espresso Maker must be delimed when you begin to notice an increase in the time to brew espresso, or when there is excessive steaming. Also, you may notice a build up of white deposits on the surface of the brew head. The frequency of cleaning depends upon the hardness of the water used. The following table gives the suggested cleaning intervals.

8

9

Page 5
Image 5
Sunbeam BVMC-ECM260 Cleaning your espresso/cappuccino maker, How to make cappuccino, After brewing clean-up, Deliming

BVMC-ECM260 specifications

The Sunbeam BVMC-ECM260 is a versatile and stylish coffee maker designed to cater to the needs of coffee enthusiasts who appreciate both functionality and aesthetics. This drip coffee maker stands out in the crowded market with its combination of excellent performance and appealing design, making it a great addition to any kitchen.

One of the standout features of the Sunbeam BVMC-ECM260 is its brew strength selector, which allows users to customize the intensity of their coffee according to personal preference. Whether you prefer a mild breakfast blend or a robust dark roast, this feature ensures that you can achieve the desired flavor profile with ease. It also boasts a 12-cup capacity, making it perfect for households with multiple coffee drinkers or for entertaining guests.

The Sunbeam BVMC-ECM260 incorporates advanced technologies to enhance the brewing process. Its even-flow showerhead technology ensures uniform saturation of coffee grounds, allowing for optimal extraction and a richer flavor. Additionally, the integrated water filtration system removes impurities from the water, resulting in fresher-tasting coffee with every brew.

Another noteworthy characteristic of this coffee maker is its user-friendly interface. The digital LCD display, complete with an easy-to-read clock and programmable timer, allows users to set their coffee brewing schedule in advance. This convenience means waking up to the aroma of freshly brewed coffee is just a button press away.

The design of the Sunbeam BVMC-ECM260 is equally impressive. With a sleek and modern look, this coffee maker features a stainless steel body that not only adds a touch of elegance but is also durable and easy to clean. The transparent water reservoir lets users easily monitor water levels, while the swing-out brew basket facilitates hassle-free filling and cleaning.

In addition to these features, the Sunbeam BVMC-ECM260 comes with an automatic shut-off function for peace of mind, ensuring that the machine powers down after a designated period of inactivity. It also includes a dual side water window for easy viewing, helping users fill the machine without any spillovers.

In summary, the Sunbeam BVMC-ECM260 coffee maker offers a blend of advanced brewing technologies, user-friendly features, and an attractive design, making it a superb choice for coffee aficionados looking to elevate their morning routine. Whether brewing for one or serving a crowd, this coffee maker delivers flavorful results every time.