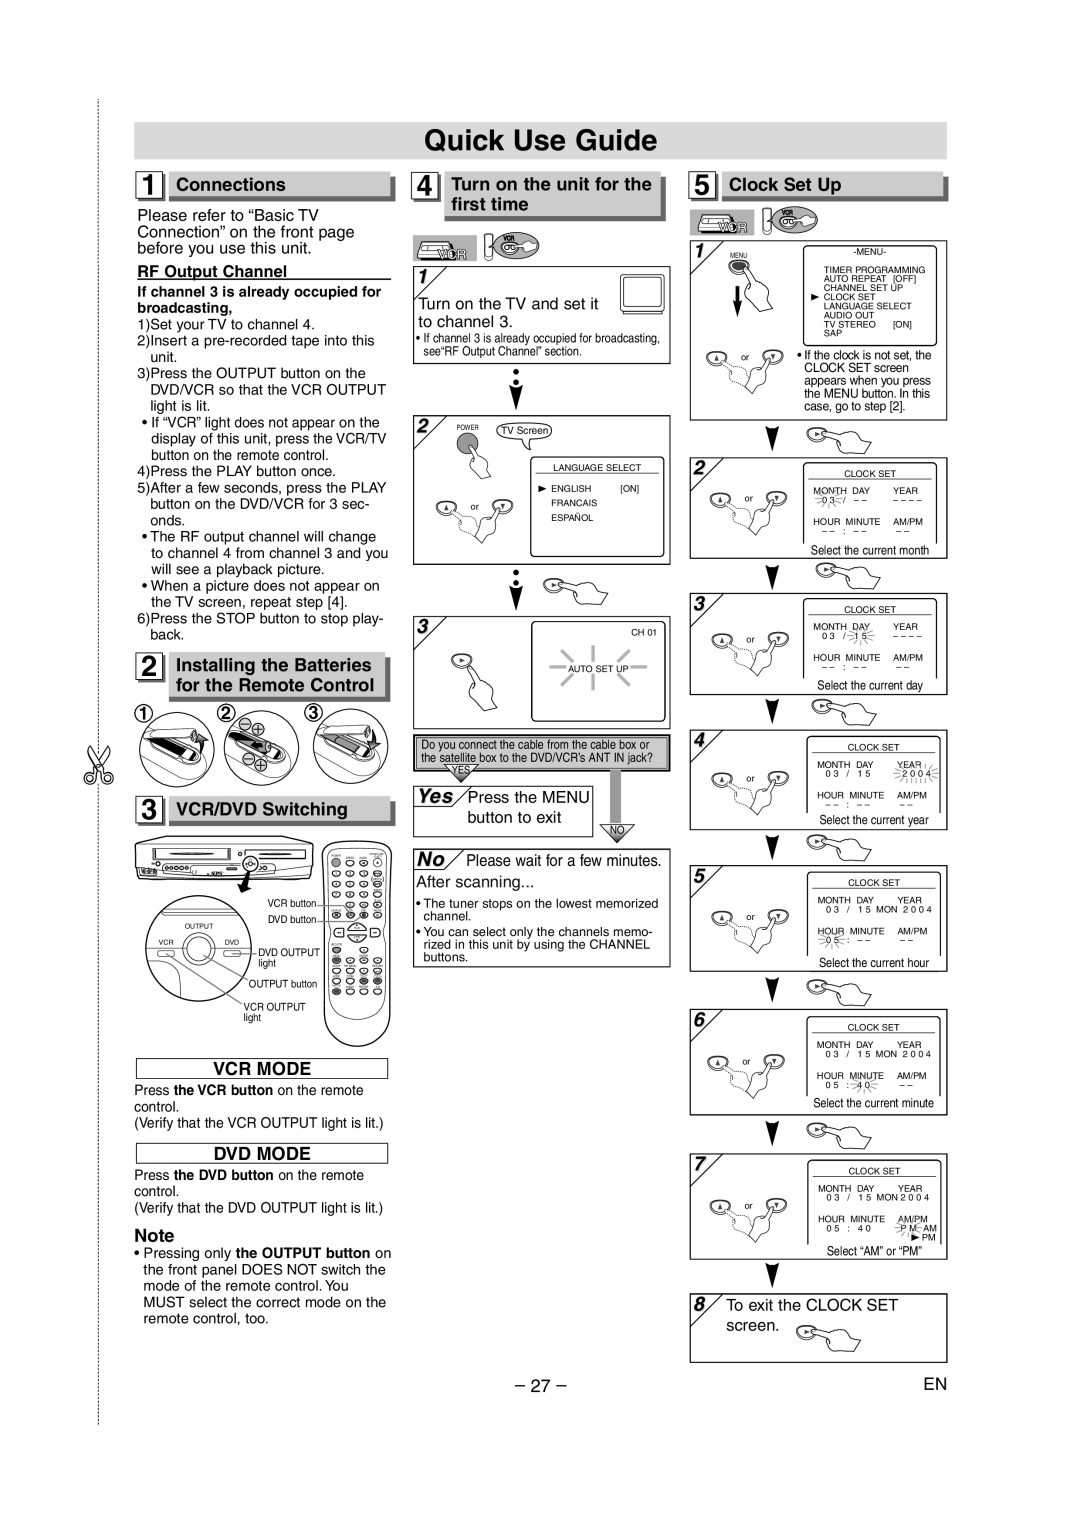
1 Connections

Please refer to “Basic TV Connection” on the front page before you use this unit.

RF Output Channel

If channel 3 is already occupied for broadcasting,

1)Set your TV to channel 4.

2)Insert a pre-recorded tape into this unit.

3)Press the OUTPUT button on the DVD/VCR so that the VCR OUTPUT light is lit.

If “VCR” light does not appear on the display of this unit, press the VCR/TV button on the remote control.

4)Press the PLAY button once.

5)After a few seconds, press the PLAY button on the DVD/VCR for 3 sec- onds.

The RF output channel will change to channel 4 from channel 3 and you will see a playback picture.

When a picture does not appear on the TV screen, repeat step [4].

6)Press the STOP button to stop play- back.

2

Installing the Batteries


for the Remote Control

1

2

3

Quick Use Guide

4 Turn on the unit for the first time

VCR

VCR

1

Turn on the TV and set it to channel 3.

If channel 3 is already occupied for broadcasting, see“RF Output Channel” section.

2

POWER

TV Screen


LANGUAGE SELECT


B ENGLISH

[ON]


or

FRANCAIS


ESPAÑOL


3

CH 01


AUTO SET UP

5

Clock Set Up


VCR


VCR


1

MENU

-MENU-

TIMER PROGRAMMING

AUTO REPEAT [OFF]

CHANNEL SET UP

BCLOCK SET LANGUAGE SELECT AUDIO OUT


TV STEREO [ON]


SAP

or

• If the clock is not set, the


CLOCK SET screen


appears when you press


the MENU button. In this


case, go to step [2].

2


CLOCK SET

or

MONTH DAY

YEAR

0 3

/ – –

– – – –


HOUR MINUTE

AM/PM


– –

: – –

– –


Select the current month

3


CLOCK SET


MONTH DAY

YEAR

or

0 3

/ 1 5

– – – –


HOUR MINUTE

AM/PM


– –

: – –

– –


Select the current day

3

VCR/DVD Switching


POWER


OPEN/CLOSE


SPEED

AUDIO

/EJECT


1

2

3


SKIP/CH.


4

5

6


VCR/TV


VCR button

7

8

9


0

+10

SLOW


DISPLAY

VCR

DVD

PAUSE


DVD button


OUTPUT


PLAY


VCR

DVD


STOP


REC/OTR


DVD OUTPUT

MENU


ENTER


light

SETUP

TOP MENU


RETURN


MODE

ZOOM

SEARCH

CLEAR/


OUTPUT button

T-SET

ANGLE

REPEAT

A-B


SUBTITLE


VCR OUTPUT light

VCR MODE

Press the VCR button on the remote control.

(Verify that the VCR OUTPUT light is lit.)

DVD MODE

Press the DVD button on the remote control.

(Verify that the DVD OUTPUT light is lit.)

Note

Pressing only the OUTPUT button on the front panel DOES NOT switch the mode of the remote control. You MUST select the correct mode on the remote control, too.

Do you connect the cable from the cable box or the satellite box to the DVD/VCR’s ANT IN jack?

YES

Yes Press the MENU button to exit

NO

No Please wait for a few minutes.

After scanning...

The tuner stops on the lowest memorized channel.

You can select only the channels memo- rized in this unit by using the CHANNEL buttons.

4


CLOCK SET


MONTH DAY

YEAR

or

0 3

/ 1 5

2 0 0 4


HOUR MINUTE

AM/PM


– –

: – –

– –


Select the current year

5

CLOCK SET

MONTH DAY

YEAR

0 3

/ 1 5 MON 2 0 0 4

or


HOUR MINUTE

AM/PM

0 5

: – –

– –

Select the current hour

6

CLOCK SET

MONTH DAY

YEAR

0 3

/ 1 5 MON 2 0 0 4

or


HOUR MINUTE

AM/PM

0 5

: 4 0

– –

Select the current minute

7

CLOCK SET

MONTH DAY

YEAR

0 3

/ 1 5 MON 2 0 0 4

or


HOUR MINUTE

AM/PM

0 5

: 4 0

P M AM


B PM

Select “AM” or “PM”

8To exit the CLOCK SET screen.

– 27 –

EN

Page 27
Image 27
Sylvania CDVC90DP Quick Use Guide, Connections, Installing the Batteries, For the Remote Control, VCR/DVD Switching

CDVC90DP specifications

The Sylvania CDVC90DP is a versatile and compact device that combines the best features of a versatile CD player and a digital media player, making it an essential addition to any music lover's collection. Designed with both functionality and style in mind, it caters to a wide range of audio formats and playback options.

One of the standout features of the Sylvania CDVC90DP is its ability to play standard CDs as well as CD-R and CD-RW formats, allowing users to enjoy their favorite music with flexibility. In addition to traditional CD playback, it supports MP3 files, providing a broader range of audio options. Users can easily create custom playlists on their MP3 CDs, maximizing their listening experience.

The device is equipped with a built-in FM radio tuner, enhancing its functionality as an all-in-one audio solution. This feature allows users to tune into their favorite radio stations and enjoy live broadcasts. The built-in speakers are designed to deliver high-quality sound, making it perfect for personal use or small gatherings.

Portability is another major highlight of the Sylvania CDVC90DP. It features a lightweight design and comes with a handy carrying handle, making it easy to take along on trips or outdoor events. Additionally, it can be powered by both AC adapter or batteries, providing flexibility for use anywhere, whether at home, in the office, or on the go.

The user-friendly interface includes easy-to-use controls for effortless navigation. The intuitive button layout allows users to quickly switch between modes, adjust the volume, and select tracks. The LCD display offers clear visibility of the current track, radio station, and other essential information during playback.

For those who prefer a more private listening experience, the Sylvania CDVC90DP features a headphone jack, allowing users to connect their headphones and enjoy music without disturbing others. This makes it suitable for both personal listening and group activities.

In summary, the Sylvania CDVC90DP is an impressive multimedia player that combines the classic appeal of CD and radio playback with modern MP3 capabilities. Its portability, versatility, and user-friendly features make it a fantastic choice for music enthusiasts seeking an all-in-one audio solution. Ideal for home use as well as travel, it is designed to enrich the listening experience with style and convenience.