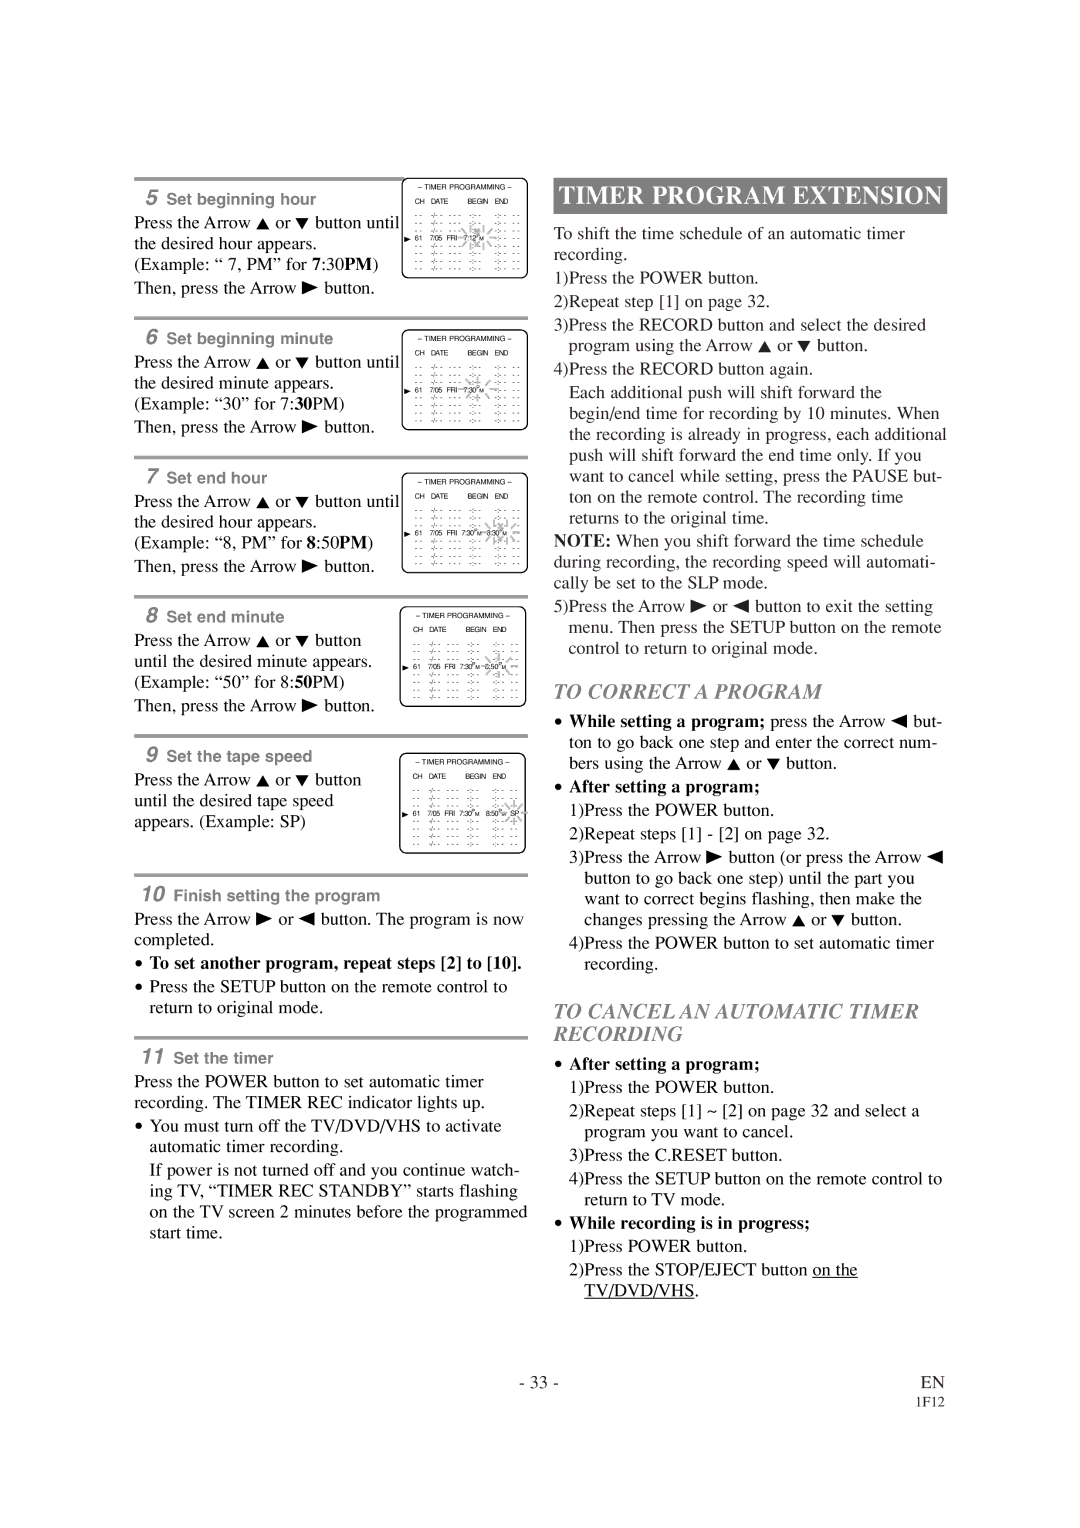
5 Set beginning hour

– TIMER PROGRAMMING –

CH DATE

BEGIN END

Press the Arrow K or L button until

- -

-/- - - - -

-:- -

-:- - - -

- -

-/- - - - -

-:- -

-:- - - -


- -

-/- - - - -

-:- -

-:- - - -

the desired hour appears.

B 61

7/05 FRI 7:12PM

-:- - - -

- -

-/- - - - -

-:- -

-:- - - -

(Example: “ 7, PM” for 7:30PM)

- -

-/- - - - -

-:- -

-:- - - -

- -

-/- - - - -

-:- -

-:- - - -


- -

-/- - - - -

-:- -

-:- - - -

Then, press the Arrow B button.


6 Set beginning minute

– TIMER PROGRAMMING –

Press the Arrow K or L button until

CH DATE

BEGIN END

- -

-/- - - - -

-:- -

-:- - - -

the desired minute appears.

- -

-/- - - - -

-:- -

-:- - - -

B 61

7/05 FRI 7:30PM

-:- - - -


- -

-/- - - - -

-:- -

-:- - - -

(Example: “30” for 7:30PM)

- -

-/- - - - -

-:- -

-:- - - -

- -

-/- - - - -

-:- -

-:- - - -


- -

-/- - - - -

-:- -

-:- - - -

Then, press the Arrow B button.

- -

-/- - - - -

-:- -

-:- - - -


7 Set end hour

– TIMER PROGRAMMING –

Press the Arrow K or L button until

CH DATE

BEGIN END

the desired hour appears.

- -

-/- - - - -

-:- -

-:- - - -

- -

-/- - - - -

-:- -

-:- - - -

- -

-/- - - - -

-:- -

-:- - - -

(Example: “8, PM” for 8:50PM)

B 61

7/05 FRI 7:30PM

8:30PM - -

- -

-/- - - - -

-:- -

-:- - - -


- -

-/- - - - -

-:- -

-:- - - -

Then, press the Arrow B button.

- -

-/- - - - -

-:- -

-:- - - -

- -

-/- - - - -

-:- -

-:- - - -


8 Set end minute

– TIMER PROGRAMMING –

Press the Arrow K or L button

CH

DATE

BEGIN END

- -

-/- - - - -

-:- -

-:- - - -

until the desired minute appears.

- -

-/- - - - -

-:- -

-:- - - -

B 61

7/05 FRI 7:30PM

8:50PM - -


- -

-/- - - - -

-:- -

-:- - - -

(Example: “50” for 8:50PM)

- -

-/- - - - -

-:- -

-:- - - -

- -

-/- - - - -

-:- -

-:- - - -


- -

-/- - - - -

-:- -

-:- - - -

Then, press the Arrow B button.

- -

-/- - - - -

-:- -

-:- - - -


9 Set the tape speed

– TIMER PROGRAMMING –

Press the Arrow K or L button

CH

DATE

BEGIN END

until the desired tape speed

- -

-/- - - - -

-:- -

-:- - - -

- -

-/- - - - -

-:- -

-:- - - -


- -

-/- - - - -

-:- -

-:- - - -

appears. (Example: SP)

B 61

7/05 FRI 7:30PM

8:50PM SP

- -

-/- - - - -

-:- -

-:- - - -


- -

-/- - - - -

-:- -

-:- - - -


- -

-/- - - - -

-:- -

-:- - - -


- -

-/- - - - -

-:- -

-:- - - -

10Finish setting the program

Press the Arrow B or s button. The program is now completed.

To set another program, repeat steps [2] to [10].

Press the SETUP button on the remote control to return to original mode.

11Set the timer

Press the POWER button to set automatic timer recording. The TIMER REC indicator lights up.

You must turn off the TV/DVD/VHS to activate automatic timer recording.

If power is not turned off and you continue watch- ing TV, “TIMER REC STANDBY” starts flashing on the TV screen 2 minutes before the programmed start time.

TIMER PROGRAM EXTENSION

To shift the time schedule of an automatic timer recording.

1)Press the POWER button. 2)Repeat step [1] on page 32.

3)Press the RECORD button and select the desired program using the Arrow K or L button.

4)Press the RECORD button again.

Each additional push will shift forward the begin/end time for recording by 10 minutes. When the recording is already in progress, each additional push will shift forward the end time only. If you want to cancel while setting, press the PAUSE but- ton on the remote control. The recording time returns to the original time.

NOTE: When you shift forward the time schedule during recording, the recording speed will automati- cally be set to the SLP mode.

5)Press the Arrow B or s button to exit the setting menu. Then press the SETUP button on the remote control to return to original mode.

TO CORRECT A PROGRAM

While setting a program; press the Arrow s but- ton to go back one step and enter the correct num- bers using the Arrow K or L button.

After setting a program; 1)Press the POWER button. 2)Repeat steps [1] - [2] on page 32.

3)Press the Arrow B button (or press the Arrow s button to go back one step) until the part you want to correct begins flashing, then make the changes pressing the Arrow K or L button.

4)Press the POWER button to set automatic timer recording.

TO CANCEL AN AUTOMATIC TIMER RECORDING

After setting a program; 1)Press the POWER button.

2)Repeat steps [1] ~ [2] on page 32 and select a program you want to cancel.

3)Press the C.RESET button.

4)Press the SETUP button on the remote control to return to TV mode.

While recording is in progress; 1)Press POWER button.

2)Press the STOP/EJECT button on the TV/DVD/VHS.

- 33 -

EN

1F12

Page 33
Image 33
Sylvania SSC719B1 owner manual Timer Program Extension, To Correct a Program, To Cancel AN Automatic Timer Recording

SSC719B1 specifications

The Sylvania SSC719B1 is an innovative LED floodlight designed to deliver efficient and robust lighting solutions ideal for various applications, ranging from commercial to residential use. This state-of-the-art lighting fixture stands out due to its blend of modern technology, energy efficiency, and durability, making it a popular choice for consumers and businesses alike.

One of the main features of the SSC719B1 is its impressive brightness, which can illuminate large areas effectively with its high lumen output. The floodlight is equipped with advanced LED technology, allowing it to produce a bright, uniform light that enhances visibility in outdoor settings. This feature is particularly beneficial for security lighting, landscape illumination, or outdoor events, ensuring that any space is well-lit and welcoming.

Energy efficiency is another notable characteristic of the SSC719B1. Compared to traditional incandescent or halogen floodlights, this LED fixture consumes significantly less energy, leading to reduced electricity bills and a smaller carbon footprint. With a long lifespan of up to 50,000 hours, users can expect to enjoy dependable lighting without frequent replacements, further contributing to its cost-effectiveness.

The Sylvania SSC719B1 is also designed with versatility in mind. Its sturdy construction allows for various mounting options, making it easily adaptable for different settings, such as gardens, driveways, sports fields, parking lots, and building exteriors. The floodlight features a durable housing, ensuring resistance to weather elements, including rain, snow, and dust, which is crucial for outdoor applications.

Furthermore, the SSC719B1 incorporates advanced thermal management technology, preventing overheating and ensuring optimal performance over extended periods. This feature not only enhances the life of the fixture but also maintains consistent light output, regardless of operating conditions.

In terms of design, the Sylvania SSC719B1 presents a sleek and modern appearance, aligning seamlessly with contemporary architectural styles. Its lightweight design allows for easy installation, whether mounting on walls or poles.

Overall, the Sylvania SSC719B1 represents a significant advancement in floodlight technology, combining brightness, efficiency, and durability to meet the diverse lighting needs of users. Its blend of practical features and modern design makes it an excellent investment for those seeking reliable and effective outdoor lighting solutions.