4

QuickStart - First Session (Continued)

Section I

Plug your source into INPUT D, and flip the switch next to it to "MIC". (You could plug it into any input from INPUT A-D, but we're using INPUT D so the directions can match the guitar input routing.)

To route INPUT D to track 1 of the recorder, you need to assign INPUT D to channel 1 of the mixer. (Channel 1 feeds track 1, channel 6 feeds track 6, etc.) Route INPUT D to channel 1 by holding down INPUT D and pressing SELECT for channel 1. The LEDs should confirm the routing as you enter it by flashing the LEDs for INPUT D and SELECT LED for channel 1. If you raise channel 1's fader and the stereo fader, you should hear the audio source.

Recording the First Track

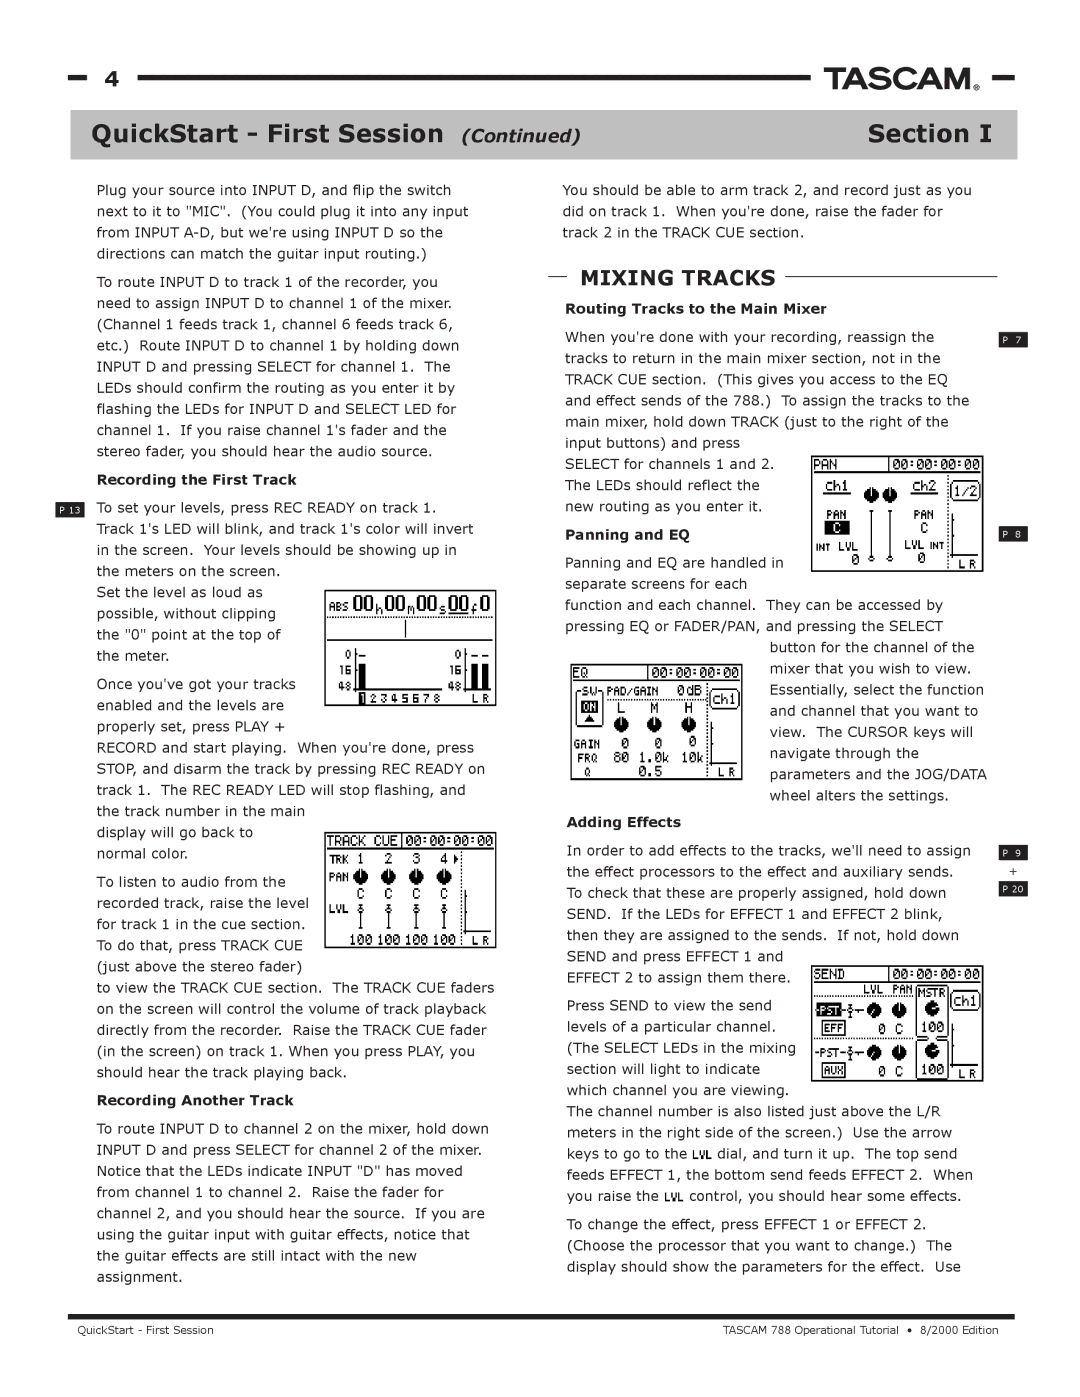
P 13 To set your levels, press REC READY on track 1. Track 1's LED will blink, and track 1's color will invert in the screen. Your levels should be showing up in the meters on the screen.

Set the level as loud as possible, without clipping the "0" point at the top of the meter.

Once you've got your tracks enabled and the levels are properly set, press PLAY +

RECORD and start playing. When you're done, press STOP, and disarm the track by pressing REC READY on track 1. The REC READY LED will stop flashing, and the track number in the main

display will go back to normal color.

To listen to audio from the recorded track, raise the level for track 1 in the cue section. To do that, press TRACK CUE (just above the stereo fader)

to view the TRACK CUE section. The TRACK CUE faders on the screen will control the volume of track playback directly from the recorder. Raise the TRACK CUE fader (in the screen) on track 1. When you press PLAY, you should hear the track playing back.

Recording Another Track

To route INPUT D to channel 2 on the mixer, hold down INPUT D and press SELECT for channel 2 of the mixer. Notice that the LEDs indicate INPUT "D" has moved from channel 1 to channel 2. Raise the fader for channel 2, and you should hear the source. If you are using the guitar input with guitar effects, notice that the guitar effects are still intact with the new assignment.

You should be able to arm track 2, and record just as you did on track 1. When you're done, raise the fader for track 2 in the TRACK CUE section.

MIXING TRACKS

Routing Tracks to the Main Mixer


When you're done with your recording, reassign the

P 7

tracks to return in the main mixer section, not in the


TRACK CUE section. (This gives you access to the EQ


and effect sends of the 788.) To assign the tracks to the


main mixer, hold down TRACK (just to the right of the


input buttons) and press


SELECT for channels 1 and 2.


The LEDs should reflect the


new routing as you enter it.


Panning and EQ

P 8

Panning and EQ are handled in separate screens for each

function and each channel. They can be accessed by pressing EQ or FADER/PAN, and pressing the SELECT

button for the channel of the mixer that you wish to view. Essentially, select the function and channel that you want to view. The CURSOR keys will navigate through the parameters and the JOG/DATA wheel alters the settings.

Adding Effects


In order to add effects to the tracks, we'll need to assign

P 9

the effect processors to the effect and auxiliary sends.

+

To check that these are properly assigned, hold down

P 20


SEND. If the LEDs for EFFECT 1 and EFFECT 2 blink,


then they are assigned to the sends. If not, hold down


SEND and press EFFECT 1 and


EFFECT 2 to assign them there.


Press SEND to view the send


levels of a particular channel.


(The SELECT LEDs in the mixing


section will light to indicate


which channel you are viewing.


The channel number is also listed just above the L/R


meters in the right side of the screen.) Use the arrow


keys to go to the

dial, and turn it up. The top send


feeds EFFECT 1, the bottom send feeds EFFECT 2. When


you raise the

control, you should hear some effects.


To change the effect, press EFFECT 1 or EFFECT 2.


(Choose the processor that you want to change.) The


display should show the parameters for the effect. Use


QuickStart - First Session

TASCAM 788 Operational Tutorial • 8/2000 Edition

Page 4
Image 4
Tascam 788 manual QuickStart First Session, Mixing Tracks

788 specifications

The Tascam 788 is a portable digital audio workstation that made a significant impact in the realm of music production and recording. Launched in the early 2000s, the 788 is particularly well-regarded for its blend of portability, versatility, and quality. Aimed primarily at musicians, podcasters, and sound designers, this device caters to those who need a reliable means to capture high-fidelity audio in various environments.

At the heart of the Tascam 788 is its ability to record up to eight tracks simultaneously, offering a total of 24 tracks for playback. This multi-track capability allows users to layer instruments and vocals, creating rich, full-bodied productions. Each track supports high-resolution recording at 24-bit/96kHz, providing professional quality that rivals many studio setups. The onboard effects and mixing capabilities further enhance its functionality, allowing users to manipulate their recordings in real-time.

The Tascam 788 features a user-friendly interface with a large LCD screen, making navigation straightforward. It includes a variety of inputs, including XLR and TRS, making it flexible for different microphone types and instruments. The device also has built-in phantom power for condenser mics, ensuring that you can capture clear audio with minimal external setup.

One of the standout features of the Tascam 788 is its integrated CD-RW drive, allowing users to burn audio directly onto CDs without needing a computer. This is particularly useful for artists wishing to create demo discs or share their music with others quickly and easily. Additionally, the presence of a USB port means that users can connect the device to a computer for further editing and file management, making it easy to integrate with digital audio software.

The Tascam 788 employs a compact and rugged design that is ideal for mobile musicians and recording engineers. Weighing less than many of its contemporaries, the device can be easily transported, making it suitable for on-the-go recording sessions. The long battery life adds to its portability, enabling recordings without the constant need for a power source.

In summary, the Tascam 788 stands out as a versatile tool for both novice and professional audio creators. With its multi-track recording capabilities, high-quality audio, and portable design, it remains a beloved choice for those looking to capture and produce music seamlessly and effectively. Whether in a studio or on the road, the Tascam 788 brings together essential features that cater to the diverse needs of today's audio artists.