Function Overview

Remote Control

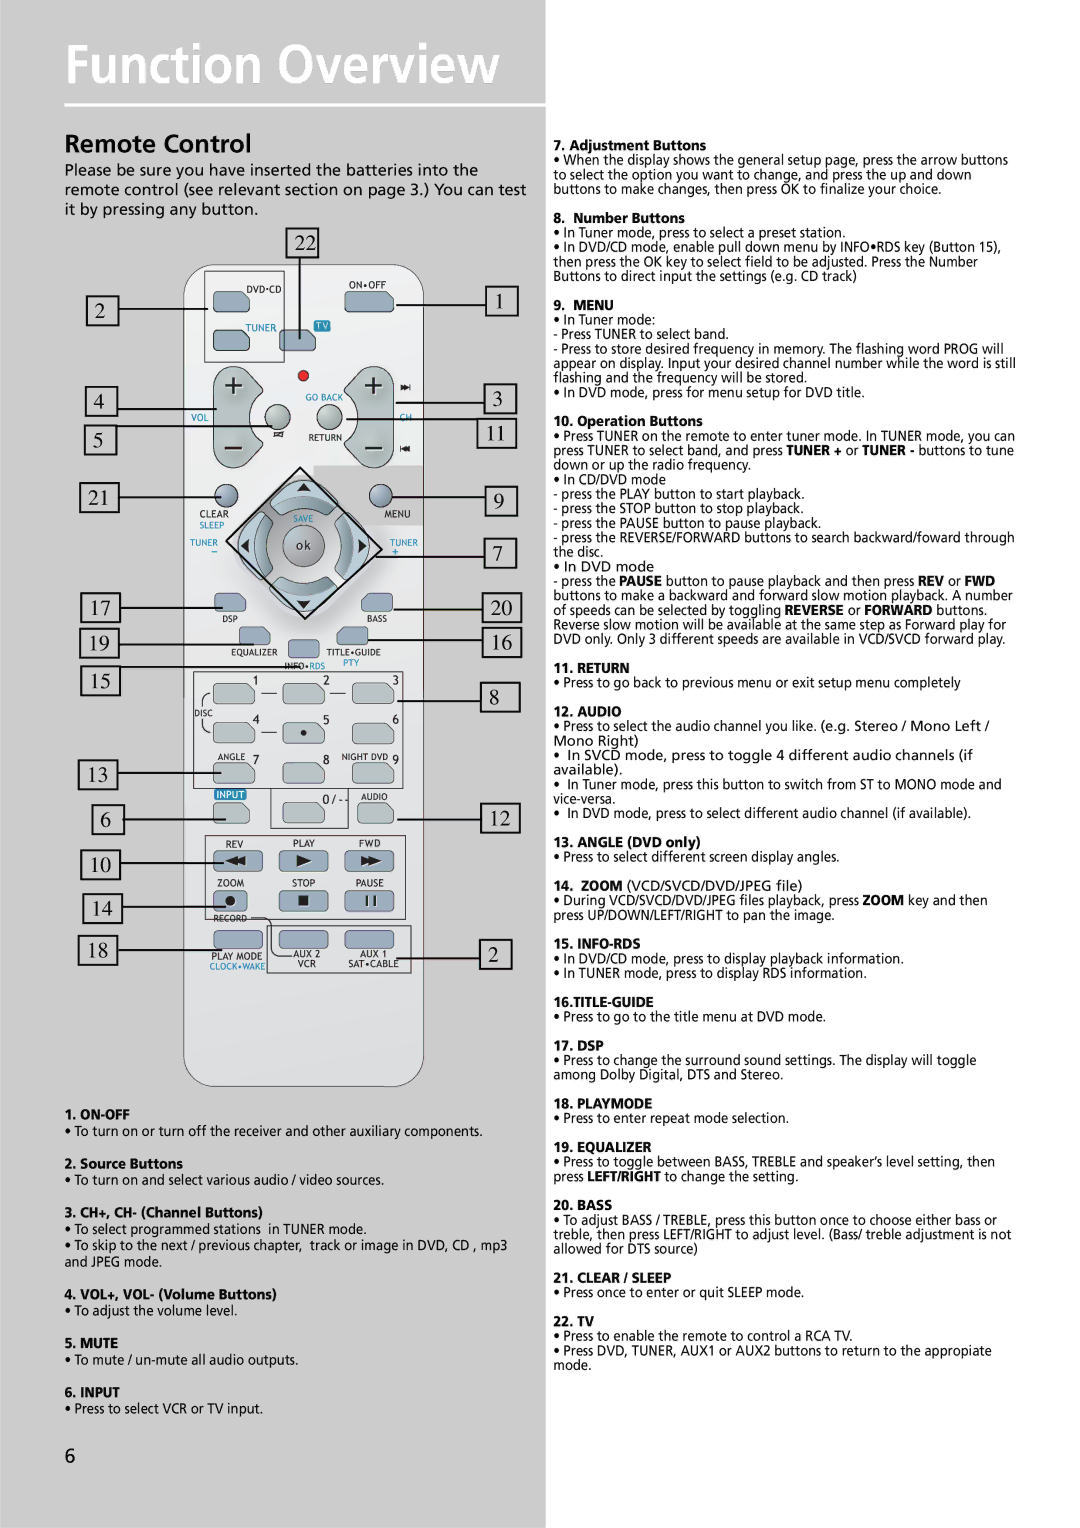
Please be sure you have inserted the batteries into the remote control (see relevant section on page 3.) You can test it by pressing any button.


22


1

2


4

3

5

11


21

9


7

17 20

19 16

15

8


13


6

12

10


14


18

2

1. ON-OFF

• To turn on or turn off the receiver and other auxiliary components.

2. Source Buttons

• To turn on and select various audio / video sources.

3. CH+, CH- (Channel Buttons)

To select programmed stations in TUNER mode.

To skip to the next / previous chapter, track or image in DVD, CD , mp3 and JPEG mode.

4.VOL+, VOL- (Volume Buttons)

• To adjust the volume level.

5.MUTE

• To mute / un-mute all audio outputs.

6. INPUT

• Press to select VCR or TV input.

7. Adjustment Buttons

When the display shows the general setup page, press the arrow buttons to select the option you want to change, and press the up and down buttons to make changes, then press OK to finalize your choice.

8. Number Buttons

In Tuner mode, press to select a preset station.

In DVD/CD mode, enable pull down menu by INFO•RDS key (Button 15), then press the OK key to select field to be adjusted. Press the Number Buttons to direct input the settings (e.g. CD track)

9. MENU

• In Tuner mode:

-Press TUNER to select band.

-Press to store desired frequency in memory. The flashing word PROG will appear on display. Input your desired channel number while the word is still flashing and the frequency will be stored.

• In DVD mode, press for menu setup for DVD title.

10. Operation Buttons

Press TUNER on the remote to enter tuner mode. In TUNER mode, you can press TUNER to select band, and press TUNER + or TUNER - buttons to tune down or up the radio frequency.

In CD/DVD mode

-press the PLAY button to start playback.

-press the STOP button to stop playback.

-press the PAUSE button to pause playback.

-press the REVERSE/FORWARD buttons to search backward/foward through the disc.

• In DVD mode

-press the PAUSE button to pause playback and then press REV or FWD buttons to make a backward and forward slow motion playback. A number of speeds can be selected by toggling REVERSE or FORWARD buttons. Reverse slow motion will be available at the same step as Forward play for DVD only. Only 3 different speeds are available in VCD/SVCD forward play.

11. RETURN

• Press to go back to previous menu or exit setup menu completely

12. AUDIO

Press to select the audio channel you like. (e.g. Stereo / Mono Left / Mono Right)

In SVCD mode, press to toggle 4 different audio channels (if available).

In Tuner mode, press this button to switch from ST to MONO mode and vice-versa.

In DVD mode, press to select different audio channel (if available).

13. ANGLE (DVD only)

• Press to select different screen display angles.

14.ZOOM (VCD/SVCD/DVD/JPEG file)

During VCD/SVCD/DVD/JPEG files playback, press ZOOM key and then press UP/DOWN/LEFT/RIGHT to pan the image.

15. INFO-RDS

In DVD/CD mode, press to display playback information.

In TUNER mode, press to display RDS information.

16.TITLE-GUIDE

• Press to go to the title menu at DVD mode.

17. DSP

Press to change the surround sound settings. The display will toggle among Dolby Digital, DTS and Stereo.

18. PLAYMODE

• Press to enter repeat mode selection.

19. EQUALIZER

Press to toggle between BASS, TREBLE and speaker’s level setting, then press LEFT/RIGHT to change the setting.

20. BASS

To adjust BASS / TREBLE, press this button once to choose either bass or treble, then press LEFT/RIGHT to adjust level. (Bass/ treble adjustment is not allowed for DTS source)

21. CLEAR / SLEEP

• Press once to enter or quit SLEEP mode.

22. TV

Press to enable the remote to control a RCA TV.

Press DVD, TUNER, AUX1 or AUX2 buttons to return to the appropiate mode.

6

Page 9
Image 9
Technicolor - Thomson DPL909VD manual Remote Control, On-Off

DPL909VD specifications

The Technicolor Thomson DPL909VD is a noteworthy player in the realm of home entertainment, offering a blend of advanced features and cutting-edge technologies. This digital video player is designed to cater to the needs of modern users, providing a seamless viewing experience that combines high-quality video playback with user-friendly functionality.

One of the standout features of the DPL909VD is its ability to play a wide variety of media formats. This versatility ensures that users can enjoy their favorite movies, TV shows, and music without worrying about compatibility issues. The player supports various formats, including DVD, CD, MP3, JPEG, and DivX, making it an all-in-one solution for digital entertainment.

The DPL909VD is equipped with advanced video processing technologies that enhance the viewing experience. With its high-resolution output capabilities, viewers can enjoy crisp, clear images that bring content to life. The player also supports progressive scan technology, which minimizes flicker and delivers smoother video playback. This is particularly beneficial for fast-paced action scenes or sports programming, where clarity and fluidity are essential.

In terms of connectivity, the DPL909VD offers multiple options. It features composite video, S-Video, and component video outputs, allowing users to connect it to various types of televisions and display devices. Additionally, it incorporates HDMI output, which provides a single-cable solution for high-definition video and audio transmission. This ensures that users can enjoy an immersive audio-visual experience without the clutter of multiple cables.

The user interface of the DPL909VD is designed with convenience in mind. The remote control features intuitive buttons for easy navigation, allowing users to access their media files and settings effortlessly. Furthermore, the player comes with a built-in parental control feature, enabling parents to restrict access to certain content and ensuring a safe viewing environment for children.

Durability is another hallmark of the Technicolor Thomson DPL909VD, as it is built to withstand everyday use while maintaining high performance levels. Its sleek and compact design makes it an attractive addition to any home entertainment setup, and it can easily fit into existing media centers.

In summary, the Technicolor Thomson DPL909VD stands out as a versatile and efficient digital video player. With its wide format compatibility, advanced video processing, and user-friendly features, it caters to the dynamic needs of today's viewers, making it a valuable asset for any home entertainment setup.