EN41

C. Connection to a TV or VCR equipped with an S-VIDEO IN and/or A/V input (RCA type) connectors

* When connecting the cables, open this cover.

When an S-Video

** The Audio cable is not required for watching still

cable is not used.

images when the VIDEO/DSC Switch is set to “

”.


Audio/Video cable

Yellow to VIDEO IN


[mini-plug to RCA plug]

(provided)


Core filter

White to

AUDIO L IN**


TV


To AV


Red to


AUDIO R IN**

VCR


To S

Core filter

S-Video cable

To S-VIDEO IN


(optional)


To TV or VCR

Connector cover*

1

2

3

4

5

Make sure all units are turned off.

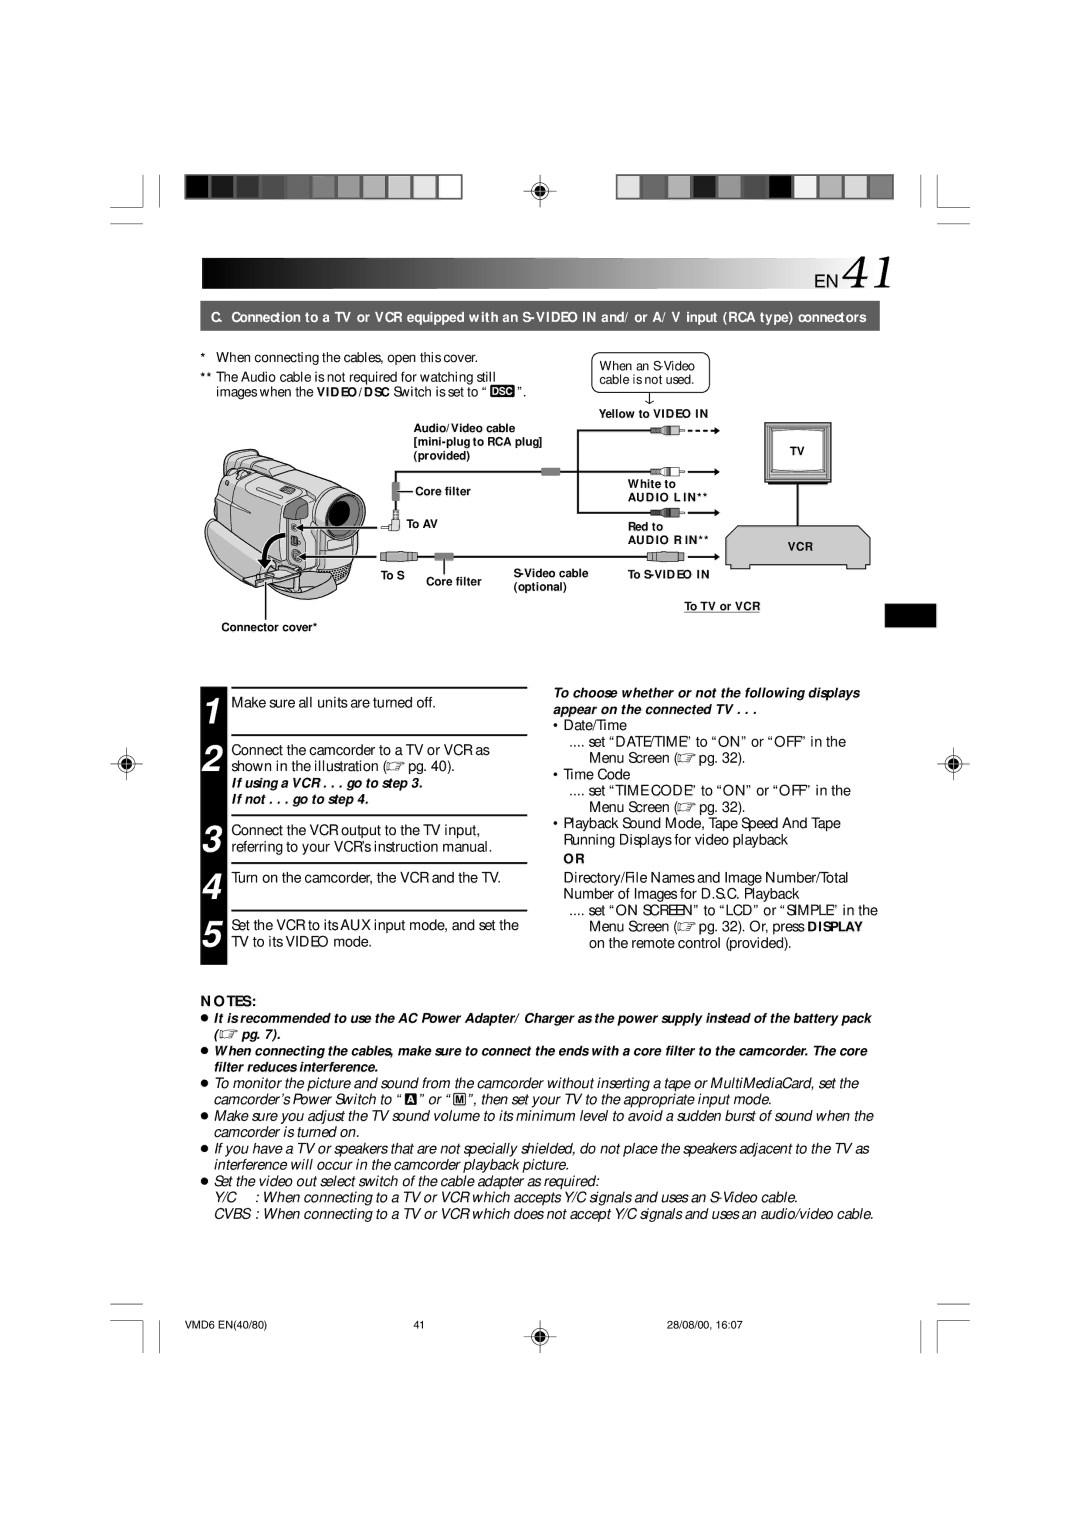
Connect the camcorder to a TV or VCR as shown in the illustration ( pg. 40).

If using a VCR . . . go to step 3.

If not . . . go to step 4.

Connect the VCR output to the TV input, referring to your VCR’s instruction manual.

Turn on the camcorder, the VCR and the TV.

Set the VCR to its AUX input mode, and set the TV to its VIDEO mode.

To choose whether or not the following displays appear on the connected TV . . .

•Date/Time

.... set “DATE/TIME” to “ON” or “OFF” in the

Menu Screen ( pg. 32). •Time Code

.... set “TIME CODE” to “ON” or “OFF” in the

Menu Screen ( pg. 32).

Playback Sound Mode, Tape Speed And Tape Running Displays for video playback

OR

Directory/File Names and Image Number/Total Number of Images for D.S.C. Playback

.... set “ON SCREEN” to “LCD” or “SIMPLE” in the Menu Screen ( pg. 32). Or, press DISPLAY on the remote control (provided).

NOTES:

It is recommended to use the AC Power Adapter/ Charger as the power supply instead of the battery pack (  pg. 7).

When connecting the cables, make sure to connect the ends with a core filter to the camcorder. The core filter reduces interference.

To monitor the picture and sound from the camcorder without inserting a tape or MultiMediaCard, set the camcorder’s Power Switch to “ ” or “ ”, then set your TV to the appropriate input mode.

Make sure you adjust the TV sound volume to its minimum level to avoid a sudden burst of sound when the camcorder is turned on.

If you have a TV or speakers that are not specially shielded, do not place the speakers adjacent to the TV as interference will occur in the camcorder playback picture.

Set the video out select switch of the cable adapter as required:

Y/C : When connecting to a TV or VCR which accepts Y/C signals and uses an S-Video cable.

CVBS : When connecting to a TV or VCR which does not accept Y/C signals and uses an audio/video cable.

VMD6 EN(40/80)

41

28/08/00, 16:07

Page 42
Image 42
Technicolor - Thomson VMD 6 If using a VCR . . . go to step If not . . . go to step, When an S-Video, Cable is not used

VMD 6 specifications

The Technicolor - Thomson VMD 6 is a sophisticated video module designed for advanced video processing and distribution applications. Known for its reliability and high performance, the VMD 6 is widely utilized in broadcast, multimedia, and video surveillance systems. Its robust architecture ensures that it meets the demanding requirements of contemporary content delivery networks.

One of the standout features of the VMD 6 is its ability to support various video formats, including SD, HD, and even 4K resolutions. The module is equipped with an automated format detection system that simplifies the integration of different video sources, making it adaptable to various workflows. This versatility is crucial in environments where multiple video streams must be handled simultaneously without compromising quality.

The VMD 6 leverages advanced compression technologies to efficiently encode and decode video streams. It incorporates industry-standard codecs such as H.264 and H.265, enabling high-quality video streaming while minimizing bandwidth usage. This compression capability is particularly beneficial for delivering content over constrained networks, ensuring seamless playback regardless of connection quality.

Another key characteristic of the Technicolor - Thomson VMD 6 is its real-time processing capabilities. The module features low-latency processing, which is essential for live broadcasts and interactive applications. Its architecture allows for frame-accurate editing and timing synchronization, making it an ideal choice for broadcast studios and post-production facilities.

The user interface of the VMD 6 is designed for ease of use, providing operators with intuitive control over the module’s features. With comprehensive monitoring options, users can track video quality metrics and system performance in real-time, enabling proactive maintenance and troubleshooting.

In terms of connectivity, the VMD 6 offers multiple input and output options, including HDMI, SDI, and IP streaming. This ensures compatibility with a wide range of external devices and simplifies integration into existing infrastructures.

Overall, the Technicolor - Thomson VMD 6 stands out as a versatile and powerful video module. Its support for various video formats, advanced compression capabilities, real-time processing features, and user-friendly interface make it an invaluable asset for any organization looking to enhance its video processing and distribution efficiencies. This module represents a significant advancement in video technology, catering to the needs of contemporary media environments.