Rotate MENU/BRIGHT to select “ press it.
Set the Power Switch to “ ” while pressing down the Lock Button located on the switch.
Press MENU/BRIGHT. The Menu Screen appears.
”, then

Exposure Control

Manual exposure adjustment is recommended in the following situations:

When shooting using reverse lighting or when the background is too bright.

When shooting on a reflective natural background such as at the beach or when skiing.

When the background is overly dark or the subject light.

1

2

3

4 Rotate MENU/BRIGHT to select “MANUAL”, then press it. The Menu Screen disappears. “EXP.” and the highlight bar on the exposure control indicator are displayed.

5 Rotate MENU/BRIGHT towards “+” to brighten the image, or towards to darken the image. (maximum ± 6)

6 Press MENU/BRIGHT. Exposure adjustment is complete. The indication “EXP.” and the highlight bar on the exposure control indicator go out.

E N 2 9

Iris Lock

Use this function in the following situations:

When shooting a moving subject.

When the distance to the subject changes (so its size in the LCD monitor or the viewfinder changes), such as when the subject is backing away.

When shooting on a reflective natural background such as at the beach or when skiing.

When shooting objects under a spotlight.

When zooming.

When the subject is close, keep the iris locked. Even when the subject moves away from you, the image will not darken or brighten.

Before the following steps, perform steps 1 through 4 of “Exposure Control”.

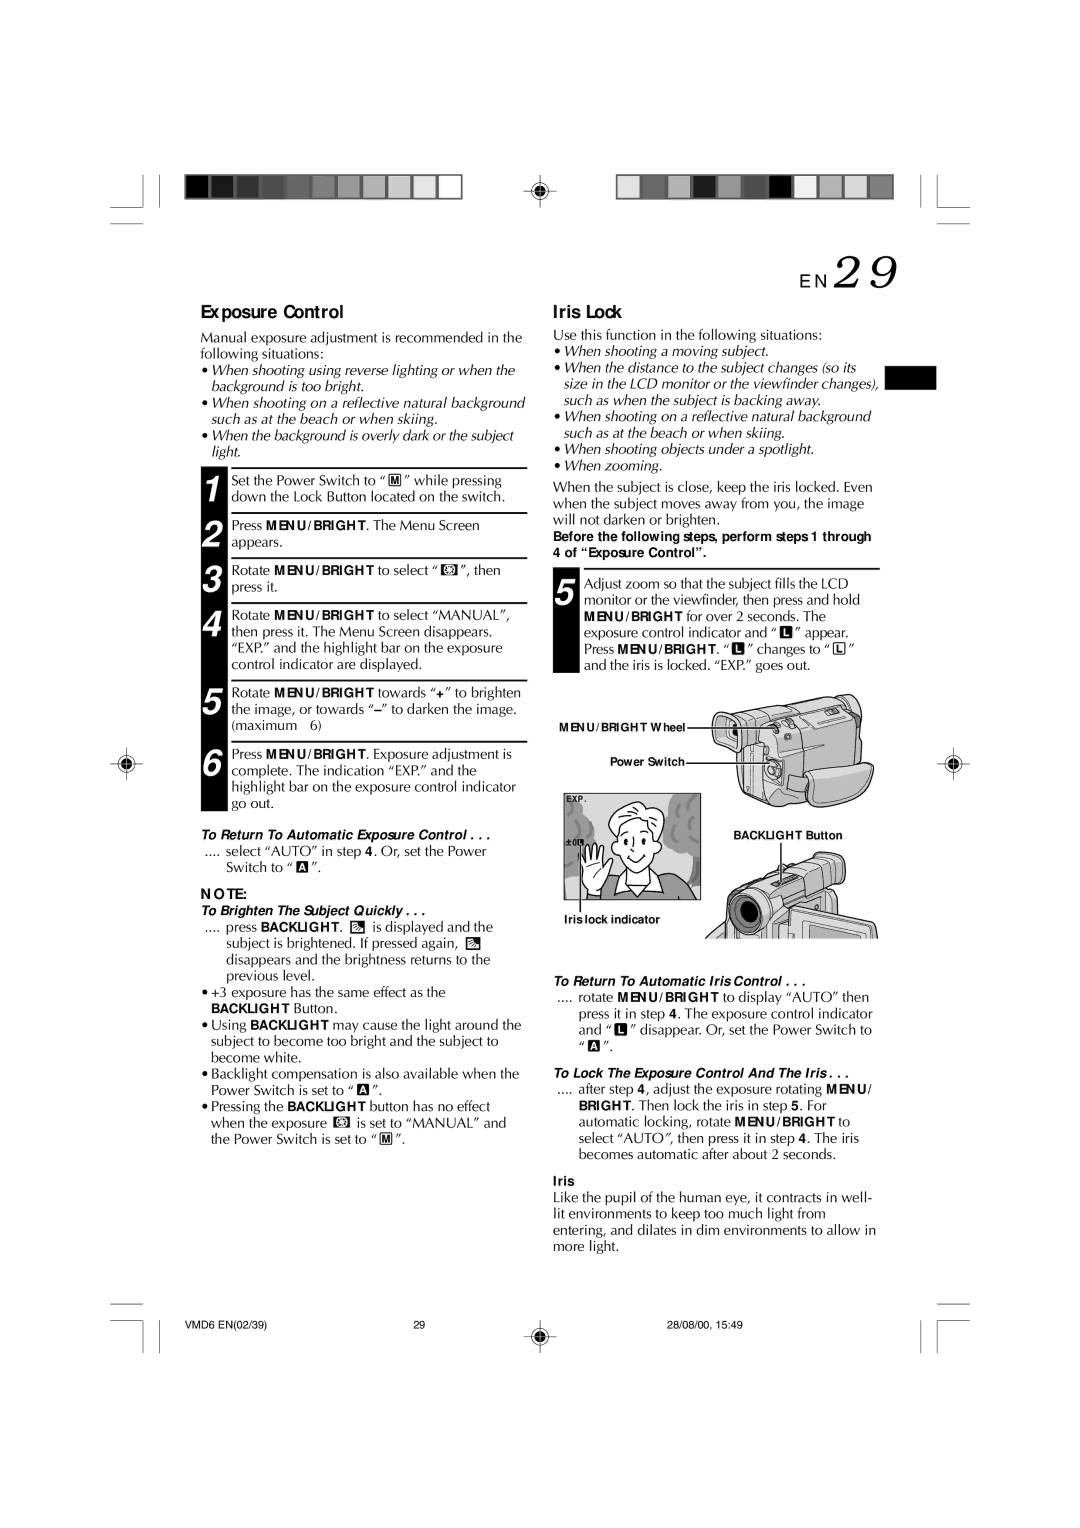
5 Adjust zoom so that the subject fills the LCD monitor or the viewfinder, then press and hold MENU/BRIGHT for over 2 seconds. The exposure control indicator and “ ” appear. Press MENU/BRIGHT. “ ” changes to “ ” and the iris is locked. “EXP.” goes out.

MENU/BRIGHT Wheel

Power Switch

EXP .

To Return To Automatic Exposure Control . . .

.... select “AUTO” in step 4. Or, set the Power

Switch to “”.

NOTE:

0

BACKLIGHT Button

To Brighten The Subject Quickly . . .

.... press BACKLIGHT. is displayed and the

subject is brightened. If pressed again, disappears and the brightness returns to the previous level.

+3 exposure has the same effect as the BACKLIGHT Button.

Using BACKLIGHT may cause the light around the subject to become too bright and the subject to become white.

Backlight compensation is also available when the Power Switch is set to “ ”.

Pressing the BACKLIGHT button has no effect

when the exposure is set to “MANUAL” and the Power Switch is set to “ ”.

Iris lock indicator

To Return To Automatic Iris Control . . .

.... rotate MENU/BRIGHT to display “AUTO” then

press it in step 4. The exposure control indicator and “ ” disappear. Or, set the Power Switch to “”.

To Lock The Exposure Control And The Iris . . .

.... after step 4, adjust the exposure rotating MENU/

BRIGHT. Then lock the iris in step 5. For automatic locking, rotate MENU/BRIGHT to select “AUTO, then press it in step 4. The iris becomes automatic after about 2 seconds.

Iris

Like the pupil of the human eye, it contracts in well- lit environments to keep too much light from entering, and dilates in dim environments to allow in more light.

VMD6 EN(02/39)

29

28/08/00, 15:49

Page 30
Image 30
Technicolor - Thomson VMD 6 user manual Exposure Control, Iris Lock

VMD 6 specifications

The Technicolor - Thomson VMD 6 is a sophisticated video module designed for advanced video processing and distribution applications. Known for its reliability and high performance, the VMD 6 is widely utilized in broadcast, multimedia, and video surveillance systems. Its robust architecture ensures that it meets the demanding requirements of contemporary content delivery networks.

One of the standout features of the VMD 6 is its ability to support various video formats, including SD, HD, and even 4K resolutions. The module is equipped with an automated format detection system that simplifies the integration of different video sources, making it adaptable to various workflows. This versatility is crucial in environments where multiple video streams must be handled simultaneously without compromising quality.

The VMD 6 leverages advanced compression technologies to efficiently encode and decode video streams. It incorporates industry-standard codecs such as H.264 and H.265, enabling high-quality video streaming while minimizing bandwidth usage. This compression capability is particularly beneficial for delivering content over constrained networks, ensuring seamless playback regardless of connection quality.

Another key characteristic of the Technicolor - Thomson VMD 6 is its real-time processing capabilities. The module features low-latency processing, which is essential for live broadcasts and interactive applications. Its architecture allows for frame-accurate editing and timing synchronization, making it an ideal choice for broadcast studios and post-production facilities.

The user interface of the VMD 6 is designed for ease of use, providing operators with intuitive control over the module’s features. With comprehensive monitoring options, users can track video quality metrics and system performance in real-time, enabling proactive maintenance and troubleshooting.

In terms of connectivity, the VMD 6 offers multiple input and output options, including HDMI, SDI, and IP streaming. This ensures compatibility with a wide range of external devices and simplifies integration into existing infrastructures.

Overall, the Technicolor - Thomson VMD 6 stands out as a versatile and powerful video module. Its support for various video formats, advanced compression capabilities, real-time processing features, and user-friendly interface make it an invaluable asset for any organization looking to enhance its video processing and distribution efficiencies. This module represents a significant advancement in video technology, catering to the needs of contemporary media environments.