NOTE: Groups x,x,x, and x are set up to work with the other US frequency band (A and B). These groups are listed last no matter how many open channels are avail- able. If you are using a mix of Band A and Band B, scroll down to these groups and use the clearest group.
6.Change
7.For set up, make sure the mixer or amplifier input used for the
8.Plug an audio cable (not supplied) into the 3 pin XLR or 1/4 inch output of the
a.NOTE: The XLR connector is the preferred connec- tion since the output is balanced and will be more im- mune to noise for longer runs of cable although either can be used with good results. If the 1/4 inch connector is used, adjust the output level on the back panel to 12 o'clock (midway in the range) to start and adjust later if necessary.
Now refer ahead to transmitter setup and return to step 9 when that is completed.
9.With the transmitter on, speak into the microphone or play the guitar. Turn up the level on the mixer or amplifier until you are able to hear the desired signal. If no audio is pres- ent, repeat setup and refer to the troubleshooting section.
NOTE: If the 1/4 inch output is used, it may be necessary to adjust the receiver output until the volume level from the wireless system approximates the level of an equiva- lent wired microphone/instrument.
10.Squelch Adjustment - The squelch setting can be used to maximize range or immunity to noise. Press and hold Up for 3 seconds. The current squelch setting will be dis- played. Adjust the squelch using the UP/DOWN keys. Maximum squelch (9) maximizes noise immunity but lim- its the range. Minimum squelch (1) will maximize the range but allow more noise to break through the squelch. Press SET to save the new squelch setting.
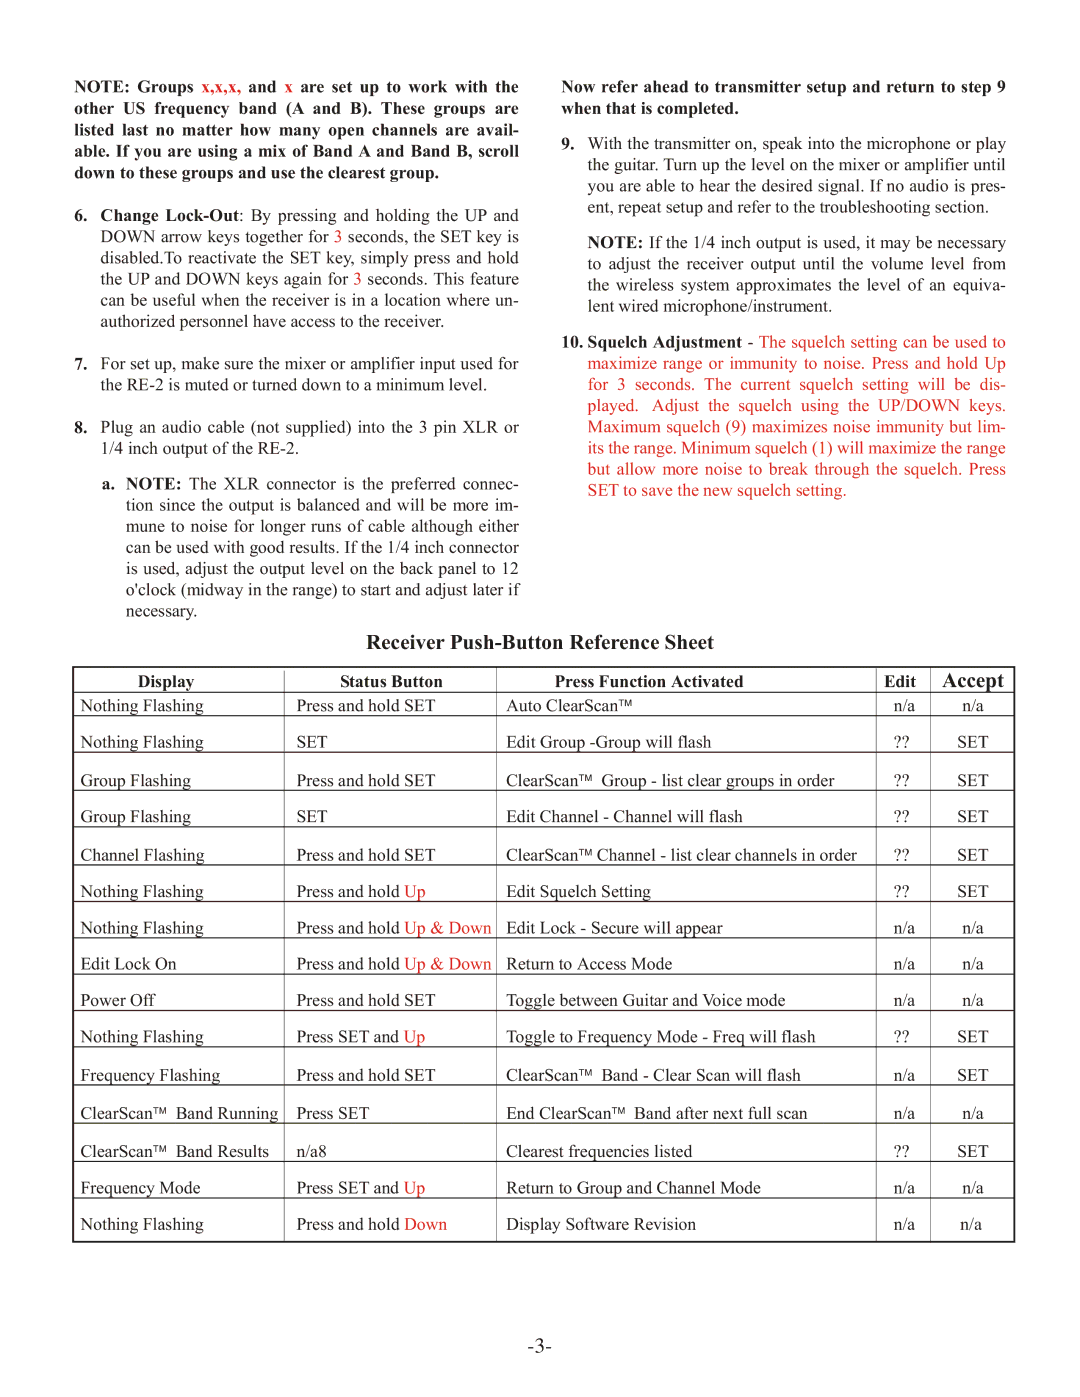
Receiver Push-Button Reference Sheet
Display | Status Button | Press Function Activated | Edit | Accept |
Nothing Flashing | Press and hold SET | Auto ClearScan™ | n/a | n/a |
Nothing Flashing | SET | Edit Group | ?? | SET |
Group Flashing | Press and hold SET | ClearScan™ Group - list clear groups in order | ?? | SET |
Group Flashing | SET | Edit Channel - Channel will flash | ?? | SET |
Channel Flashing | Press and hold SET | ClearScan™ Channel - list clear channels in order | ?? | SET |
Nothing Flashing | Press and hold Up | Edit Squelch Setting | ?? | SET |
Nothing Flashing | Press and hold Up & Down | Edit Lock - Secure will appear | n/a | n/a |
Edit Lock On | Press and hold Up & Down | Return to Access Mode | n/a | n/a |
Power Off | Press and hold SET | Toggle between Guitar and Voice mode | n/a | n/a |
Nothing Flashing | Press SET and Up | Toggle to Frequency Mode - Freq will flash | ?? | SET |
Frequency Flashing | Press and hold SET | ClearScan™ Band - Clear Scan will flash | n/a | SET |
ClearScan™ Band Running | Press SET | End ClearScan™ Band after next full scan | n/a | n/a |
ClearScan™ Band Results | n/a8 | Clearest frequencies listed | ?? | SET |
Frequency Mode | Press SET and Up | Return to Group and Channel Mode | n/a | n/a |
Nothing Flashing | Press and hold Down | Display Software Revision | n/a | n/a |
|
|
|
|
|