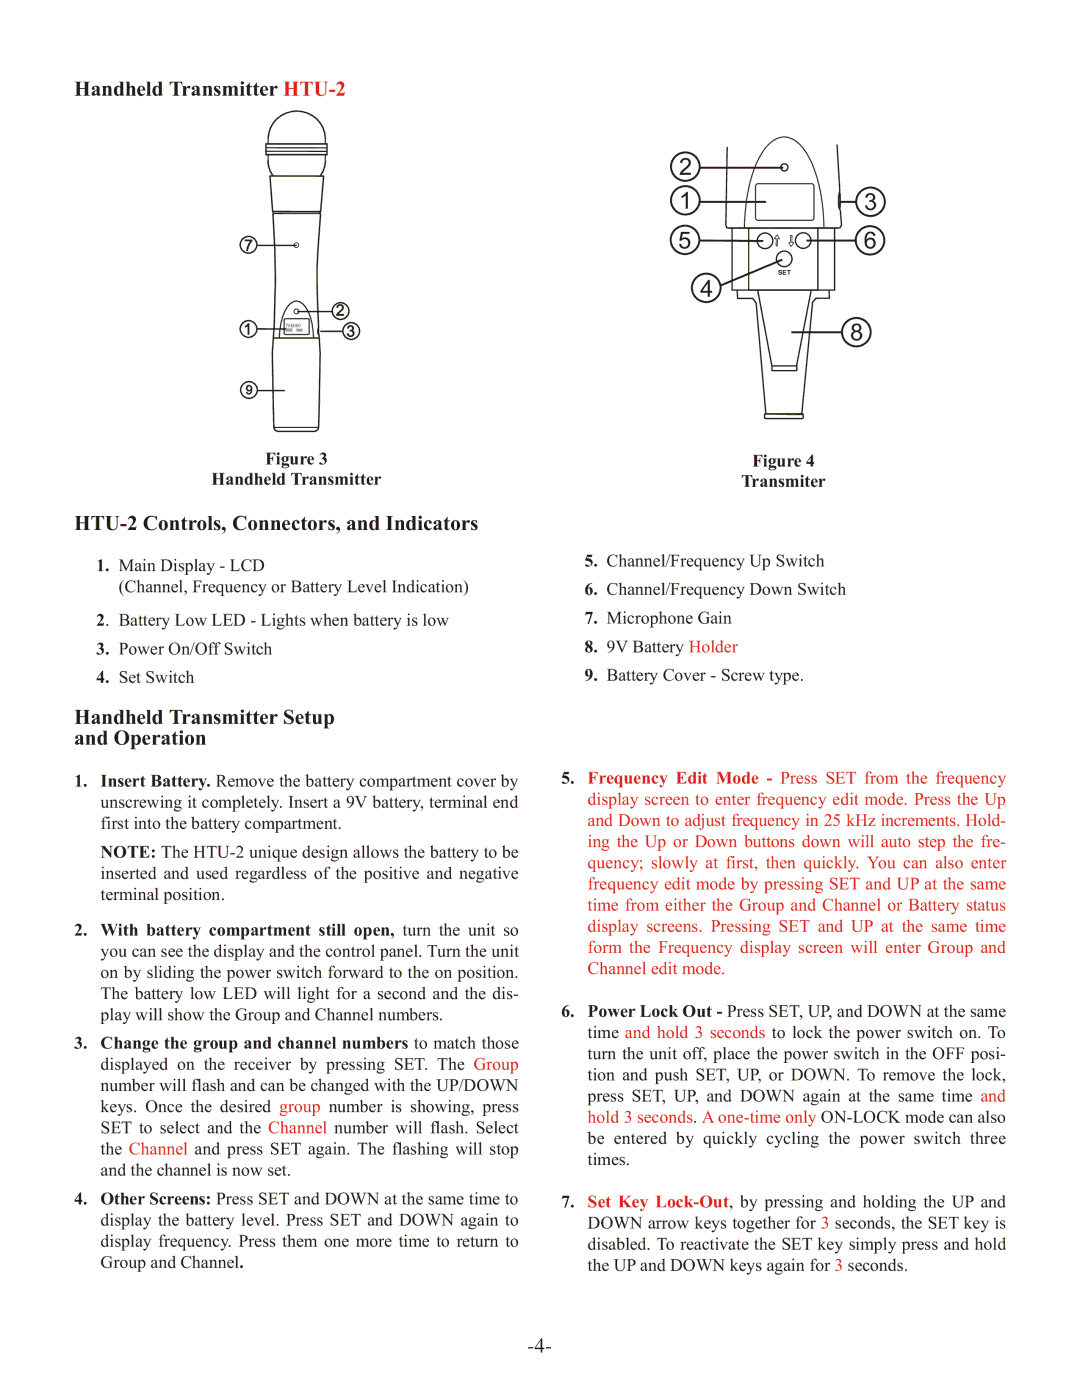
Handheld Transmitter HTU-2
7
2
1 | 755050 |
3 |
9
Figure 3
Handheld Transmitter
HTU-2 Controls, Connectors, and Indicators
1.Main Display - LCD
(Channel, Frequency or Battery Level Indication)
2. Battery Low LED - Lights when battery is low
3.Power On/Off Switch
4.Set Switch
2 ![]()
1 ![]()
![]() 3
3
5 ![]()
![]()
![]()
![]() 6
6
SET
4
8
Figure 4
Transmiter
5.Channel/Frequency Up Switch
6.Channel/Frequency Down Switch
7.Microphone Gain
8.9V Battery Holder
9.Battery Cover - Screw type.
Handheld Transmitter Setup
and Operation
1.Insert Battery. Remove the battery compartment cover by unscrewing it completely. Insert a 9V battery, terminal end first into the battery compartment.
NOTE: The
2.With battery compartment still open, turn the unit so you can see the display and the control panel. Turn the unit on by sliding the power switch forward to the on position. The battery low LED will light for a second and the dis- play will show the Group and Channel numbers.
3.Change the group and channel numbers to match those displayed on the receiver by pressing SET. The Group number will flash and can be changed with the UP/DOWN keys. Once the desired group number is showing, press SET to select and the Channel number will flash. Select the Channel and press SET again. The flashing will stop and the channel is now set.
4.Other Screens: Press SET and DOWN at the same time to display the battery level. Press SET and DOWN again to display frequency. Press them one more time to return to Group and Channel.
5.Frequency Edit Mode - Press SET from the frequency display screen to enter frequency edit mode. Press the Up and Down to adjust frequency in 25 kHz increments. Hold- ing the Up or Down buttons down will auto step the fre- quency; slowly at first, then quickly. You can also enter frequency edit mode by pressing SET and UP at the same time from either the Group and Channel or Battery status display screens. Pressing SET and UP at the same time form the Frequency display screen will enter Group and Channel edit mode.
6.Power Lock Out - Press SET, UP, and DOWN at the same time and hold 3 seconds to lock the power switch on. To turn the unit off, place the power switch in the OFF posi- tion and push SET, UP, or DOWN. To remove the lock, press SET, UP, and DOWN again at the same time and hold 3 seconds. A
7.Set Key
