Operating the menu screen

CONTENTS

42

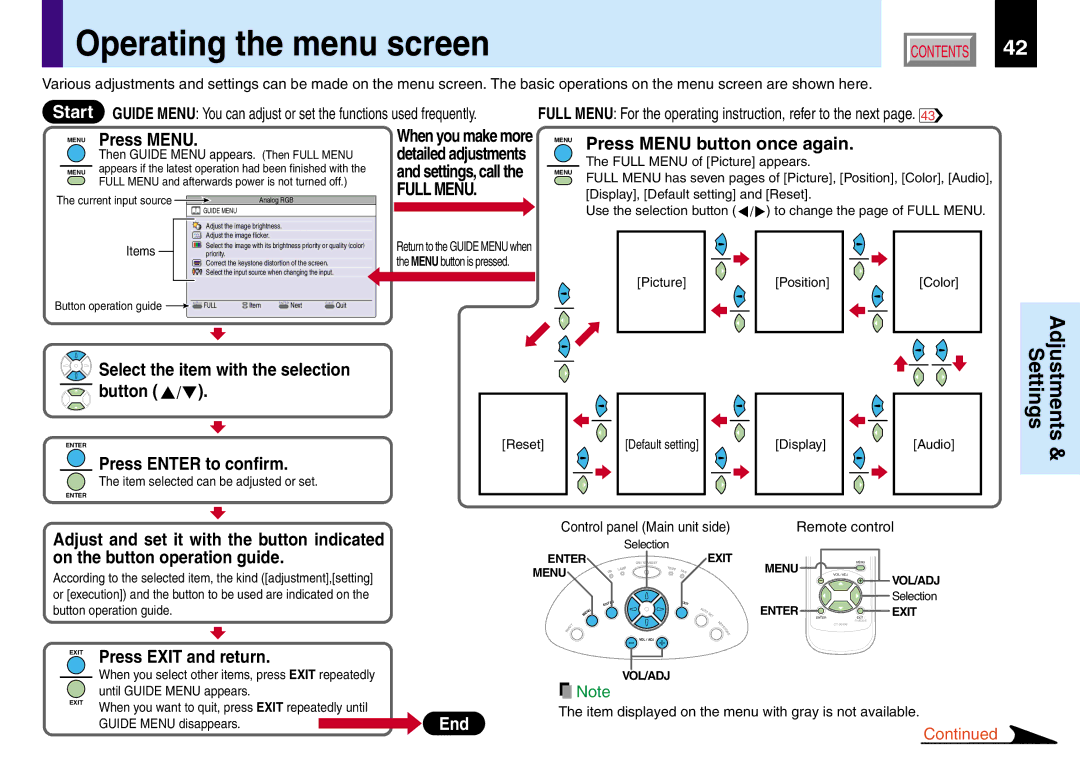
Various adjustments and settings can be made on the menu screen. The basic operations on the menu screen are shown here.

Start GUIDE MENU: You can adjust or set the functions used frequently.

FULL MENU: For the operating instruction, refer to the next page. 43


MENU

Press MENU.


When you make more


MENU Press MENU button once again.


Then GUIDE MENU appears. (Then FULL MENU


detailed adjustments


The FULL MENU of [Picture] appears.


appears if the latest operation had been finished with the


and settings, call the


MENU


MENU

FULL MENU has seven pages of [Picture], [Position], [Color], [Audio],


FULL MENU and afterwards power is not turned off.)


FULL MENU.


The current input source


[Display], [Default setting] and [Reset].


Analog RGB


GUIDE MENU


Use the selection button ( / ) to change the page of FULL MENU.


Adjust the image brightness.


Adjust the image flicker.


Return to the GUIDE MENU when


Items


Select the image with its brightness priority or quality (color)


priority.


the MENU button is pressed.


Correct the keystone distortion of the screen.


Select the input source when changing the input.

[Picture]

[Position]

[Color]

Button operation guide

MENU FULL

Item

ENTER Next

EXIT Quit

Select the item with the selection button (/).

ENTER

[Reset]

[Default setting]

[Display]

[Audio]

Press ENTER to confirm.

The item selected can be adjusted or set.

ENTER

Control panel (Main unit side)

Remote control

Settings

Adjustments


&


Adjust and set it with the button indicated on the button operation guide.

According to the selected item, the kind ([adjustment],[setting] or [execution]) and the button to be used are indicated on the button operation guide.

Selection

ENTER


ON / STANDBY


EXIT

MENU


ON

LAMP

TEMP

FAN


ER


E


ENT


XIT


U


AU


N


TO

S


E


M


ET


K


T


E


S


U


Y


N

P


T

I


N


E

MENU

MENU

VOL / ADJ


VOL/ADJ


Selection

ENTER

EXIT

ENTER

EXIT /


P.MODE


CT-90106

VOL / ADJ

EXIT

EXIT

Press EXIT and return.

When you select other items, press EXIT repeatedly until GUIDE MENU appears.

When you want to quit, press EXIT repeatedly until GUIDE MENU disappears.

VOL/ADJ

Note

The item displayed on the menu with gray is not available.

End

Continued

Page 42
Image 42
Toshiba TLP551, 251, 250, TLP550 owner manual Operating the menu screen, Press Menu

251, TLP550, TLP551, 250 specifications

Toshiba has long been recognized for its innovation in the field of semiconductor technology, particularly in the area of optoelectronic devices. Among its extensive portfolio, the Toshiba TLP series stands out, especially models such as the TLP250, TLP551, TLP550, and TLP251. These optoisolators are designed to provide exceptional performance in various applications, including industrial controls, communication equipment, and power supplies.

The TLP250 is a high-speed transistor optoisolator that boasts a maximum data transmission rate of up to 10 Mbps. It is designed for applications where precise isolation between input and output is critical. The device employs a GaAlAs light-emitting diode, ensuring a fast response time and efficient operation. Its package includes a phototransistor, which enables it to switch high voltages and currents, making it ideal for driving loads in various circuits.

In contrast, the TLP551 offers a higher level of phototransistor isolation with a breakdown voltage of up to 5 kV. This model is well-suited for environments where electrical noise is a concern, as it provides reliable and stable isolation. With a maximum forward current of 50 mA, the TLP551 ensures that even in complex industrial settings, signal integrity can be maintained effectively.

The TLP550 is another noteworthy optoisolator, characterized by its compact size and robust performance. It also integrates a phototransistor output, which allows for a high degree of flexibility in design. This model is engineered to deliver a maximum isolation voltage of 3.75 kV, making it suitable for various high-voltage applications.

Finally, the TLP251 offers a unique combination of features tailored for demanding applications. With its high-speed response and excellent voltage gain, it is particularly advantageous in communication systems. Its ability to provide isolation while transferring data makes it an essential component for many digital interfaces.

In summary, the Toshiba TLP series, including models like the TLP250, TLP551, TLP550, and TLP251, exemplify the brand's commitment to quality and innovation in optoelectronic devices. These models are engineered to meet the rigorous demands of modern applications, offering features such as high-speed operation, significant isolation voltage ratings, and versatile output options. For engineers and designers, choosing the right Toshiba optoisolator can significantly enhance the reliability and efficiency of their electronic systems.