Digital Still Camera PDR-M70
PDR-M70
For customers in the U.S.A
FCC Statement
For customers in Canada
Conventions Used In This Manual
Before Reading This Manual
Trademark Information
Indicates another page to refer to for extra information
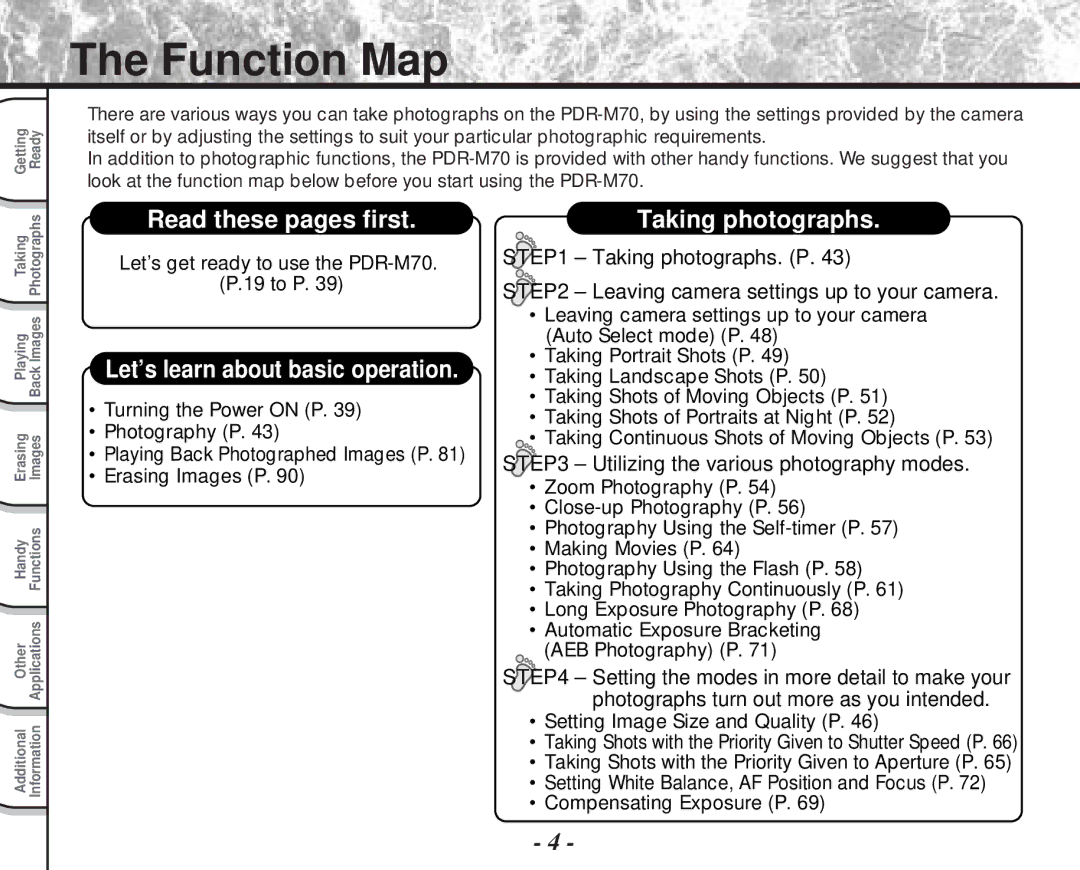
Function Map
Taking photographs
Function Map
Playing back your photographed images
Contents
Contents
Safety Precautions
Indication definitions Graphic symbol definitions
Safety Precautions
Use the battery only for its originally intended purpose
Do not use the camera in the bath or shower
Do not touch power or TV antenna cords during a thunderstorm
Before you move the camera, disconnect cords and cables
Do not look at the sun through the camera viewfinder
Using Your Camera Correctly
Avoid using or storing the camera in the following places
Do not expose the camera to sand
Using Your Camera Correctly
Carrying Out Maintenance on Your Camera
About Battery Use
When Not Using the Battery For a Long Time
Charging the Battery
Using Your Camera Correctly
Accessories
Names of Parts
Getting Ready
Names of Parts
Mode dial
Status display
Shoulder strap attachment Shoulder strap attachment fitting
Attaching the Shoulder Strap
Pass the leading end through the fastener and pull
Tight
Preparing the Battery
Loading the Battery
Remove the battery cover from the battery
Close the battery cover 1 , and slide the battery cover
Preparing the Battery
Removing the Battery
Make sure that the battery cover is firmly closed
Charging the Battery
Set the Power switch to OFF
Turning the Power OFF
Battery Wear
Blinks twice Either charge, or replace with a new battery
Using the Power Outlet
About SmartMedia
About SmartMedia
Open the SmartMedia cover
Removing SmartMedia
About SmartMedia
Write Protection
LCD Monitor Display during photography
LCD Monitor Display during photography
Mode
Mode
Turning the Power OFF
Turning the Power ON/OFF
Turning the Power on
Set the Power switch to on
How to Hold Your Camera
Fingers
Against the sides of your chest
How to Press the Shutter Button
Press the shutter button down half way
Press the shutter button down fully
How to Press the Shutter Button
Memo
Photography Auto Photography
Set the mode dial to Turn the LCD monitor OFF.
Turning the Power on
Get ready to take the photograph
Using the LCD Monitor
Photography Auto Photography
Press the shutter button down half way 1 , and press
Set the mode dial to
Look at the image on the LCD monitor to compose Picture
It down fully
Setting the Image Size and Quality
Quality Fine Jpeg compression Normal 1/7.5 Jpeg compression
Setting the Image Size and Quality
For details on how to take photographs Photograph
Take the photograph
Taking Photographs in Mode Auto Select mode
Auto
Taking Photographs in the Mode
LCD monitor is displayed in green
Taking Photographs in the Mode
Taking Photographs in the Mode
Taking Photographs in the Mode
Taking Photographs
Shutter is opened and closed 36 times
Zoom Photography
Zoom Photography
Digital Zoom Photography
Close-up Photography Macro Photography
Set the mode dial to , , or Press the macro/info button
Using the LCD Monitor
Look at the image on the LCD monitor to compose the picture
Photography Using the Self-timer Self-timer Photography
Compose the picture
Photography Using the Flash
Set the mode dial to , or
Mode, flash photography can be selected when is selected
Photography Using the Flash
Memo
Taking Photographs Continuously
Press the Mode button, and select burst
Follows Mode
Photography
Taking Photographs Continuously
Press or to verify the image
Use or to select the recording method
Use to select and press Enter
Making Movies
Make a movie of moving images. Audio can also be recorded
Photography in the Aperture-priority Mode
Set the mode dial to Press or to adjust the aperture value
Are also possible
Set the mode dial to Press or to adjust the shutter speed
Speed
Or , and manual
Photography in the Shutter speed-priority Mode
Long Exposure Photography Bulb Photography
Is displayed on the LCD monitor
Press or to adjust the exposure
Mode, exposure compensation is possible at the setting
Exposure Compensation
Exposure Compensation
Effective Subjects and Set Values
Set the mode dial to either
Press the Mode button, and select AEB photography
Manual setting items are displayed
Other Manual Settings
Set the mode dial to or
Press Enter
Other Manual Settings
Press or to select the setting item
Press , press or to select options and press
AF/AE area Area
Center default Down Left Right
White Balance W.B
Photography in incandescent light
Focus Focus
Strobe Flash
Press
Set the mode dial to one of , , or Press the Menu button
Use To select the desired item
To quit the Recording MENU, press the Menu button
Vivid color
Changing the Preset Conditions Recording Menu
Set the color of the image to be photographed
Black and white
Sharpness
Contrast
Digital Zoom
LCD
Press or to move forward and reverse
Play back photographed still images one image at a time
Playing Back Movies
Press , , or to select the movie to play back
Playing Back Movies
To play back another movie, press Enter
Last image frame appears on the LCD monitor
Nine images are displayed simultaneously
Use , , or to select the area to enlarge
Adjust the zoom ratio by the Zoom switch
Use or to select the frame you want to enlarge
To return to the regular display, press Enter
To quit the slideshow, press Enter
Auto Playback Slideshow
Use or to select Slide Show and press
Playback Menu is displayed
Press the Zoom switch towards T to begin playback
Playback of Multi Image Pictures
Automatic playback begins
Standard
Image only
Histogram
About Folders
Erasing Images Erase Frame
Set the mode dial to , , , or
When is selected, use or to select the image to be erased
Press the erase button
Erasing Images Erase Frame
Erasing Folders All Images in a Folder/All Still Images
Hold down the erase button for two seconds
Erasing Folders All Images in a Folder/All Still Images
Use or to select or and press
To cancel resetting of image numbers, select Cancel
Set the mode dial to , , , , or
To cancel formatting, select
Formatting the SmartMedia
Images taken in the multi photography mode
Reducing the Image Size Resize
Movies
Use or to select the image and press Enter
Reducing the Image Size Resize
Use or to select Resize and press
Use or to select EXECUTE, and press Enter
Compressing Images Quality
Images taken with another camera Protected images Movies
Compressing Images Quality
Use or to select QUALITY, and press
Copying Images
Copy menu is displayed
Use or to select the desired image, and press
Copying Images
100
Load the SmartMedia for copying the image to
101
Use or to select OK, and press Enter
Copy Images
102
Image No. for copying
Set the mode dial to Press the Menu button
Print Information
103
Press or to select Select or ALL, and press
Print Information
104
Set the number of prints and date
Press or to select EXECUTE, and press Enter
To end setting, press or to select END, and press Enter
105
Select the desired operation
106
This feature prevents images from being erased
Protecting Images
Protecting an Image
Use or to select Protect and press
Protecting Images
108
Protect menu is displayed
109
Carry out in Protecting An Image
Recording/Playing Back Audio
Recording Audio
110
111
Recording/Playing Back Audio
Playing Back Audio
Press or to select the file
Press or to select Press Enter
Erasing Files
112
Press or to select , and press Enter
113
Basic Photographic Settings SET-UP mode
Setup Menu appears
Use or to select the item you want to set
To quit the Setup MENU, change the mode dial setting
Basic Photographic Settings SET-UP mode
Auto Power OFF
114
115
Select OK and press Enter
Frame Number
OSD Language
Video OUT
116
117
About Still Image Numbers and Folder Numbers
About Image Numbers and Folders
Reset
118
119
Adjusting the LCD Monitor Brightness
Use To adjust the brightness
Use To select LCD Press
Viewfinder LED Meaning Color State
About the Color of the Viewfinder LED
120
Half down
Taking and Playing Back Photographs on a TV
121
Taking and Playing Back Photographs on a TV
122
Take photographs or play them back
Using SmartMedia on a PC
Transferring Images to a PC
123
Separately Sold Accessories
124
Connecting to Other Devices
125
Power on the camera again
Demo Mode
Follow steps 1 to 3 in the above procedure again
126
Specifications
127
Specifications
128
129
DC 5
Adapter provided PDR-AC10, PDR-AC10E or PDR-AC10U
130
131
132
133
Troubleshooting
134
Troubleshooting
135
136
Glossary
137
Glossary
138
Contact Numbers
Numéros à appeler
Toshiba Digital Still Camera