Lamp replacement
A lamp is consumable supplies. If used for extended periods, images will appear dark, and the lamp could burn out. This is characteristic of a lamp, and is not malfunction. (The lifetime of the lamp depends on condition of use.) If this happens, replace it with a new one.
![]() WARNING
WARNING
•If the projector is mounted on the ceiling, it is recommended to use your Toshiba dealer- ship when the lamp has to be exchanged.
Uncovering the lamp while the projector is mounted on a ceiling may lead to a danger of damage from falling pieces of glass if the lamp is broken. Besides, working at high elevations can also be hazardous. Do not attempt to replace the lamp by yourself.
•When replacement is required, be sure to use TLPLW11 (sold separately).
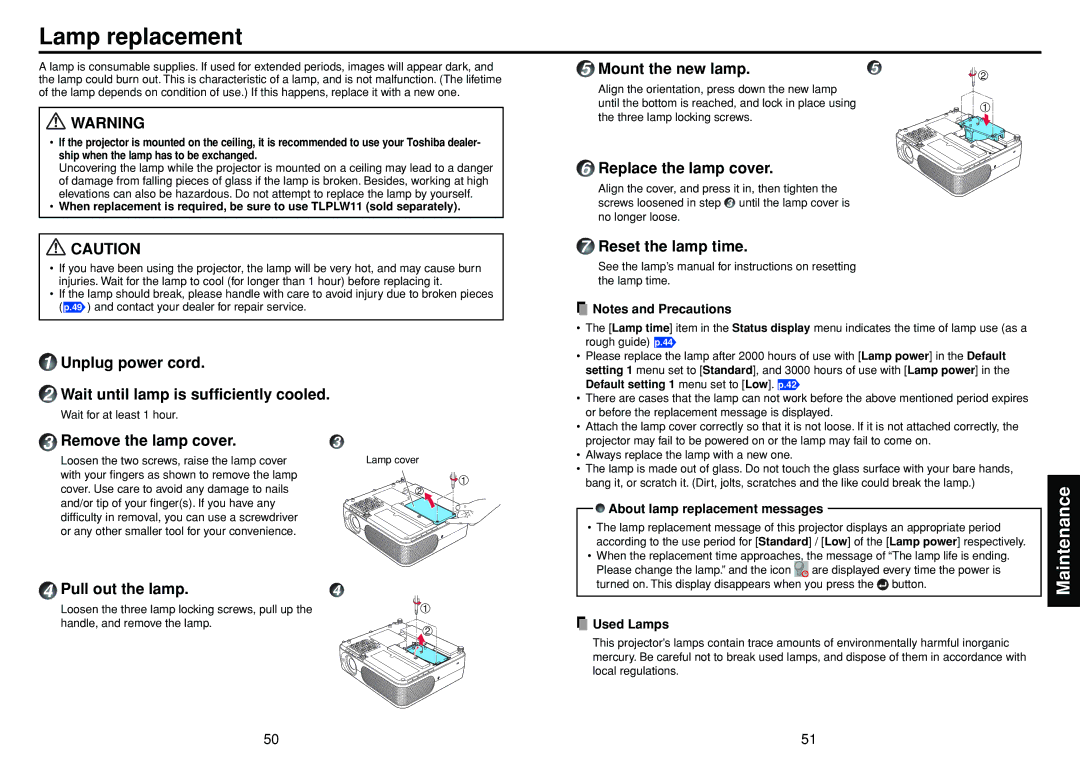
5 Mount the new lamp. | 5 |
Align the orientation, press down the new lamp until the bottom is reached, and lock in place using the three lamp locking screws.
6Replace the lamp cover.
Align the cover, and press it in, then tighten the screws loosened in step 3 until the lamp cover is no longer loose.
![]() 2
2
1
![]() CAUTION
CAUTION
•If you have been using the projector, the lamp will be very hot, and may cause burn injuries. Wait for the lamp to cool (for longer than 1 hour) before replacing it.
•If the lamp should break, please handle with care to avoid injury due to broken pieces ( p.49 ) and contact your dealer for repair service.
1Unplug power cord.
2Wait until lamp is sufficiently cooled.
Wait for at least 1 hour.
7Reset the lamp time.
See the lamp’s manual for instructions on resetting the lamp time.
![]() Notes and Precautions
Notes and Precautions
• The [Lamp time] item in the Status display menu indicates the time of lamp use (as a |
rough guide) p.44 |
• Please replace the lamp after 2000 hours of use with [Lamp power] in the Default |
setting 1 menu set to [Standard], and 3000 hours of use with [Lamp power] in the |
Default setting 1 menu set to [Low]. p.42 |
• There are cases that the lamp can not work before the above mentioned period expires |
or before the replacement message is displayed. |
• Attach the lamp cover correctly so that it is not loose. If it is not attached correctly, the |
3Remove the lamp cover.
Loosen the two screws, raise the lamp cover with your fingers as shown to remove the lamp cover. Use care to avoid any damage to nails and/or tip of your finger(s). If you have any difficulty in removal, you can use a screwdriver or any other smaller tool for your convenience.
4Pull out the lamp.
Loosen the three lamp locking screws, pull up the handle, and remove the lamp.
3
Lamp cover
![]() 1
1
2
4
1
2
projector may fail to be powered on or the lamp may fail to come on. |
• Always replace the lamp with a new one. |
• The lamp is made out of glass. Do not touch the glass surface with your bare hands, |
bang it, or scratch it. (Dirt, jolts, scratches and the like could break the lamp.) |

 About lamp replacement messages
•The lamp replacement message of this projector displays an appropriate period according to the use period for [Standard] / [Low] of the [Lamp power] respectively.
•When the replacement time approaches, the message of “The lamp life is ending. Please change the lamp.” and the icon ![]() are displayed every time the power is turned on. This display disappears when you press the
are displayed every time the power is turned on. This display disappears when you press the ![]() button.
button.
 Used Lamps
This projector’s lamps contain trace amounts of environmentally harmful inorganic mercury. Be careful not to break used lamps, and dispose of them in accordance with local regulations.
Maintenance
50 | 51 |
