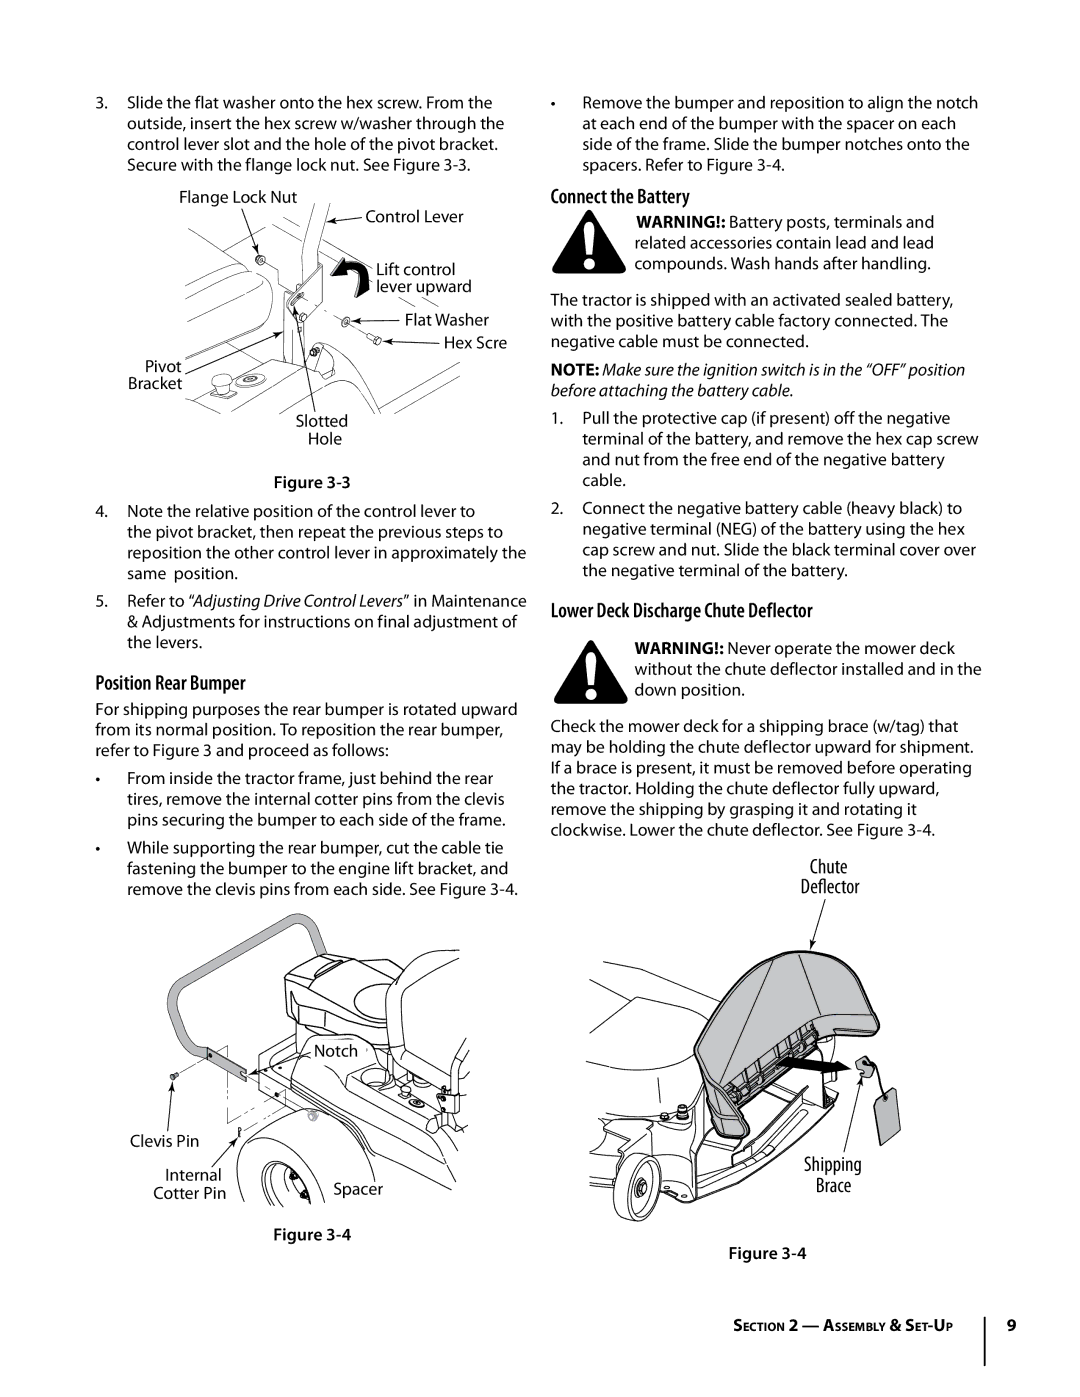
3.Slide the flat washer onto the hex screw. From the outside, insert the hex screw w/washer through the control lever slot and the hole of the pivot bracket. Secure with the flange lock nut. See Figure 3-3.

Flange Lock Nut

Control Lever

Lift control

lever upward

Flat Washer

Hex Scre

Pivot

Bracket

Slotted

Hole

Figure 3-3

4.Note the relative position of the control lever to the pivot bracket, then repeat the previous steps to reposition the other control lever in approximately the same position.

5.Refer to “Adjusting Drive Control Levers” in Maintenance & Adjustments for instructions on final adjustment of the levers.

Position Rear Bumper

For shipping purposes the rear bumper is rotated upward from its normal position. To reposition the rear bumper, refer to Figure 3 and proceed as follows:

From inside the tractor frame, just behind the rear tires, remove the internal cotter pins from the clevis pins securing the bumper to each side of the frame.

While supporting the rear bumper, cut the cable tie fastening the bumper to the engine lift bracket, and remove the clevis pins from each side. See Figure 3-4.

Remove the bumper and reposition to align the notch at each end of the bumper with the spacer on each side of the frame. Slide the bumper notches onto the spacers. Refer to Figure 3-4.

Connect the Battery

warning!: Battery posts, terminals and related accessories contain lead and lead compounds. Wash hands after handling.

The tractor is shipped with an activated sealed battery, with the positive battery cable factory connected. The negative cable must be connected.

Note: Make sure the ignition switch is in the “OFF” position before attaching the battery cable.

1.Pull the protective cap (if present) off the negative terminal of the battery, and remove the hex cap screw and nut from the free end of the negative battery cable.

2.Connect the negative battery cable (heavy black) to negative terminal (NEG) of the battery using the hex cap screw and nut. Slide the black terminal cover over the negative terminal of the battery.

Lower Deck Discharge Chute Deflector

WARNING!: Never operate the mower deck without the chute deflector installed and in the down position.

Check the mower deck for a shipping brace (w/tag) that may be holding the chute deflector upward for shipment. If a brace is present, it must be removed before operating the tractor. Holding the chute deflector fully upward, remove the shipping by grasping it and rotating it clockwise. Lower the chute deflector. See Figure 3-4.

Chute

Deflector

Clevis Pin

Internal

Cotter Pin

Notch

Shipping


Brace

Spacer


Figure 3-4

Figure 3-4

Section 2 — Assembly & Set-Up

Page 9
Image 9
Troy-Bilt RZT manual Position Rear Bumper, Connect the Battery, Lower Deck Discharge Chute Deflector

RZT specifications

The Troy-Bilt RZT is a formidable lawn mower that brings a blend of efficiency, performance, and user-friendly features to the forefront of lawn care. Designed for homeowners who demand both power and precision, the RZT series offers a riding mower experience unlike any other.

One of the standout features of the Troy-Bilt RZT is its innovative Zero Turn Technology, which enables exceptional maneuverability. This technology allows users to make sharp turns and navigate around obstacles with ease, ensuring precise mowing in tight spaces. The dual lever steering system enhances control, allowing for quick direction changes and saving time on larger properties.

The engine options available with the RZT series range from powerful V-twin engines to reliable OHV engines, providing homeowners with choices that cater to their specific mowing requirements. These engines ensure robust performance, delivering the horsepower needed to tackle even the toughest grass and terrain.

The RZT models come equipped with reinforced deck materials that result in superior durability. The cutting deck typically ranges from 42 to 54 inches, allowing users to cover more ground in less time while achieving a clean, professional cut. Additionally, the adjustable cutting height feature provides versatility, enabling users to customize their mowing height based on grass type and conditions.

Troy-Bilt enhances user convenience with features such as an ergonomic seat design, ensuring maximum comfort during extended mowing sessions. The easy-to-access controls and dashboard simplify operation, making it suitable for both novice and experienced users alike.

Maintenance is made straightforward with Troy-Bilt’s integrated maintenance reminders and easy-to-reach grease points for routine upkeep. The mower's mulch kit option allows for grass clippings to be finely chopped and returned to the lawn, promoting a healthier turf while saving time on clean-up.

Overall, the Troy-Bilt RZT combines powerful performance, advanced technology, and practical user-focused features to create a reliable riding mower. Whether managing a suburban lawn or a larger property, the RZT series proves to be a top contender for those seeking to maintain their outdoor space efficiently and effectively.