® VMH26NR

COMPACT CLASSIC HEARTH FIREPLACE

INSTALLATION

Continued

OPTIONAL WIRELESS HAND- HELD REMOTE CONTROL ACCESSORIES

(GHRC Series & GHRCT Series)

Installing Receiver

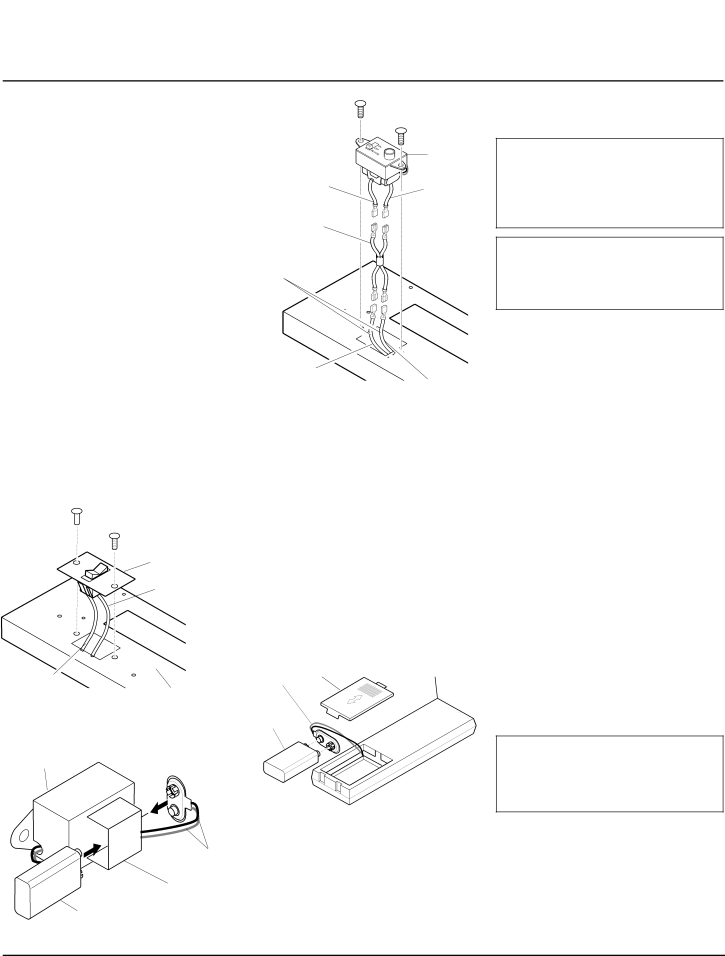
1.Remove screws.

2.Disconnect switch wires from the con- trol valve.

3.Remove switch plate (see Figure 27). Discard switch plate after removing. Save the screws.

4.Locate the battery clip mounted on the back of the receiver (see Figure 28).

5.Slide 9-volt battery (not included) through the clip.

6.Attach the terminal wires to the battery (see Figure 28).

7.Connect wires as shown in Figure 29.

8.Install remote receiver unit onto gas heater base using the two screws re- moved in step one (see Figure 29).

Screw

Switch Plate

Red Wire

Remote

Receiver

Black Wire

Red Wire

Wire Harness*

Wires from

Valve

Black Wire

Red Wire

Figure 29 - Installing Remote Receiver

*Wire harness provided in the fireplace hardware pack.

Installing 9-Volt Battery in Hand- Held Remote Control Unit

1.Remove battery cover on back of re- mote control unit.

2.Attach terminal wires to the battery (not included). Place battery into the battery housing.

3.Replace battery cover onto remote con- trol unit.

OPTIONAL WALL MOUNTED THERMOSTAT - GWMT1

WARNING: Read and follow installation instructions. Instal- lation should be done by a quali- fied installer familiar with low- voltage wiring procedures.

WARNING: Do not connect this thermostat to any electrical source! Electrical shock and/or fire hazard will occur.

1. Connect one terminal of 25 ft. wire to

bottom contact of switch (see Figure 31,

page 17).

2. Connect remaining wire terminal to the

“TH” terminal on the control valve.

Make sure that wire terminals are in the

positions on your unit as pictured in

Figure 31 on page 17. If wires are not

“crossed” the thermostat will not work.

3. Route the 25 ft. wire to a convenient

location to mount your thermostat (no

outside wall). IMPORTANT: The wire

may be shortened but must not be

lengthened.

The thermostat should be mounted 54"

above the floor in a location where there

is good air circulation.Avoid heat sources

such as lamps, direct sunlight, fireplace,

or heat and air conditioning ducts.

4. Gently remove the cover of the ther-

mostat from the base. Grasp the sides

Battery

Remote

of the cover firmly and pull to separate

Black Wire

Heater Base

Figure 27 - Switch Plate and Wiring Harness

Receiver

Terminal

Wires

Battery Clip

9-Volt Battery

Figure 28 - Attaching Battery to Receiver

Terminal CoverControl Unit Wires

9-Volt Battery

Battery

Housing

Figure 30 - Installing Battery in Hand- Held Remote Control Unit

from the base.

5. Feed the electrical wires through the

rectangular slots on each side of the

base (see Figure 32, page 17).

WARNING: Do not connect the thermostat to a power source. Electrical shock and/or a fire haz- ard will occur.

16

104325

Page 16
Image 16
Vanguard Heating VMH26NR Optional Wireless HAND- Held Remote Control Accessories, Optional Wall Mounted Thermostat GWMT1

VMH26NR specifications

The Vanguard Heating VMH26NR is an innovative heating solution designed to provide efficient warmth while prioritizing energy savings and user comfort. With its sleek design and advanced technologies, the VMH26NR stands out in the crowded market of heating appliances.

One of the main features of the VMH26NR is its powerful heating capability. Equipped with a robust heating element, it can produce a significant amount of warmth quickly, making it ideal for medium to large spaces. Whether you are heating a living room, office, or workshop, the VMH26NR ensures that you stay comfortable during the colder months.

Efficiency is another hallmark of this model. The VMH26NR employs cutting-edge energy-saving technologies that optimize power consumption. This not only reduces energy bills but also lessens the environmental impact associated with conventional heating methods. Users can enjoy a warm atmosphere while being conscious of their carbon footprint.

The VMH26NR also features a user-friendly digital thermostat, which allows for precise temperature control. Users can easily adjust the settings to their comfort level, ensuring that the space remains at an ideal temperature without unnecessary energy expenditure. The digital display provides clear readings, making it easy to monitor performance and settings.

For added convenience, the unit comes with a programmable timer, allowing users to schedule the heating periods according to their routines. This feature is particularly beneficial for those who want the heater to operate only when needed, further enhancing energy efficiency and user convenience.

Safety is a top priority in the design of the VMH26NR. It is equipped with several safety features, including overheat protection and a tip-over switch, which automatically shuts off the unit in case of accidents. This ensures peace of mind, especially in households with pets or young children.

The Vanguard Heating VMH26NR also boasts a compact, portable design that makes it easy to move from room to room. Its lightweight construction and built-in handles provide added portability, allowing users to enjoy warmth wherever it is needed most.

In conclusion, the Vanguard Heating VMH26NR is a powerful, efficient, and user-friendly heating solution. Its advanced features, safety mechanisms, and adaptability make it an excellent choice for anyone looking to enhance their comfort during the chilly seasons. Whether you are a homeowner or a business owner, the VMH26NR promises to deliver reliable performance and satisfaction.