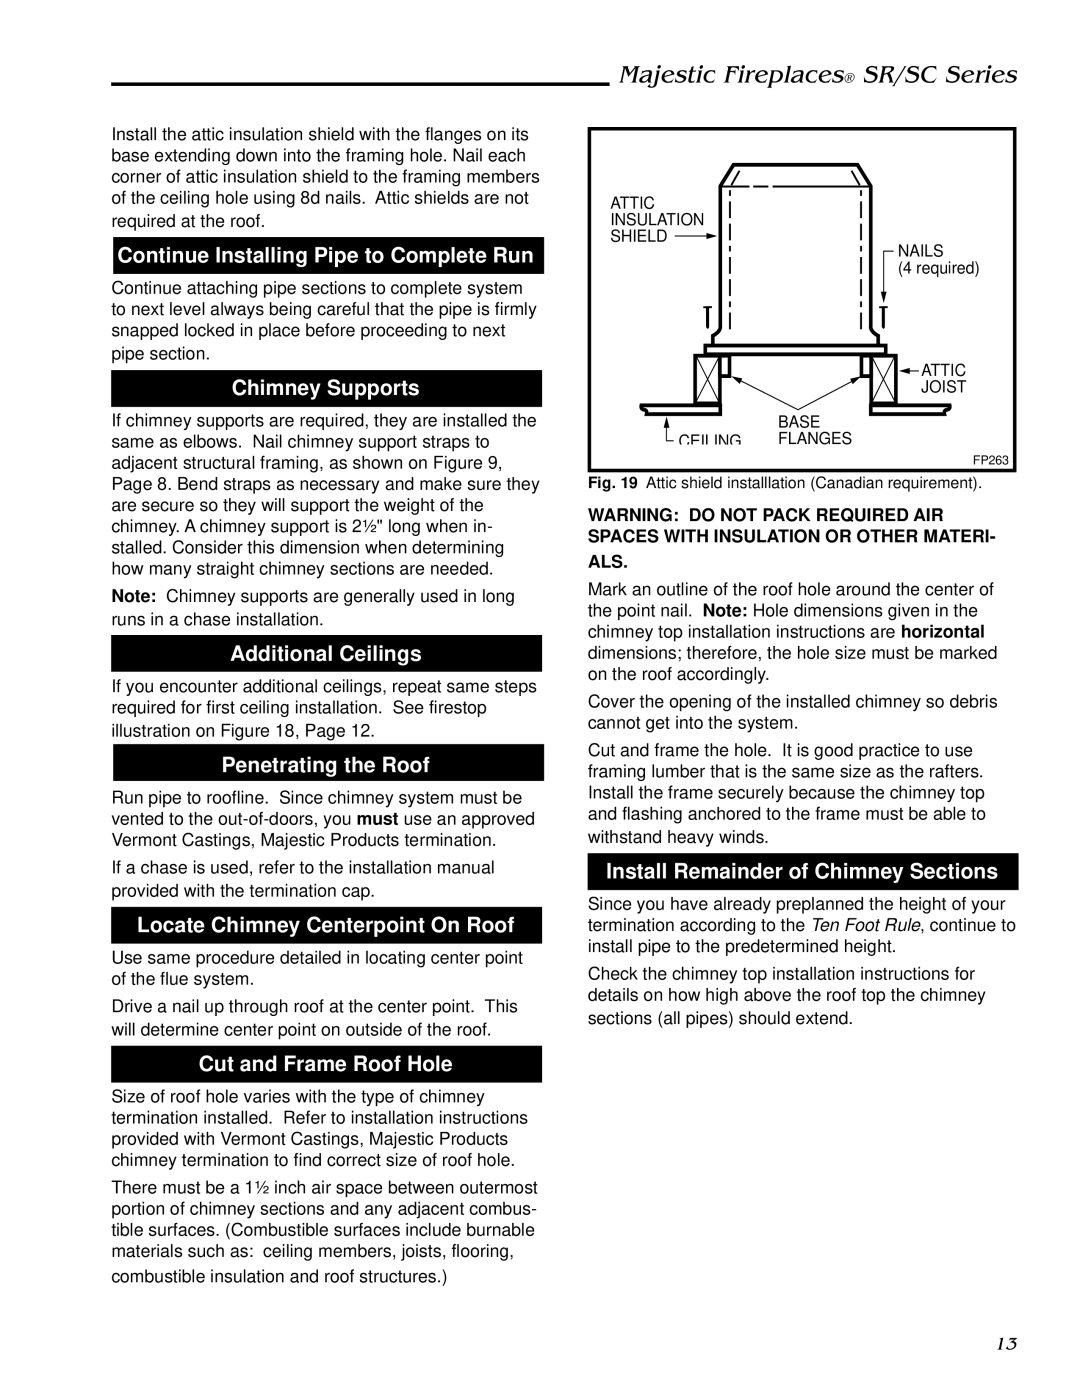
Install the attic insulation shield with the flanges on its base extending down into the framing hole. Nail each corner of attic insulation shield to the framing members of the ceiling hole using 8d nails. Attic shields are not required at the roof.

Continue Installing Pipe to Complete Run

Continue attaching pipe sections to complete system to next level always being careful that the pipe is firmly snapped locked in place before proceeding to next pipe section.

Chimney Supports

If chimney supports are required, they are installed the same as elbows. Nail chimney support straps to adjacent structural framing, as shown on Figure 9, Page 8. Bend straps as necessary and make sure they are secure so they will support the weight of the chimney. A chimney support is 2¹⁄₂" long when in- stalled. Consider this dimension when determining how many straight chimney sections are needed.

Note: Chimney supports are generally used in long runs in a chase installation.

Additional Ceilings

If you encounter additional ceilings, repeat same steps required for first ceiling installation. See firestop illustration on Figure 18, Page 12.

Penetrating the Roof

Run pipe to roofline. Since chimney system must be vented to the out-of-doors, you must use an approved Vermont Castings, Majestic Products termination.

If a chase is used, refer to the installation manual provided with the termination cap.

Locate Chimney Centerpoint On Roof

Use same procedure detailed in locating center point of the flue system.

Drive a nail up through roof at the center point. This will determine center point on outside of the roof.

Cut and Frame Roof Hole

Size of roof hole varies with the type of chimney termination installed. Refer to installation instructions provided with Vermont Castings, Majestic Products chimney termination to find correct size of roof hole.

There must be a 1¹⁄₂ inch air space between outermost portion of chimney sections and any adjacent combus- tible surfaces. (Combustible surfaces include burnable materials such as: ceiling members, joists, flooring, combustible insulation and roof structures.)

Majestic Fireplaces® SR/SC Series

ATTIC INSULATION

SHIELD

NAILS

(4 required)

ATTIC

JOIST

BASE

CEILING FLANGES

FP263

Fig. 19 Attic shield installlation (Canadian requirement).

WARNING: DO NOT PACK REQUIRED AIR SPACES WITH INSULATION OR OTHER MATERI-

ALS.

Mark an outline of the roof hole around the center of the point nail. Note: Hole dimensions given in the chimney top installation instructions are horizontal dimensions; therefore, the hole size must be marked on the roof accordingly.

Cover the opening of the installed chimney so debris cannot get into the system.

Cut and frame the hole. It is good practice to use framing lumber that is the same size as the rafters. Install the frame securely because the chimney top and flashing anchored to the frame must be able to withstand heavy winds.

Install Remainder of Chimney Sections

Since you have already preplanned the height of your termination according to the Ten Foot Rule, continue to install pipe to the predetermined height.

Check the chimney top installation instructions for details on how high above the roof top the chimney sections (all pipes) should extend.

13

Page 13
Image 13
Vermont Casting SR36, SR42, SC42, SC36 Continue Installing Pipe to Complete Run, Additional Ceilings, Penetrating the Roof

SR36, SR42, SC42, SC36 specifications

Vermont Castings is renowned for producing high-quality wood and gas fireplaces and stoves, with models like the SR36, SC42, SR42, and SC36 standing out for their efficiency, design, and innovative features. These gas inserts offer a perfect blend of performance and aesthetics, making them an ideal choice for any home looking to enhance its ambiance and heating capabilities.

The Vermont Castings SR36 and SR42 are both designed to deliver warmth and comfort while maintaining an elegant and traditional look. The SR36 model boasts a heating capacity of up to 30,000 BTUs, suitable for spaces up to 1,500 square feet, making it an excellent option for mid-sized rooms. The SR42, with a higher BTU output of up to 40,000, is perfect for larger areas, providing exceptional warmth and efficiency.

The SC36 and SC42 models cater to those wanting traditional style with state-of-the-art technology. The SC36 offers similar heating capabilities, ideal for cozy evenings, while the SC42 brings in a larger flame area for a more dramatic effect. Both models feature a large, clear glass front that provides an unobstructed view of the fire, enhancing the room's atmosphere.

One of the standout characteristics of these models is their inclusion of advanced combustion technology, which ensures maximum heat output while minimizing emissions. The EPA-certified design means that users can enjoy an environmentally friendly heating solution without sacrificing performance. Innovative features like the adjustable flame height and thermostat control allow users to customize their experience easily.

Additionally, the Vermont Castings inserts come equipped with a convenient remote control option, allowing homeowners to adjust settings from the comfort of their sofas. The cast iron construction is not only stylish but also ensures durability and excellent heat retention.

In summary, the Vermont Castings SR36, SC42, SR42, and SC36 models represent the ideal fusion of tradition and modern technology in heating solutions. With their high efficiency, beautiful designs, and user-friendly features, these gas inserts provide an unparalleled heating experience, making them a cherished addition to any home.