Product Controls
Meat Probe Functions
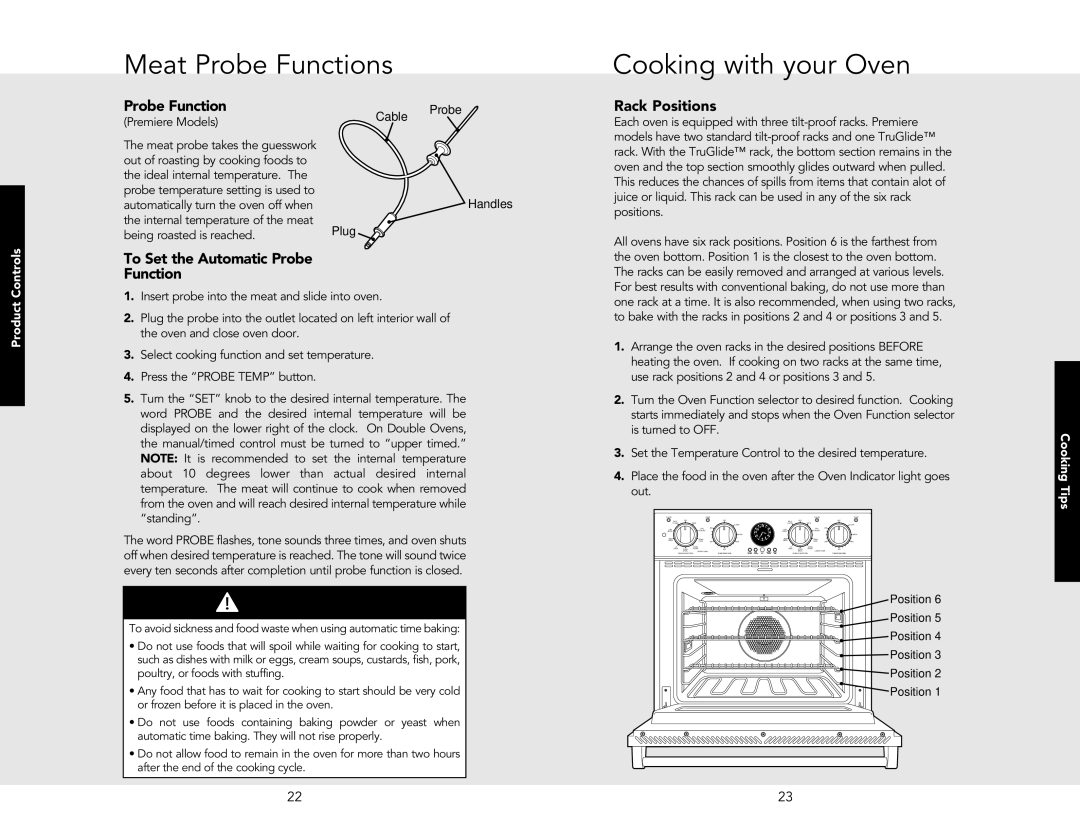
Probe Function | Cable | Probe |
(Premiere Models) |
| |
|
| |
The meat probe takes the gueswork |
|
|
out of roasting bycooking foodsto |
|
|
the ideal internal temperature. The |
|
|
probe temperature setting isused to |
| Handles |
automatically turn the oven off when |
| |
the internaltemperature of the meat | Plug |
|
being roasted si reached. |
| |
|
|
To Set the Automatic Probe
Function
1.Insert probe into the meat and slide into oven.
2.Plug the probe into the outlet located on left interior wall of the oven and close oven door.
3.Select cooking function and set temperature.
4.Press the “PROBE TEMP” button.
5.Turn the “SET”knob to the desired internal temperature. The
word PROB E and the desired internal t emperature wi ll b e displayed on the lower right of the clock. On Double Ovens, the manual/timed control must be turned to “upper timed.”
NOTE: It i s rec ommended to s et the | internal te mperature |
about 10 degrees lower than act | ual desired internal |
temperature. The meat will continue to cook when removed from the oven and will reach desired internal temperature while “standing”.
The word PROBE flashes, tone sounds three times, and oven shuts off when desired temperature is reachedThe. tone will sound twice every ten seconds after completion until robep function is closed.
![]() WARNING
WARNING
To avoid sickness and food waste when using automatic time baking:
•Do not use foods that will spoil while waiting for cooking to start, such as dishes with milk or eggs, cream soups, custards, fish, pork, poultry, or foods with stuffing.
•Any food that has to wait for cooking to start should be very cold or frozen before it is placed in the oven.
• Do n ot u se fo ods co ntaining ba king powder or yeast when automatic time baking. They will not rise properly.
•Do not allow food to remain in the oven for more than two hours after the end of the cooking cycle.
Cooking with your Oven
Rack Positions
Each oven is equipped with three
All ovens have six rack positions. Position 6 is the farthest from the oven bottom. Position 1 is the closest to the oven bottom. The racks can be easily removed and arranged at various levels. For best results with conventional baking, do not use more than one rack at a time. It is also recommended, when using two racks, to bake with the racks in positions 2 and 4 or positions 3 and 5.
1.Arrange the oven racks in the desired positions BEFORE heating the oven. If cooking on two racks at the same time, use rack positions 2 and 4 or positions 3 and 5.
2.Turn the Oven Function selector to desired function. Cooking starts immediately and stops when the Oven Function selector is turned to OFF.
3.Set the Temperature Control to the desired temperature.
4.Place the food in the oven after the Oven Indicator light goes out.
|
| CLEANCLESELFCLEAN | OOFFFF | BAKE | CLEANOVEN | OFF |
| OFF | OVEN | CLEAN |
|
|
|
|
| CLESELFAN |
| CLEAONFF | BAKEOFF | CLEAN |
| OVEN |
| OFF |
| CLEANUPPEROVENLIGHTOVEN | |||||||||
|
|
|
| SELF |
| BAKE | TRU | 200 | CLEAN |
|
|
|
|
|
|
|
|
|
| SELF |
| TRUBAKE | 200 |
|
| CLEAN |
|
| |||||||
| OV | N | LOW |
|
|
|
|
|
|
|
|
|
| LOW |
|
| CLEAN |
|
|
|
|
| |||||||||||||
|
|
|
|
|
| CONVEC |
|
|
|
|
|
|
|
|
|
|
|
|
| CONV. |
| CONVEC | CONV. | 200 |
|
|
|
|
|
| |||||
PPLIERGHTIMEDBROILCONV. |
|
|
| CONV. |
|
|
|
|
| BROIL |
|
|
|
|
| BROIL |
|
|
| CONV. |
|
|
|
| LOWERBROIL | OVENLIGHT | |||||||||
MANUA |
|
| MEDBROIL |
|
|
| BAKECONV. |
|
|
|
|
|
|
|
|
|
| SETMED |
|
| BROIL |
| BAKE | 300 |
|
|
|
| |||||||
LOWERTIMEDBROIL | MAXI |
|
| TRU | BAKE | 300 |
|
|
| 500 |
|
|
|
|
| BROIL |
|
| MAXI |
| BAKETRU |
|
|
|
|
|
| 500 |
| ||||||
|
|
|
| BROIL | BROILMINI | CONVECUPPEROVEN. | BROIL |
|
| CLOCK/ | BAKE |
| MIN/SEC | START |
| HI |
| BROIL | CONV.BROILMINI | CONVEC300 | 400 | 500BROIL |
|
| |||||||||||
|
|
|
| HI |
|
|
|
|
|
| SET |
|
|
|
| LOWEROVEN |
|
|
| ||||||||||||||||
|
|
|
| BROIL | OVENBROILNCTION | UPPEROVENTEMPERATURE | 400 |
|
| PROBE | HOURS | TIMER | TIME |
| BROIL | BROILOVENFUNCTINLWEROVENO |
|
| 400 |
|
|
|
| ||||||||||||
|
|
|
|
| CONV. | ROAST |
|
|
|
|
|
|
|
| CONV. | ROAST |
|
|
|
|
|
|
|
|
| ||||||||||
|
|
|
|
| OVENFUNCTION |
|
|
|
| TEMPERATURE |
|
|
|
|
|
|
|
| OVENFUNCTION |
|
|
|
|
| TEMPPERATURE |
|
|
| |||||||
Position 6
Position 5
![]()
![]()
![]()
![]()
![]()
![]()
![]()
![]()
![]()
![]()
![]()
![]()
![]()
![]()
![]()
![]()
![]()
![]()
![]() Position 4
Position 4
![]() Position 3
Position 3
![]() Position 2
Position 2
Position 1 |
Cooking Tips
22 | 23 |