PERFORMANCE CHECKLIST
A qualified installer should carry out the following checks:
1.All internal packaging removed.
2.Specified clearances maintained to combustible materials.
3.Pressure regulator connected and set.
4.Manual
5.Check air shutter adjustment - sharp blue flame, no yellow tipping.
6.Check for gas leaks (odors) at all gas connections.
7.Each burner lights satisfactory, individually or with adjacent burners lit.
Any adjustments necessary that are the result of the installer not following instructions will be responsibility of the installer, dealer or the end user of the product.
FINAL PREPARATION
1.Some stainless steel parts may have a plastic protective wrap which must be peeled off. The interior should be washed thoroughly with hot, soapy water to remove film residues and any dust or debris before being used, then rinsed and wiped dry. Solutions stronger than soap and water are rarely needed.
2.All stainless steel body parts should be wiped with hot, soapy water and with a liquid cleaner designed for this material. If buildup occurs, do not use steel wool, abrasive cloths, cleansers, or powders! If it is necessary to scrape stainless steel to remove encrusted materials, soak with hot, wet cloths to loosen the material, then use a wool or nylon scraper. Do not use a metal knife, spatula, or any other material tool to scrape stainless steel! Scratches are almost impossible to remove.
LIGHTING SIDE BURNERS
First, remove the burner cover or any cooking utensil from the burner grate.
![]() CAUTION
CAUTION
The side burner cover may be hot if the grill burners are in operation.
Push and turn the control knob until the “HIGH” position aligns with the indicator line on the control panel.
Immediately press the electronic ignition button corresponding to the burner(s) being lit until the burner is lit or until 4 seconds pass. If the burner does not light after several attempts, wait five minutes to allow any accumulated gas to dissipate. If the burner will not light after several attempts, then the burner can be lit by holding a lit match next to the burner ports. Push and turn the control knob until the “HIGH” position on the knob aligns with the indicator line on the control panel.
BEFORE LIGHTING SIDE BURNERS
Prior to turning on the gas, inspect the gas supply tubing or hose. Look for evidence of abrasion, cuts, wear and tear, or other damage which could require replacement prior to use. Make sure all burner control knobs are off. Do not attempt to light the burners if the smell of gas is present.
Check the connection with a soap and water solution after attaching the hose. Make sure there is gas in the tank and the tank is upright.
![]() CAUTION
CAUTION
Wait at least five minutes before relighting a hot grill to allow any accumulated gas to dissipate. Keep a spray bottle of soapy water near the gas supply valve and check the connections for gas leaks before each use.
12
Cleaning and Maintenance
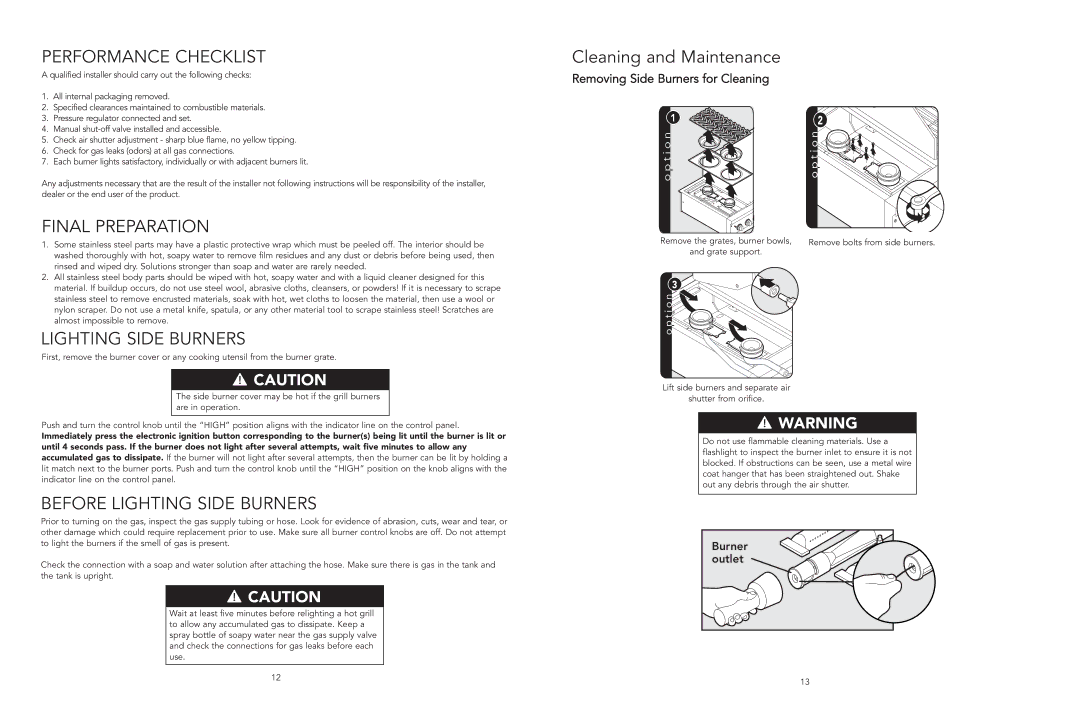
Removing Side Burners for Cleaning
1 | 2 |
Remove the grates, burner bowls, | Remove bolts from side burners. |
and grate support. |
|
3
Lift side burners and separate air
shutter from orifice.
![]() WARNING
WARNING
Do not use flammable cleaning materials. Use a flashlight to inspect the burner inlet to ensure it is not blocked. If obstructions can be seen, use a metal wire coat hanger that has been straightened out. Shake out any debris through the air shutter.
Burner |
outlet |
13