Diagnóstico de Averías
Operating Instructions
Problema | Posible(s) Causa(s) | Acción a Tomar | ||
La bomba no se | 1. El nivel de agua es muy bajo | 1. El interruptor no encenderá la bomba a menos que la | ||
enciende o funciona |
|
| bomba esté totalmente sumergida en agua | |
| 2. El fusible está quemado o el | 2. Si el fusible está quemado reemplácelo con uno adecuado o | ||
| cortacircuito se activó |
| reconecte el cortacircuito | |
| 3. El voltaje es muy bajo | 3. Si el voltaje es inferior al mínimo recomendado, chequée el | ||
|
|
| alambrado del circuito principal de la propiedad. Si es | |
|
|
| adecuado, comuníquese con la compañía de electricidad. | |
| 4. El motor está dañado | 4. Envie el motor al centro de servicio autorizado más cercano | ||
|
|
| a su domicilio o reemplácelo | |
| 5. El flotante está dañado | 5. Reemplace el interruptor flotante | ||
| 6. El impulsor (la bomba está | 6. Si la propela no gira, destápela y límpiela | ||
| obstruída con basura) | 7. Coloque el interruptor de modo que se mueva sin | ||
| 7. El interruptor está obstruído |
| problemas. Reubique la bomba si es necesario | |
|
| 8. Cerciórese de que el nivel de líquido esté por lo menos a 33 | ||
| 8. Nivel de líquido insuficiente |
| cm (13”) del fondo de la pileta | |
|
|
| ||
La bomba se | 1. El agua se regresa de las tuberías | 1. Instale una válvula de chequeo | ||
enciende y se apaga | 2. El interruptor/flotante está dañado | 2. Reemplace el interruptor flotante | ||
constantemente | 3. No instaló una válvula de chequeo o | 3. Desconecte la válvula de chequeo y revísela a ver si está | ||
| la válvula de chequeo tiene una |
| bien instalada y funcionando adecuadamente | |
| fuga | 4. Haga los cálculos una vez más para cerciorarse de que esté | ||
| 4. La distancia de la descarga es | |||
| inferior al mínimo recomendado |
| usando una bomba adecuada | |
| por el fabricante |
|
|
|
|
|
| ||
La bomba se apaga y | 1. La temperatura del agua es excesiva | 1. La bomba no se debe usar para bombear agua a más de | ||
se enciende |
|
| 44°C (120° F). | |
independientemente | 2. El interruptor está dañado u | 2. Reemplace o reubique la bomba | ||
del interruptor (el | obstruído y por lo tanto la bomba |
|
|
|
sistema de protección | funciona al seco |
| ! PRECAUCION | La bomba puede comenzar a |
térmica se activa) |
|
| funcionar sin previo aviso. | |
|
|
| ||
| 3. El voltaje es muy bajo | Desconéctela del tomacorrientes antes de darle servicio | ||
| 3. Si el voltaje es inferior al mínimo recomendado, chequée el | |||
|
|
| alambrado del circuito principal de la propiedad. Si es | |
|
|
| adecuado, comuníquese con la compañía de electricidad | |
|
|
| ||
La bomba hace | 1. Los cojinetes están desgastados | 1. Cambie la bomba | ||
mucho ruido o vibra | 2. El impulsor está obstruído con | 2. Destape la unidad, limpie el impulsor y/o reemplácelo si está | ||
excesivamente | basura o está rota |
| roto | |
| 3. Las tuberías que conectan la bomba | 3. Reemplace una porción de la tubería de descarga con un | ||
| al edificio son muy rígidas o están |
| conector flexible | |
| muy flojas |
|
|
|
|
|
| ||
La bomba no deja | 1. El interruptor flotante está dañado | 1. Reemplace el interruptor flotante | ||
de funcionar | 2. El intyerruptor flotante no se puede | 2. Reubique la bomba o limpie la pileta según sea necesario | ||
| mover libremente |
| para que el flotante se mueva sin problemas | |
| 3. Las tuberiás de descarga están | 3. Desconecte la bomba y limpie la bomba y las tuberías | ||
| obstruídas |
|
|
|
| 4. Entrada excesiva de agua o la | 4. Haga los cálculos una vez más para cerciorarse de que esté | ||
| bomba no es la adecuada para la |
| usando una bomba adecuada | |
| aplicación en que se está usando |
|
|
|
|
|
| ||
La bomba funciona | 1. El voltaje es muy bajo | 1. Si el voltaje es inferior al mínimo recomendado, chequée el | ||
pero bombea muy | 2. El impulsor o la tubería de descarga |
| alambrado del circuito principal de la propiedad. Si es | |
poca agua o no |
| adecuado, comuníquese con la compañía de electricidad. | ||
bombea agua | están obstruídos con basura | 2. Desconecte el impulsor, límpielo y cerciórese de que esté | ||
| 3. La bomba tiene alguna pieza |
| bien instalado | |
| dañada o el impulsor está obstruído | 3. Reemplace las piezas dañadas o toda la bomba. Si es | ||
| 4. La bomba no es la adecuada para la |
| necesario limpie las piezas que estén sucias | |
| aplicación en que se está usando | 4. Haga los cálculos una vez más para cerciorarse de que esté | ||
| 5. La válvula de chequeo está atascada |
| usando una bomba adecuada | |
| o instalada incorrectamente | 5. Desconecte la válvula de chequeo y revísela a ver si está | ||
| 6. La válvula de cierre está cerrada |
| bien instalada y funcionando adecuadamente | |
|
| 6. Abra la válvula | ||
General Safety Information (Continued)
! DANGER
Do not walk on wet area until all power has been turned off. If the
electric company to
Installation
NOTICE | In any installation | |
where property | ||
|
damage and/or personal injury might result from an inoperative or leaking
pump due to power outages, discharge line blockage or any other reason, use a backup system(s).
1.Thread the discharge pipe or pipe nipple into the discharge connection.
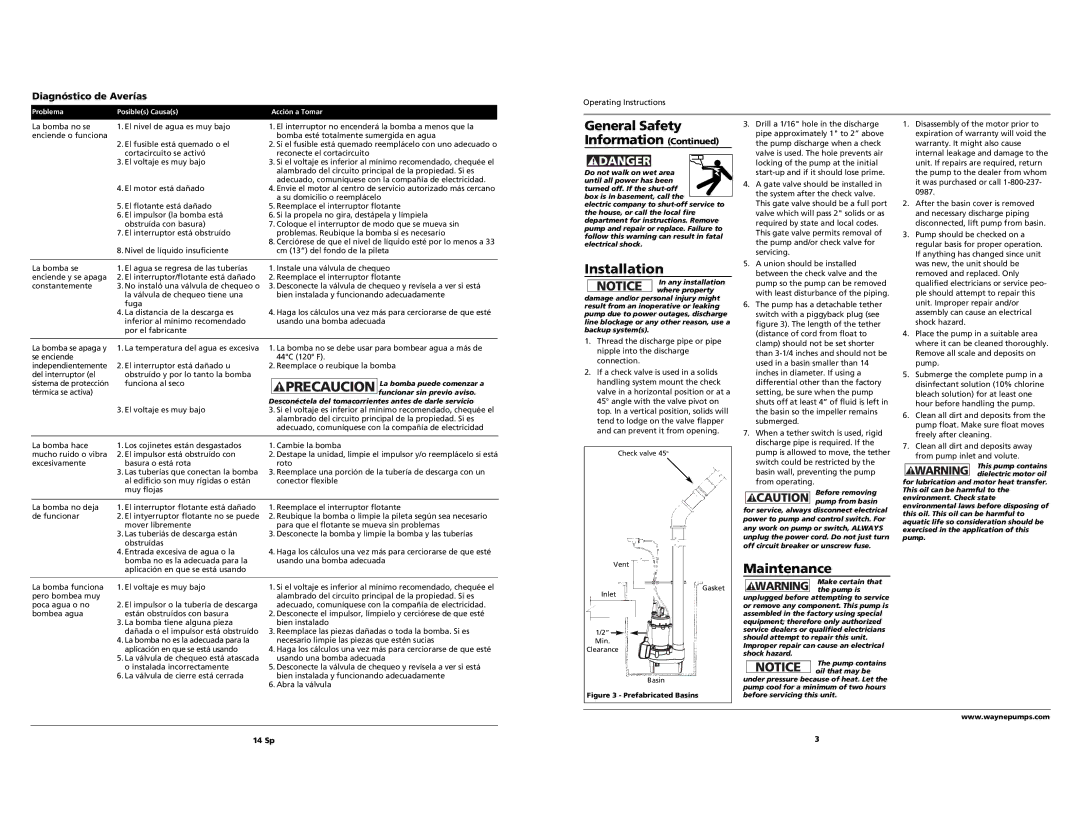
2.If a check valve is used in a solids handling system mount the check valve in a horizontal position or at a 45° angle with the valve pivot on top. In a vertical position, solids will tend to lodge on the valve flapper and can prevent it from opening.
Check valve 45o
Vent
Gasket
Inlet
1/2” ![]() Min.
Min.
Clearance
Basin
Figure 3 - Prefabricated Basins
3.Drill a 1/16" hole in the discharge pipe approximately 1" to 2” above the pump discharge when a check valve is used. The hole prevents air locking of the pump at the initial
4.A gate valve should be installed in the system after the check valve. This gate valve should be a full port valve which will pass 2" solids or as required by state and local codes. This gate valve permits removal of the pump and/or check valve for servicing.
5.A union should be installed between the check valve and the pump so the pump can be removed with least disturbance of the piping.
6.The pump has a detachable tether switch with a piggyback plug (see figure 3). The length of the tether (distance of cord from float to clamp) should not be set shorter than
7.When a tether switch is used, rigid discharge pipe is required. If the pump is allowed to move, the tether switch could be restricted by the basin wall, preventing the pump from operating.
Before removing ! CAUTION pump from basin
for service, always disconnect electrical power to pump and control switch. For any work on pump or switch, ALWAYS unplug the power cord. Do not just turn off circuit breaker or unscrew fuse.
Maintenance
Make certain that
! WARNING the pump is unplugged before attempting to service or remove any component. This pump is assembled in the factory using special equipment; therefore only authorized service dealers or qualified electricians should attempt to repair this unit. Improper repair can cause an electrical shock hazard.
NOTICE | The pump contains |
oil that may be |
under pressure because of heat. Let the pump cool for a minimum of two hours before servicing this unit.
1.Disassembly of the motor prior to expiration of warranty will void the warranty. It might also cause internal leakage and damage to the unit. If repairs are required, return the pump to the dealer from whom it was purchased or call
2.After the basin cover is removed and necessary discharge piping disconnected, lift pump from basin.
3.Pump should be checked on a regular basis for proper operation. If anything has changed since unit was new, the unit should be removed and replaced. Only qualified electricians or service peo- ple should attempt to repair this unit. Improper repair and/or assembly can cause an electrical shock hazard.
4.Place the pump in a suitable area where it can be cleaned thoroughly. Remove all scale and deposits on pump.
5.Submerge the complete pump in a disinfectant solution (10% chlorine bleach solution) for at least one hour before handling the pump.
6.Clean all dirt and deposits from the pump float. Make sure float moves freely after cleaning.
7.Clean all dirt and deposits away from pump inlet and volute.
This pump contains ! WARNING dielectric motor oil
for lubrication and motor heat transfer. This oil can be harmful to the environment. Check state environmental laws before disposing of this oil. This oil can be harmful to aquatic life so consideration should be exercised in the application of this pump.
www.waynepumps.com
14 Sp | 3 |