SERVICE AND ADJUSTMENTS

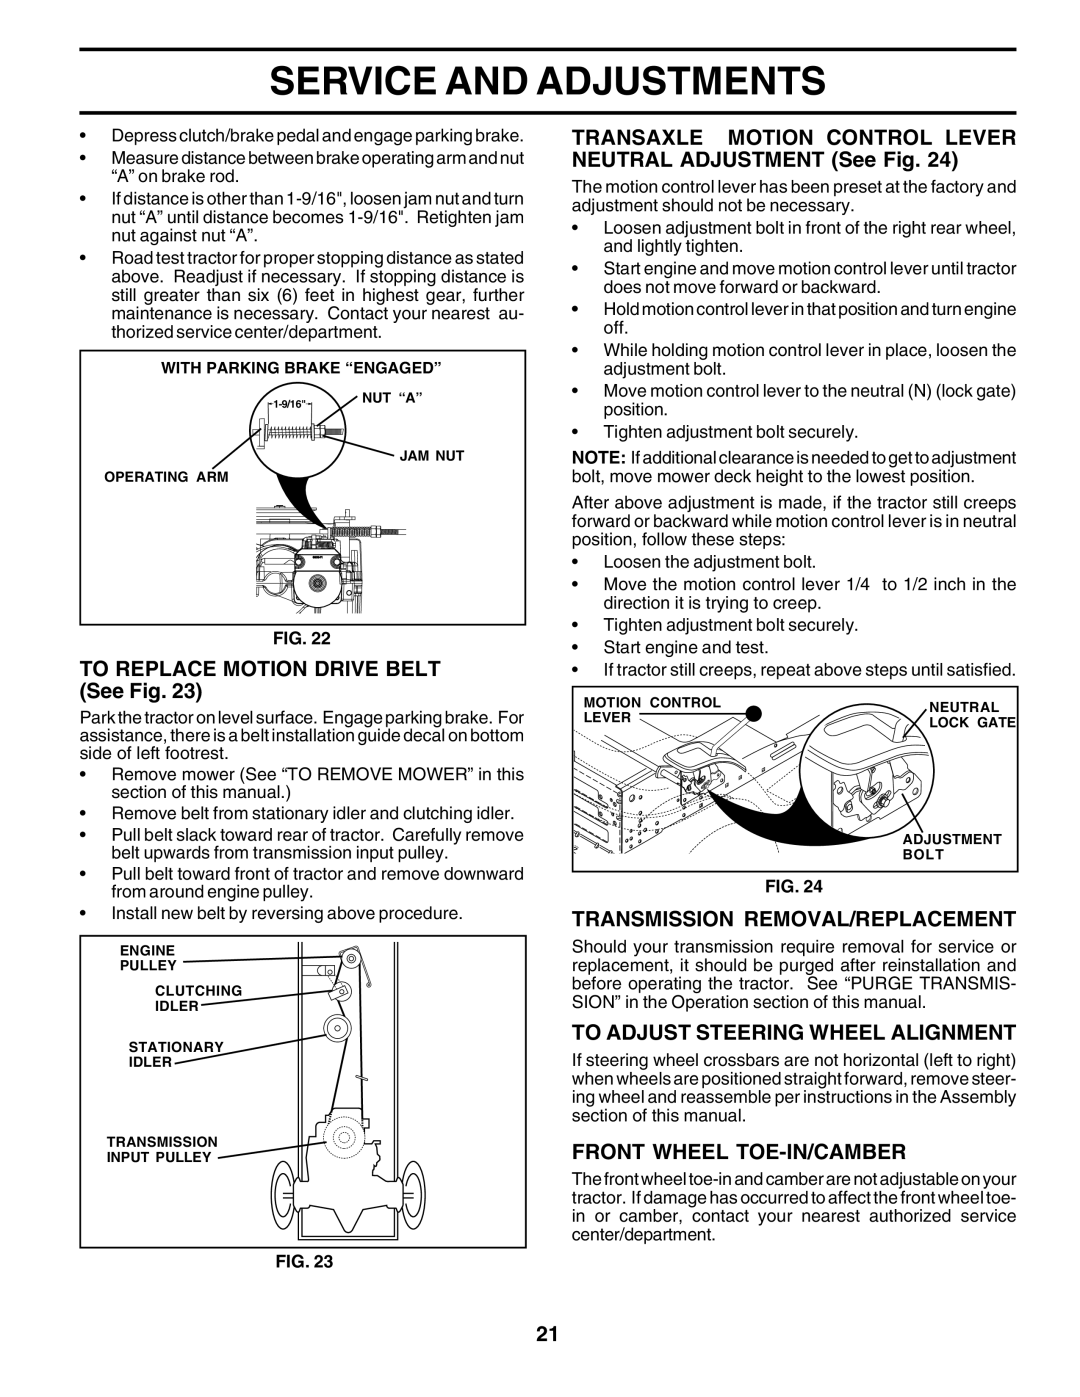
Depress clutch/brake pedal and engage parking brake.

Measure distance between brake operating arm and nut “A” on brake rod.

If distance is other than 1-9/16", loosen jam nut and turn nut “A” until distance becomes 1-9/16". Retighten jam nut against nut “A”.

Road test tractor for proper stopping distance as stated above. Readjust if necessary. If stopping distance is still greater than six (6) feet in highest gear, further maintenance is necessary. Contact your nearest au- thorized service center/department.

WITH PARKING BRAKE “ENGAGED”

1-9/16"

NUT “A”


JAM NUT

OPERATING ARM


FIG. 22

TO REPLACE MOTION DRIVE BELT (See Fig. 23)

Park the tractor on level surface. Engage parking brake. For assistance, there is a belt installation guide decal on bottom side of left footrest.

Remove mower (See “TO REMOVE MOWER” in this section of this manual.)

Remove belt from stationary idler and clutching idler.

Pull belt slack toward rear of tractor. Carefully remove belt upwards from transmission input pulley.

Pull belt toward front of tractor and remove downward from around engine pulley.

Install new belt by reversing above procedure.

ENGINE

PULLEY

CLUTCHING

IDLER

STATIONARY

IDLER

TRANSMISSION

INPUT PULLEY

FIG. 23

TRANSAXLE MOTION CONTROL LEVER NEUTRAL ADJUSTMENT (See Fig. 24)

The motion control lever has been preset at the factory and adjustment should not be necessary.

Loosen adjustment bolt in front of the right rear wheel, and lightly tighten.

Start engine and move motion control lever until tractor does not move forward or backward.

Hold motion control lever in that position and turn engine off.

While holding motion control lever in place, loosen the adjustment bolt.

Move motion control lever to the neutral (N) (lock gate) position.

Tighten adjustment bolt securely.

NOTE: If additional clearance is needed to get to adjustment bolt, move mower deck height to the lowest position.

After above adjustment is made, if the tractor still creeps forward or backward while motion control lever is in neutral position, follow these steps:

Loosen the adjustment bolt.

Move the motion control lever 1/4 to 1/2 inch in the direction it is trying to creep.

Tighten adjustment bolt securely.

Start engine and test.

If tractor still creeps, repeat above steps until satisfied.

MOTION CONTROL

NEUTRAL

LEVER

LOCK GATE


ADJUSTMENT


BOLT

FIG. 24

TRANSMISSION REMOVAL/REPLACEMENT

Should your transmission require removal for service or replacement, it should be purged after reinstallation and before operating the tractor. See “PURGE TRANSMIS- SION” in the Operation section of this manual.

TO ADJUST STEERING WHEEL ALIGNMENT

If steering wheel crossbars are not horizontal (left to right) when wheels are positioned straight forward, remove steer- ing wheel and reassemble per instructions in the Assembly section of this manual.

FRONT WHEEL TOE-IN/CAMBER

The front wheel toe-in and camber are not adjustable on your tractor. If damage has occurred to affect the front wheel toe- in or camber, contact your nearest authorized service center/department.

21

Page 21
Image 21
Weed Eater 179347 To Replace Motion Drive Belt See Fig, Transaxle Motion Control Lever Neutral Adjustment See Fig

179347 specifications

The Weed Eater 179347 is a versatile tool designed for efficient yard maintenance, catering to both residential and professional users. This string trimmer boasts a powerful engine that provides the reliability needed for tackling tough grass and weeds, making it an essential addition to any landscaping arsenal.

One of the standout features of the Weed Eater 179347 is its lightweight design. Weighing in at just over 10 pounds, it allows users to maneuver easily around their lawns, gardens, and other landscape areas without undue fatigue. The balanced build ensures comfortable handling, which is crucial for extended use during large trimming jobs.

The Weed Eater 179347 is equipped with a dependable 2-cycle engine that delivers impressive power and performance. This engine type not only enhances operational strength but also ensures faster cutting speeds, making it easier to handle dense growth. The trimmer uses a Tap 'N Go line release system that allows users to feed more line simply by tapping the trimmer head on the ground, which adds convenience and keeps the workflow steady.

Another key characteristic of the 179347 model is its adjustable handle. Users can customize the handle height and angle to suit their preferences, improving comfort and efficiency while working on various types of terrain. This flexibility is particularly beneficial for those with larger yards or varied landscaping features.

The design also includes a protective shield that keeps debris from flying towards the user, enhancing safety during operation. The trimmer’s durable construction ensures it can withstand the rigors of frequent use while maintaining its effectiveness.

In terms of technology, the Weed Eater 179347 incorporates fuel-efficient technology that minimizes emissions while providing optimal power output. This eco-friendly feature appeals to environmentally conscious users who wish to reduce their carbon footprint while maintaining their lawns.

In summary, the Weed Eater 179347 combines power, comfort, and convenience, making it an excellent choice for anyone looking to maintain their outdoor spaces effectively. With its lightweight build, powerful engine, adjustable handle, and user-friendly line feed system, this trimmer is designed to meet the demands of both casual users and professional landscapers alike, ensuring beautifully manicured lawns with ease.