SERVICE AND ADJUSTMENTS

TO REMOVE WHEEL FOR REPAIRS (See Fig. 25)

Block up axle securely.

Remove axle cover, retaining ring and washers to allow wheel removal (rear wheel contains a square key - Do not lose).

Repair tire and reassemble.

On rear wheels only: align grooves in rear wheel hub and axle. Insert square key.

Replace washers and snap retaining ring securely in axle groove.

Replace axle cover.

NOTE: To seal tire punctures and prevent flat tires due to slow leaks, tire sealant may be purchased from your local parts dealer. Tire sealant also prevents tire dry rot and corrosion.

WASHERS

RETAINING

RING

AXLE COVER

SQUARE KEY (REAR

WHEEL ONLY)

FIG. 25

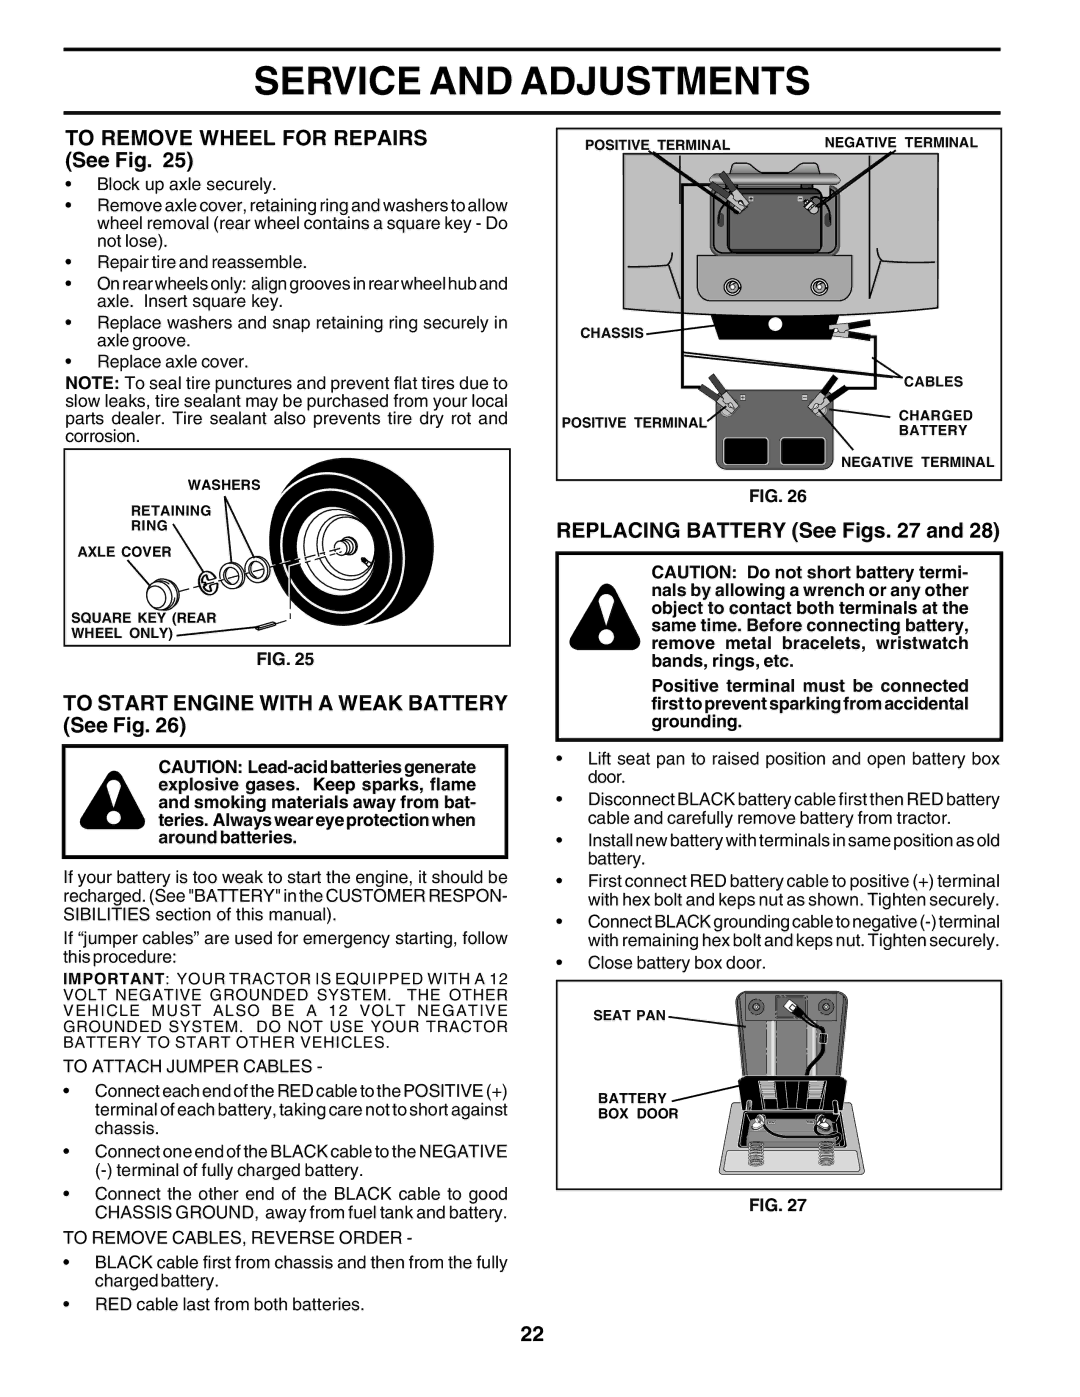
TO START ENGINE WITH A WEAK BATTERY (See Fig. 26)

CAUTION: Lead-acid batteries generate explosive gases. Keep sparks, flame and smoking materials away from bat- teries. Always wear eye protection when around batteries.

If your battery is too weak to start the engine, it should be recharged. (See "BATTERY" in the CUSTOMER RESPON- SIBILITIES section of this manual).

If “jumper cables” are used for emergency starting, follow this procedure:

IMPORTANT: YOUR TRACTOR IS EQUIPPED WITH A 12 VOLT NEGATIVE GROUNDED SYSTEM. THE OTHER VEHICLE MUST ALSO BE A 12 VOLT NEGATIVE GROUNDED SYSTEM. DO NOT USE YOUR TRACTOR BATTERY TO START OTHER VEHICLES.

TO ATTACH JUMPER CABLES -

Connect each end of the RED cable to the POSITIVE (+) terminal of each battery, taking care not to short against chassis.

Connect one end of the BLACK cable to the NEGATIVE (-) terminal of fully charged battery.

Connect the other end of the BLACK cable to good CHASSIS GROUND, away from fuel tank and battery.

TO REMOVE CABLES, REVERSE ORDER -

BLACK cable first from chassis and then from the fully charged battery.

RED cable last from both batteries.

POSITIVE TERMINAL


NEGATIVE TERMINAL


CHASSIS


CABLES

POSITIVE TERMINAL

CHARGED

BATTERY


NEGATIVE TERMINAL

FIG. 26

REPLACING BATTERY (See Figs. 27 and 28)

CAUTION: Do not short battery termi- nals by allowing a wrench or any other object to contact both terminals at the same time. Before connecting battery, remove metal bracelets, wristwatch bands, rings, etc.

Positive terminal must be connected first to prevent sparking from accidental grounding.

Lift seat pan to raised position and open battery box door.

Disconnect BLACK battery cable first then RED battery cable and carefully remove battery from tractor.

Install new battery with terminals in same position as old battery.

First connect RED battery cable to positive (+) terminal with hex bolt and keps nut as shown. Tighten securely.

Connect BLACK grounding cable to negative (-) terminal with remaining hex bolt and keps nut. Tighten securely.

Close battery box door.

SEAT PAN

BATTERY

BOX DOOR

FIG. 27

22

Page 22
Image 22
Weed Eater 179347 owner manual To Remove Wheel for Repairs See Fig, To Start Engine with a Weak Battery See Fig

179347 specifications

The Weed Eater 179347 is a versatile tool designed for efficient yard maintenance, catering to both residential and professional users. This string trimmer boasts a powerful engine that provides the reliability needed for tackling tough grass and weeds, making it an essential addition to any landscaping arsenal.

One of the standout features of the Weed Eater 179347 is its lightweight design. Weighing in at just over 10 pounds, it allows users to maneuver easily around their lawns, gardens, and other landscape areas without undue fatigue. The balanced build ensures comfortable handling, which is crucial for extended use during large trimming jobs.

The Weed Eater 179347 is equipped with a dependable 2-cycle engine that delivers impressive power and performance. This engine type not only enhances operational strength but also ensures faster cutting speeds, making it easier to handle dense growth. The trimmer uses a Tap 'N Go line release system that allows users to feed more line simply by tapping the trimmer head on the ground, which adds convenience and keeps the workflow steady.

Another key characteristic of the 179347 model is its adjustable handle. Users can customize the handle height and angle to suit their preferences, improving comfort and efficiency while working on various types of terrain. This flexibility is particularly beneficial for those with larger yards or varied landscaping features.

The design also includes a protective shield that keeps debris from flying towards the user, enhancing safety during operation. The trimmer’s durable construction ensures it can withstand the rigors of frequent use while maintaining its effectiveness.

In terms of technology, the Weed Eater 179347 incorporates fuel-efficient technology that minimizes emissions while providing optimal power output. This eco-friendly feature appeals to environmentally conscious users who wish to reduce their carbon footprint while maintaining their lawns.

In summary, the Weed Eater 179347 combines power, comfort, and convenience, making it an excellent choice for anyone looking to maintain their outdoor spaces effectively. With its lightweight build, powerful engine, adjustable handle, and user-friendly line feed system, this trimmer is designed to meet the demands of both casual users and professional landscapers alike, ensuring beautifully manicured lawns with ease.