CAMBIO DE CINTA DEL IMPULSOR DE LA CUCHILLA DE LA CORTADORA DE CÉSPED
RETIRO DE CINTA DEL IMPULSOR DE LA CORTADORA DE CÉSPED
1. | Estacione la cortadora de césped sobre una |
| superficie nivelada. |
2. | Accione el freno de estacionamiento. |
2.Coloque la palanca de control de movimiento en la posición neutral.
Las ruedas traseras deben bloquearse y patinar cuando se intente empujar manualmente la cor- tadora de césped hacia adelante. Si las ruedas traseras giran, se debe dar mantenimiento al freno. Comuníquese con un centro de servicios autorizado.
ASSEMBLY/PRE-OPERATION
Your new riding mower has been assembled at the factory with the exception of those parts left unassembled for shipping purposes. To ensure safe and proper operation of your riding mower all parts and hardware you assemble must be tightened securely. Use the correct tools as necessary to ensure proper tightness.
3. | Baje la cortadora de césped a su posición |
| más baja. |
4. | Retire la cubierta del mandril desde la |
| plataforma de la cortadora de césped. |
5. | Retire la placa del motor posterior de la unidad. |
6. | Retire la sujeción de la cinta posterior de la |
| unidad. |
7. | Enrolle con cuidado la cinta sobre la parte |
| superior del mandril de la cuchilla de la |
| cortadora de césped. |
Cinta de impulsor de la cortadora de césped
Sujeción de cinta


 Poleas guía Mandril
AJUSTE DEL EMBRAGUE
Para asegurar el desempeño de conducción apropiado, será necesario realizar el ajuste periódico del embrague. Este ajuste sólo es necesario cuando hay una reducción o pérdi- da de la conducción. Consulte la sección de mantenimiento de este manual para conocer los intervalos recomendados.
1.Estacione la cortadora de césped en una superficie nivelada.
2.Active el freno de estacionamiento.
3.Retire la cubierta del transeje posterior.
4.Con una llave de 9/16, apriete la tuerca de ajuste del embrague 1/8 de vuelta.
PRECAUCIÓN: No apriete de más la tuerca de ajuste del embrague. Sólo dé tantas vueltas de 1/8 como sea necesario.
TOOLS REQUIRED FOR ASSEMBLY
A socket wrench set will make assembly easier. Standard wrench sizes you need are listed below.
(1) | 1/2" wrench | (1) Utility knife |
(1) | Tire pressure | gauge |
When right or left hand is mentioned in this manual, it means when you are in the operating position (seated behind the steer- ing wheel).
TO REMOVE RIDING MOWER FROM CARTON
UNPACK CARTON
1.Remove all accessible loose parts and parts boxes from carton.
2.Cut along dotted lines on all four panels of carton. Remove end panels and lay side panels flat.
3.Remove packing materials from riding mower.
4.Check for any additional loose parts or cartons and remove.
NOTE: Only cut carton with a short blade utility knife, a long blade or saw can puncture
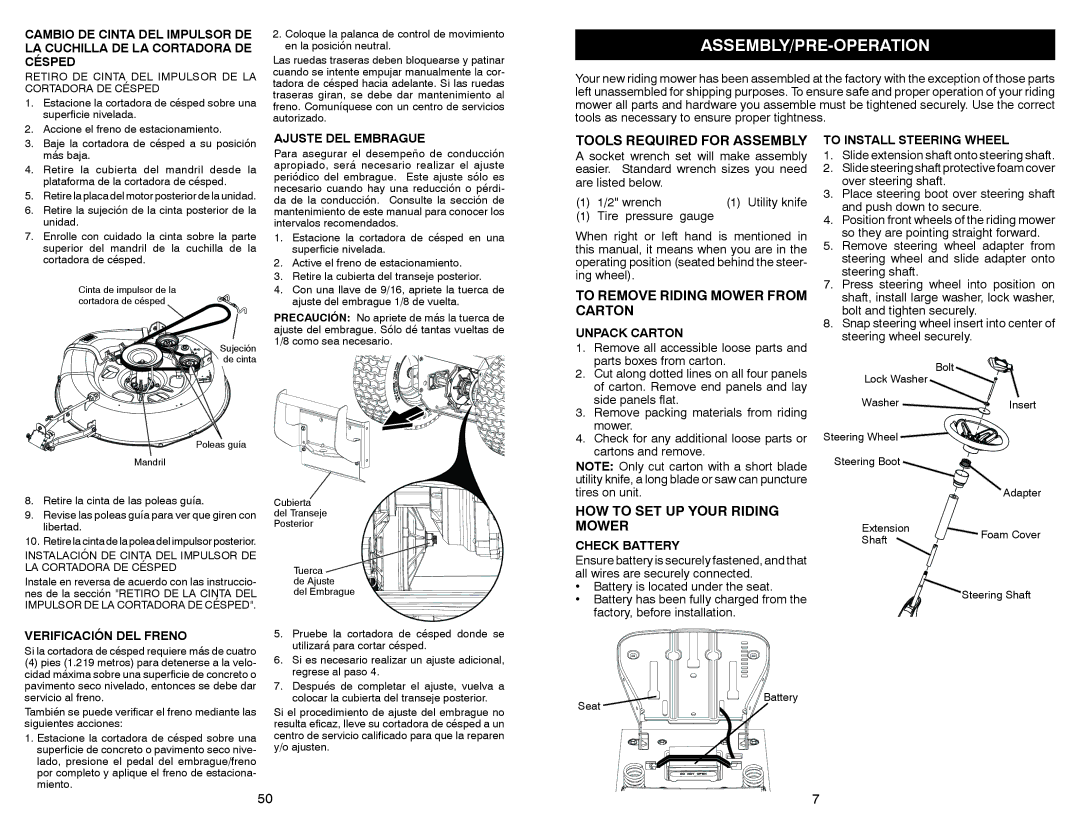
TO INSTALL STEERING WHEEL
1.Slide extension shaft onto steering shaft.
2.Slide steering shaft protective foam cover over steering shaft.
3.Place steering boot over steering shaft and push down to secure.
4.Position front wheels of the riding mower so they are pointing straight forward.
5.Remove steering wheel adapter from steering wheel and slide adapter onto steering shaft.
7.Press steering wheel into position on shaft, install large washer, lock washer, bolt and tighten securely.
8.Snap steering wheel insert into center of steering wheel securely.
Bolt
Lock Washer
Washer 
 Insert
Steering Wheel 


 Steering Boot


8. | Retire la cinta de las poleas guía. |
9. | Revise las poleas guía para ver que giren con |
| libertad. |
10. | Retire la cinta de la polea del impulsor posterior. |
INSTALACIÓN DE CINTA DEL IMPULSOR DE LA CORTADORA DE CÉSPED
Instale en reversa de acuerdo con las instruccio- nes de la sección "RETIRO DE LA CINTA DEL IMPULSOR DE LA CORTADORA DE CÉSPED".
VERIFICACIÓN DEL FRENO
Si la cortadora de césped requiere más de cuatro
(4)pies (1.219 metros) para detenerse a la velo- cidad máxima sobre una superficie de concreto o pavimento seco nivelado, entonces se debe dar servicio al freno.
También se puede verificar el freno mediante las siguientes acciones:
1.Estacione la cortadora de césped sobre una superficie de concreto o pavimento seco nive- lado, presione el pedal del embrague/freno por completo y aplique el freno de estaciona- miento.
Cubierta del Transeje Posterior
Tuerca  de Ajuste


del Embrague
5.Pruebe la cortadora de césped donde se utilizará para cortar césped.
6.Si es necesario realizar un ajuste adicional, regrese al paso 4.
7.Después de completar el ajuste, vuelva a colocar la cubierta del transeje posterior.
Si el procedimiento de ajuste del embrague no resulta eficaz, lleve su cortadora de césped a un centro de servicio calificado para que la reparen y/o ajusten.
HOW TO SET UP YOUR RIDING MOWER
CHECK BATTERY
Ensure battery is securely fastened, and that all wires are securely connected.
•Battery is located under the seat.
•Battery has been fully charged from the factory, before installation.
 Steering Shaft