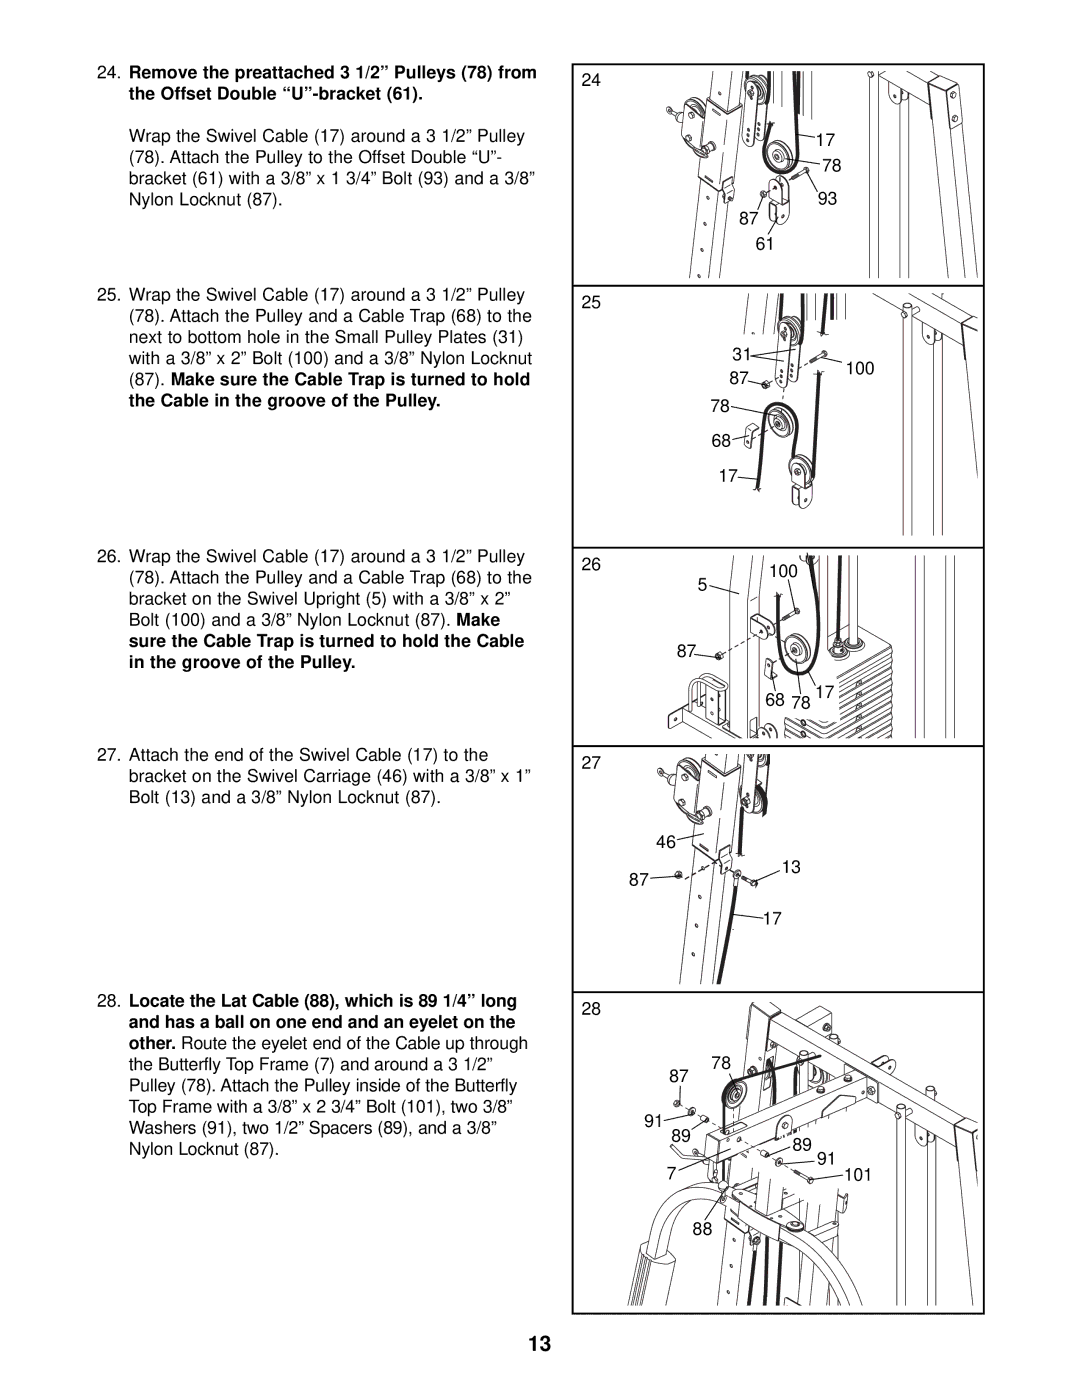
24.Remove the preattached 3 1/2” Pulleys (78) from the Offset Double
Wrap the Swivel Cable (17) around a 3 1/2” Pulley (78). Attach the Pulley to the Offset Double “U”- bracket (61) with a 3/8” x 1 3/4” Bolt (93) and a 3/8” Nylon Locknut (87).
25.Wrap the Swivel Cable (17) around a 3 1/2” Pulley (78). Attach the Pulley and a Cable Trap (68) to the next to bottom hole in the Small Pulley Plates (31) with a 3/8” x 2” Bolt (100) and a 3/8” Nylon Locknut (87). Make sure the Cable Trap is turned to hold the Cable in the groove of the Pulley.
26.Wrap the Swivel Cable (17) around a 3 1/2” Pulley (78). Attach the Pulley and a Cable Trap (68) to the bracket on the Swivel Upright (5) with a 3/8” x 2” Bolt (100) and a 3/8” Nylon Locknut (87). Make sure the Cable Trap is turned to hold the Cable in the groove of the Pulley.
27.Attach the end of the Swivel Cable (17) to the bracket on the Swivel Carriage (46) with a 3/8” x 1” Bolt (13) and a 3/8” Nylon Locknut (87).
28.Locate the Lat Cable (88), which is 89 1/4” long and has a ball on one end and an eyelet on the other. Route the eyelet end of the Cable up through the Butterfly Top Frame (7) and around a 3 1/2” Pulley (78). Attach the Pulley inside of the Butterfly Top Frame with a 3/8” x 2 3/4” Bolt (101), two 3/8” Washers (91), two 1/2” Spacers (89), and a 3/8” Nylon Locknut (87).
13
24 |
|
|
|
|
| 17 |
|
|
| 78 |
|
|
| 93 |
|
|
| 87 |
|
|
| 61 |
|
25 |
|
|
|
|
| 31 | 100 |
|
| 87 | |
|
|
| |
|
| 78 |
|
|
| 68 |
|
|
| 17 |
|
26 |
| 100 |
|
|
|
| |
|
| 5 |
|
| 87 |
| |
|
| 68 78 17 |
|
27 |
|
|
|
| 46 |
|
|
| 87 | 13 |
|
|
|
| |
|
| 17 |
|
28 |
|
|
|
| 87 | 78 |
|
|
|
| |
| 91 |
|
|
| 89 | 89 |
|
|
|
| |
| 7 | 91 | 101 |
|
| ||
|
| 88 |
|