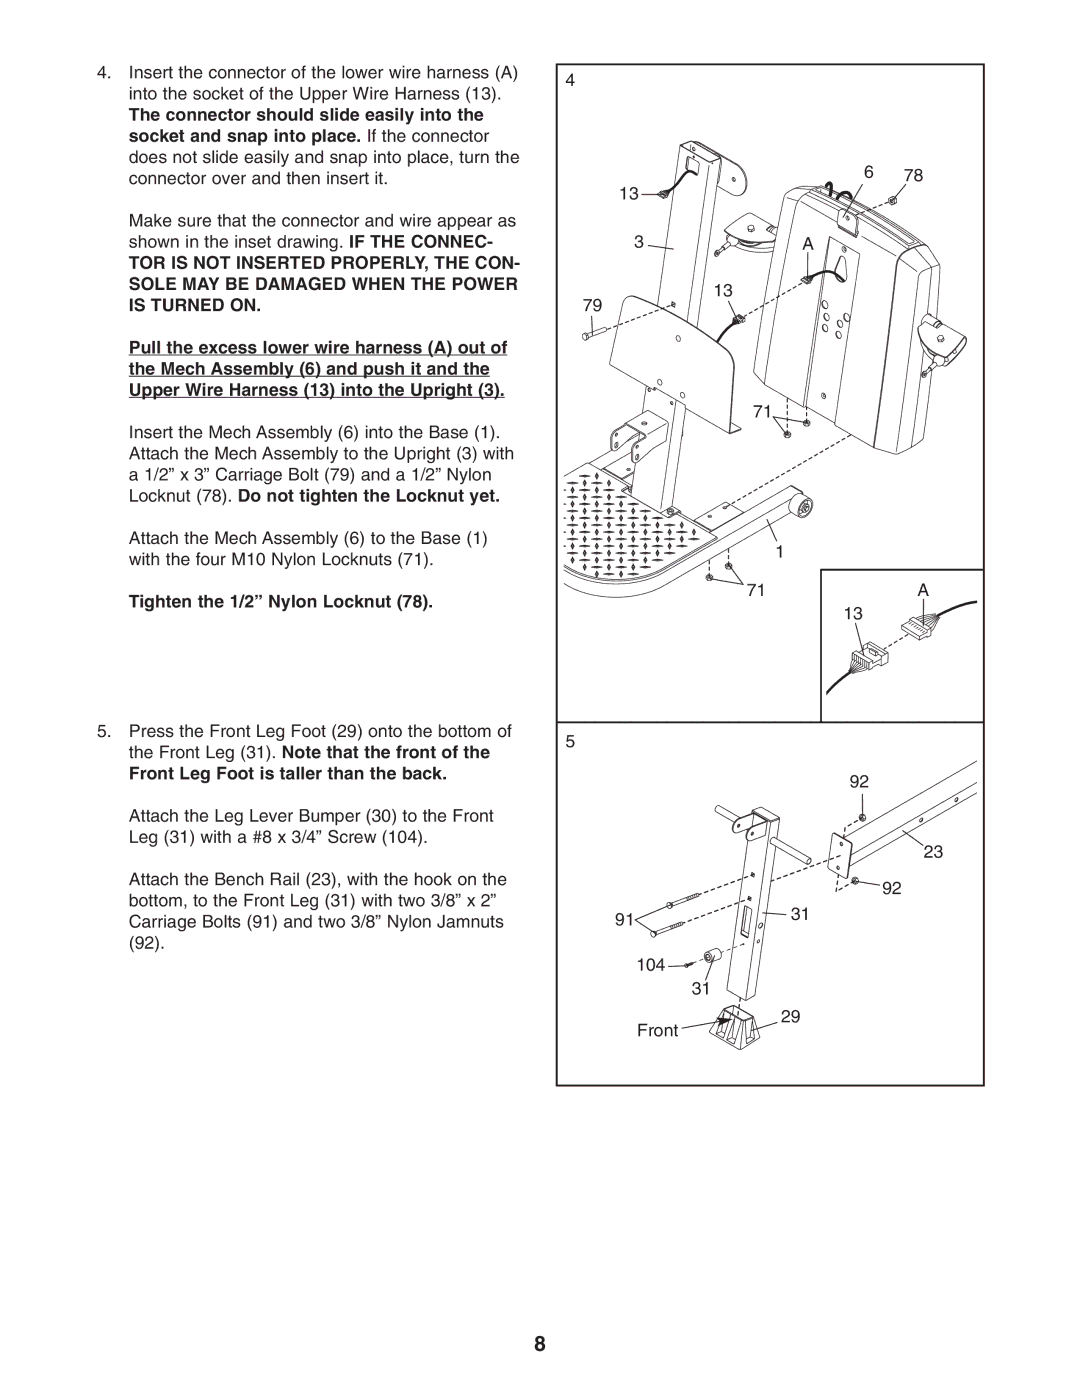
4. Insert the connector of the lower wire harness (A) | 4 |
|
|
into the socket of the Upper Wire Harness (13). |
|
| |
|
|
| |
The connector should slide easily into the |
|
|
|
socket and snap into place. If the connector |
|
|
|
does not slide easily and snap into place, turn the |
| 6 | 78 |
connector over and then insert it. | 13 | ||
|
|
| |
Make sure that the connector and wire appear as |
|
|
|
shown in the inset drawing. IF THE CONNEC- | 3 | A |
|
TOR IS NOT INSERTED PROPERLY, THE CON- |
|
|
|
SOLE MAY BE DAMAGED WHEN THE POWER | 13 |
|
|
IS TURNED ON. |
|
| |
79 |
|
| |
Pull the excess lower wire harness (A) out of |
|
|
|
the Mech Assembly (6) and push it and the |
|
|
|
Upper Wire Harness (13) into the Upright (3). |
|
|
|
| 71 |
|
|
Insert the Mech Assembly (6) into the Base (1). |
|
|
|
Attach the Mech Assembly to the Upright (3) with |
|
|
|
a 1/2” x 3” Carriage Bolt (79) and a 1/2” Nylon |
|
|
|
Locknut (78). Do not tighten the Locknut yet. |
|
|
|
Attach the Mech Assembly (6) to the Base (1) |
| 1 |
|
with the four M10 Nylon Locknuts (71). |
|
| |
|
|
| |
Tighten the 1/2” Nylon Locknut (78). | 71 |
| A |
| 13 |
| |
|
|
| |
5. Press the Front Leg Foot (29) onto the bottom of | 5 |
|
|
the Front Leg (31). Note that the front of the |
|
| |
|
|
| |
Front Leg Foot is taller than the back. |
| 92 |
|
|
|
| |
Attach the Leg Lever Bumper (30) to the Front |
|
|
|
Leg (31) with a #8 x 3/4” Screw (104). |
|
| 23 |
|
|
| |
Attach the Bench Rail (23), with the hook on the |
|
| 92 |
bottom, to the Front Leg (31) with two 3/8” x 2” |
|
| |
91 | 31 |
| |
Carriage Bolts (91) and two 3/8” Nylon Jamnuts |
| ||
|
| ||
(92). |
|
|
|
| 104 |
|
|
| 31 |
|
|
| Front | 29 |
|
|
|
| |
| 8 |
|
|