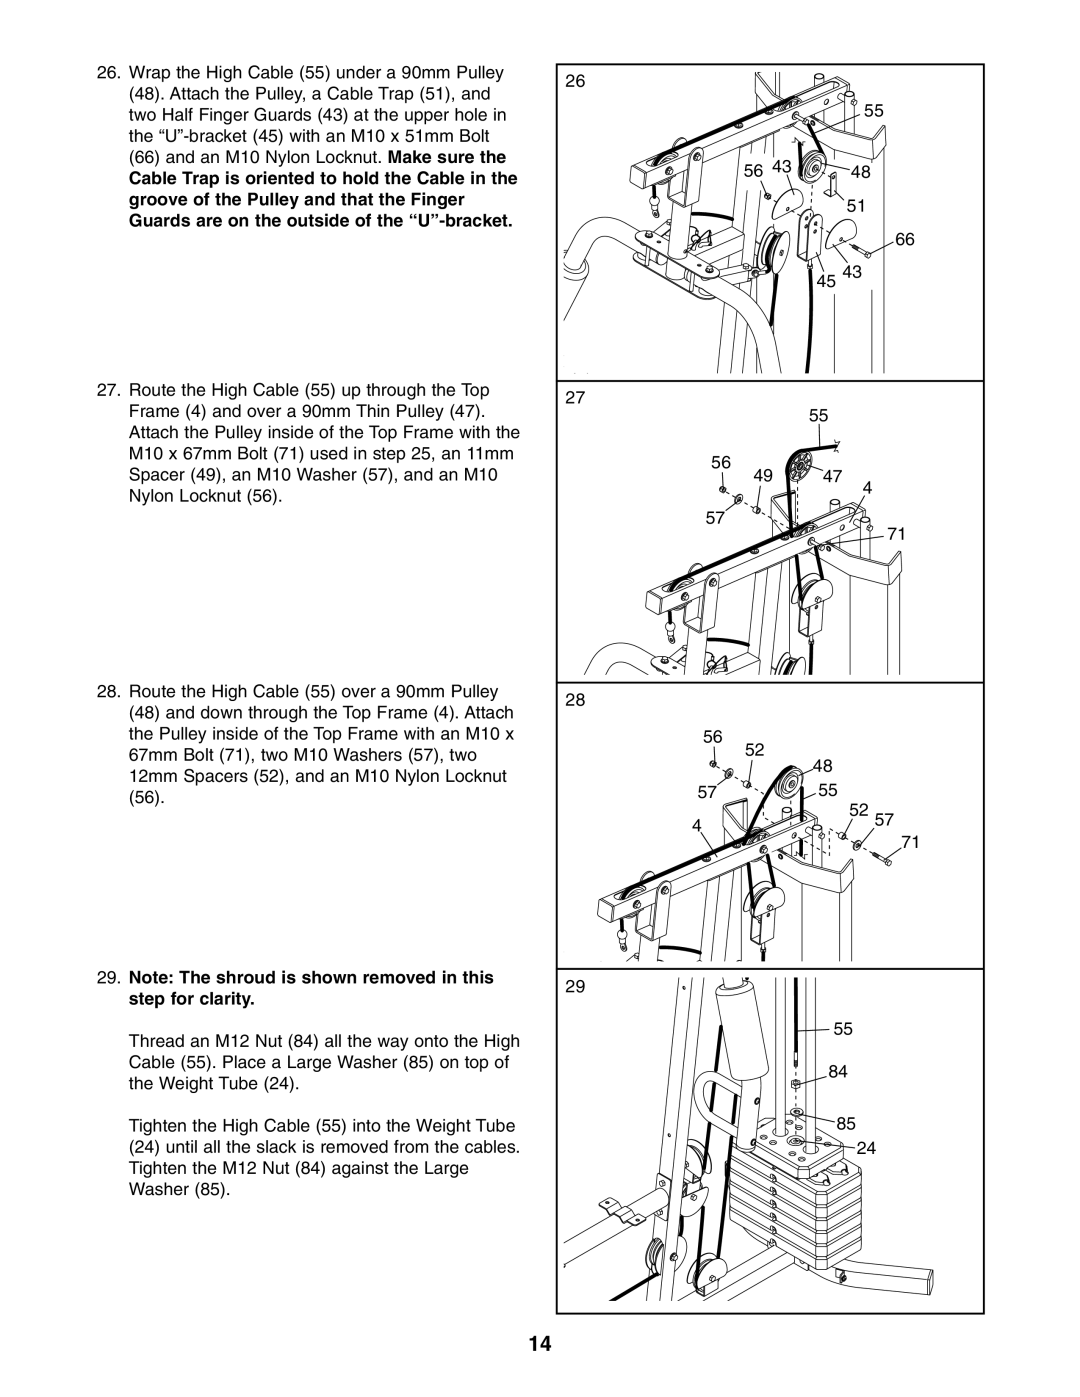
26. Wrap the High Cable (55) under a 90mm Pulley | 26 |
|
|
(48). Attach the Pulley, a Cable Trap (51), and |
|
| |
|
| 55 | |
two Half Finger Guards (43) at the upper hole in |
|
| |
the |
|
|
|
(66) and an M10 Nylon Locknut. Make sure the | 56 43 |
| 48 |
Cable Trap is oriented to hold the Cable in the |
| ||
|
|
| |
groove of the Pulley and that the Finger |
|
| 51 |
Guards are on the outside of the |
|
| |
|
| 66 | |
|
|
| |
|
| 45 43 | |
27. Route the High Cable (55) up through the Top | 27 |
|
|
Frame (4) and over a 90mm Thin Pulley (47). | 55 |
| |
|
| ||
Attach the Pulley inside of the Top Frame with the |
|
|
|
M10 x 67mm Bolt (71) used in step 25, an 11mm | 56 |
|
|
Spacer (49), an M10 Washer (57), and an M10 | 47 |
| |
49 | 4 | ||
Nylon Locknut (56). |
|
| |
|
|
| |
| 57 |
| 71 |
|
|
| |
28. Route the High Cable (55) over a 90mm Pulley | 28 |
|
|
(48) and down through the Top Frame (4). Attach |
|
| |
|
|
| |
the Pulley inside of the Top Frame with an M10 x | 56 |
|
|
67mm Bolt (71), two M10 Washers (57), two | 52 | 48 |
|
|
| ||
12mm Spacers (52), and an M10 Nylon Locknut |
|
| |
57 | 55 |
| |
(56). | 52 57 | ||
| 4 |
| |
|
| 71 | |
|
|
| |
29. Note: The shroud is shown removed in this | 29 |
|
|
step for clarity. |
|
| |
|
|
| |
Thread an M12 Nut (84) all the way onto the High |
| 55 | |
|
|
| |
Cable (55). Place a Large Washer (85) on top of |
| 84 | |
the Weight Tube (24). |
| ||
|
|
| |
Tighten the High Cable (55) into the Weight Tube |
| 85 | |
(24) until all the slack is removed from the cables. |
|
| 24 |
Tighten the M12 Nut (84) against the Large |
|
|
|
Washer (85). |
|
|
|
| 14 |
|
|