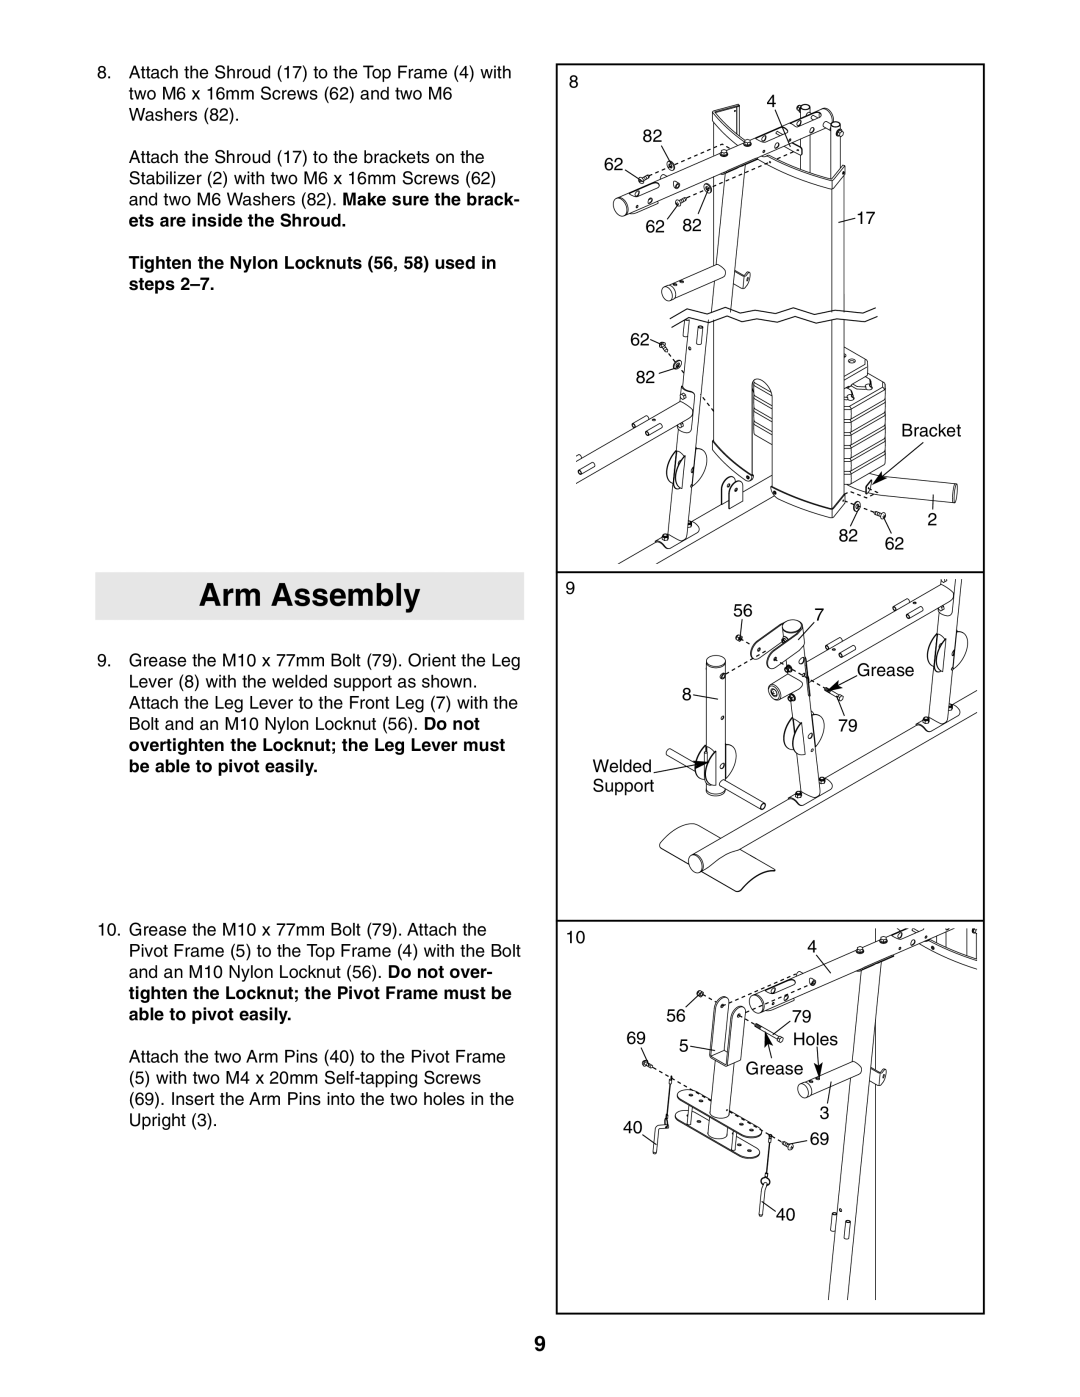
8. | Attach the Shroud (17) to the Top Frame (4) with | 8 |
|
|
|
| two M6 x 16mm Screws (62) and two M6 |
| 4 |
| |
|
|
|
| ||
| Washers (82). |
|
|
| |
|
|
|
|
| |
|
| 82 |
|
|
|
| Attach the Shroud (17) to the brackets on the | 62 |
|
|
|
| Stabilizer (2) with two M6 x 16mm Screws (62) |
|
|
| |
|
|
|
|
| |
| and two M6 Washers (82). Make sure the brack- |
|
| 17 |
|
| ets are inside the Shroud. | 62 | 82 |
| |
|
|
|
| ||
| Tighten the Nylon Locknuts (56, 58) used in |
|
|
|
|
| steps |
|
|
|
|
|
| 62 |
|
|
|
|
| 82 |
|
|
|
|
|
|
|
| Bracket |
|
|
|
| 82 | 2 |
|
|
|
| 62 | |
|
|
|
|
| |
| Arm Assembly | 9 |
|
|
|
|
| 56 | 7 |
| |
|
|
|
| ||
9. | Grease the M10 x 77mm Bolt (79). Orient the Leg |
|
| Grease | |
| Lever (8) with the welded support as shown. |
|
| ||
|
| 8 |
|
| |
| Attach the Leg Lever to the Front Leg (7) with the |
|
|
| |
|
|
|
|
| |
| Bolt and an M10 Nylon Locknut (56). Do not |
|
| 79 |
|
| overtighten the Locknut; the Leg Lever must |
|
|
|
|
| be able to pivot easily. | Welded |
|
|
|
|
| Support |
|
|
|
10. | Grease the M10 x 77mm Bolt (79). Attach the | 10 |
| 4 |
|
| Pivot Frame (5) to the Top Frame (4) with the Bolt |
|
| ||
|
|
|
| ||
| and an M10 Nylon Locknut (56). Do not over- |
|
|
|
|
| tighten the Locknut; the Pivot Frame must be |
|
|
|
|
| able to pivot easily. |
| 56 | 79 |
|
| Attach the two Arm Pins (40) to the Pivot Frame | 69 | 5 | Holes |
|
|
|
|
| ||
|
| Grease |
| ||
| (5) with two M4 x 20mm |
|
| ||
|
|
|
|
| |
| (69). Insert the Arm Pins into the two holes in the |
|
| 3 |
|
| Upright (3). | 40 |
|
| |
|
| 69 |
| ||
|
|
|
| ||
|
|
|
|
| |
|
|
|
| 40 |
|
|
| 9 |
|
|
|