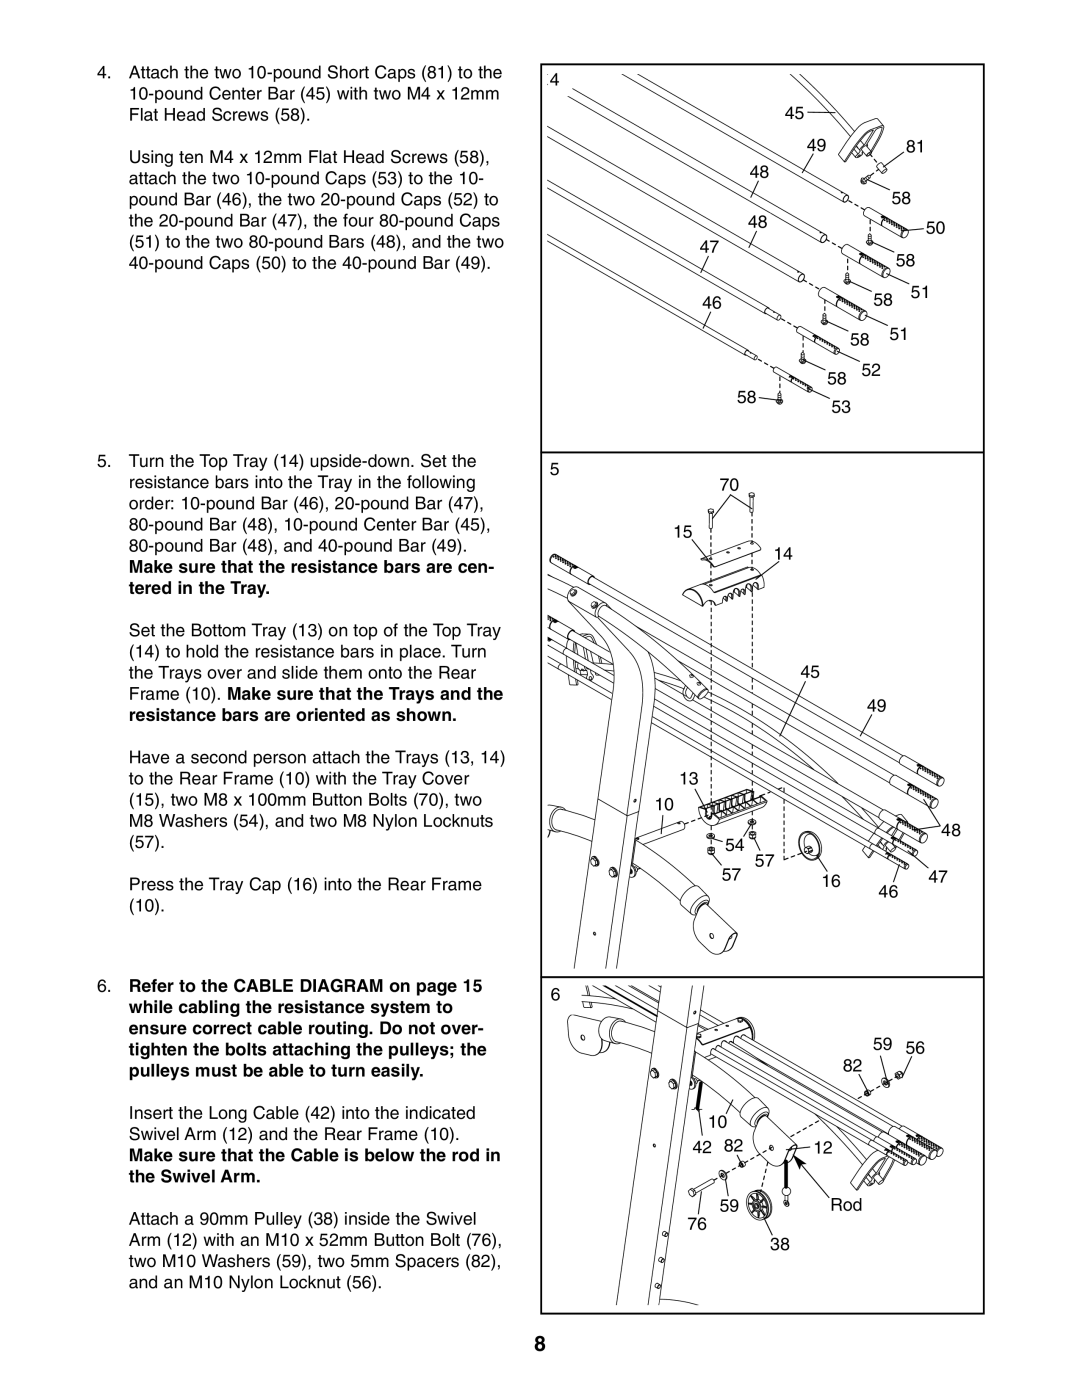
4. Attach the two | 4 |
|
|
|
|
|
|
|
|
|
|
|
| ||
|
|
| 45 |
|
|
| |
Flat Head Screws (58). |
|
|
|
|
|
| |
Using ten M4 x 12mm Flat Head Screws (58), |
|
|
| 49 |
|
| 81 |
|
| 48 |
|
|
|
| |
attach the two |
|
|
|
|
|
| |
|
|
|
|
|
|
| |
pound Bar (46), the two |
|
|
|
|
| 58 | |
the |
|
| 48 |
|
|
| 50 |
(51) to the two | 47 |
|
|
|
|
| |
|
|
|
|
| 58 | ||
|
|
|
|
| |||
|
|
|
|
|
| ||
| 46 |
|
|
| 58 | 51 | |
|
|
|
|
| 58 | 51 | |
|
|
|
|
|
|
| |
|
| 58 | 58 | 52 |
| ||
|
| 53 |
|
| |||
|
|
|
|
|
| ||
5. Turn the Top Tray (14) | 5 |
|
|
|
|
|
|
resistance bars into the Tray in the following | 70 |
|
|
|
|
| |
|
|
|
|
|
| ||
order: |
|
|
|
|
|
|
|
15 |
|
|
|
|
|
| |
|
|
|
|
|
| ||
|
|
| 14 |
|
|
| |
Make sure that the resistance bars are cen- |
|
|
|
|
|
| |
|
|
|
|
|
|
| |
tered in the Tray. |
|
|
|
|
|
|
|
Set the Bottom Tray (13) on top of the Top Tray |
|
|
|
|
|
|
|
(14) to hold the resistance bars in place. Turn |
|
|
| 45 |
|
|
|
the Trays over and slide them onto the Rear |
|
|
|
|
|
| |
Frame (10). Make sure that the Trays and the |
|
|
|
| 49 |
| |
resistance bars are oriented as shown. |
|
|
|
|
| ||
|
|
|
|
|
|
| |
Have a second person attach the Trays (13, 14) |
|
|
|
|
|
|
|
to the Rear Frame (10) with the Tray Cover | 13 |
|
|
|
|
|
|
(15), two M8 x 100mm Button Bolts (70), two | 10 |
|
|
|
|
|
|
M8 Washers (54), and two M8 Nylon Locknuts |
|
|
|
|
|
| 48 |
(57). |
| 54 |
|
|
|
| |
| 57 |
|
|
| |||
|
| 57 |
|
| 47 | ||
Press the Tray Cap (16) into the Rear Frame |
|
| 16 |
|
| ||
(10). |
|
|
|
|
| 46 | |
|
|
|
|
|
|
| |
6. Refer to the CABLE DIAGRAM on page 15 | 6 |
|
|
|
|
|
|
while cabling the resistance system to |
|
|
|
|
|
| |
|
|
|
|
|
|
| |
ensure correct cable routing. Do not over- |
|
|
|
|
| 59 | 56 |
tighten the bolts attaching the pulleys; the |
|
|
| 82 | |||
pulleys must be able to turn easily. |
|
|
|
|
| ||
Insert the Long Cable (42) into the indicated | 10 |
|
|
|
|
| |
Swivel Arm (12) and the Rear Frame (10). |
|
|
|
|
| ||
42 | 82 |
| 12 |
|
|
| |
Make sure that the Cable is below the rod in |
|
|
|
| |||
|
|
|
|
|
|
| |
the Swivel Arm. |
|
|
|
|
|
|
|
Attach a 90mm Pulley (38) inside the Swivel | 76 | 59 |
| Rod |
|
| |
|
|
|
|
|
| ||
Arm (12) with an M10 x 52mm Button Bolt (76), |
|
| 38 |
|
|
| |
|
|
|
|
|
| ||
two M10 Washers (59), two 5mm Spacers (82), |
|
|
|
|
|
|
|
and an M10 Nylon Locknut (56). |
|
|
|
|
|
|
|
| 8 |
|
|
|
|
|
|