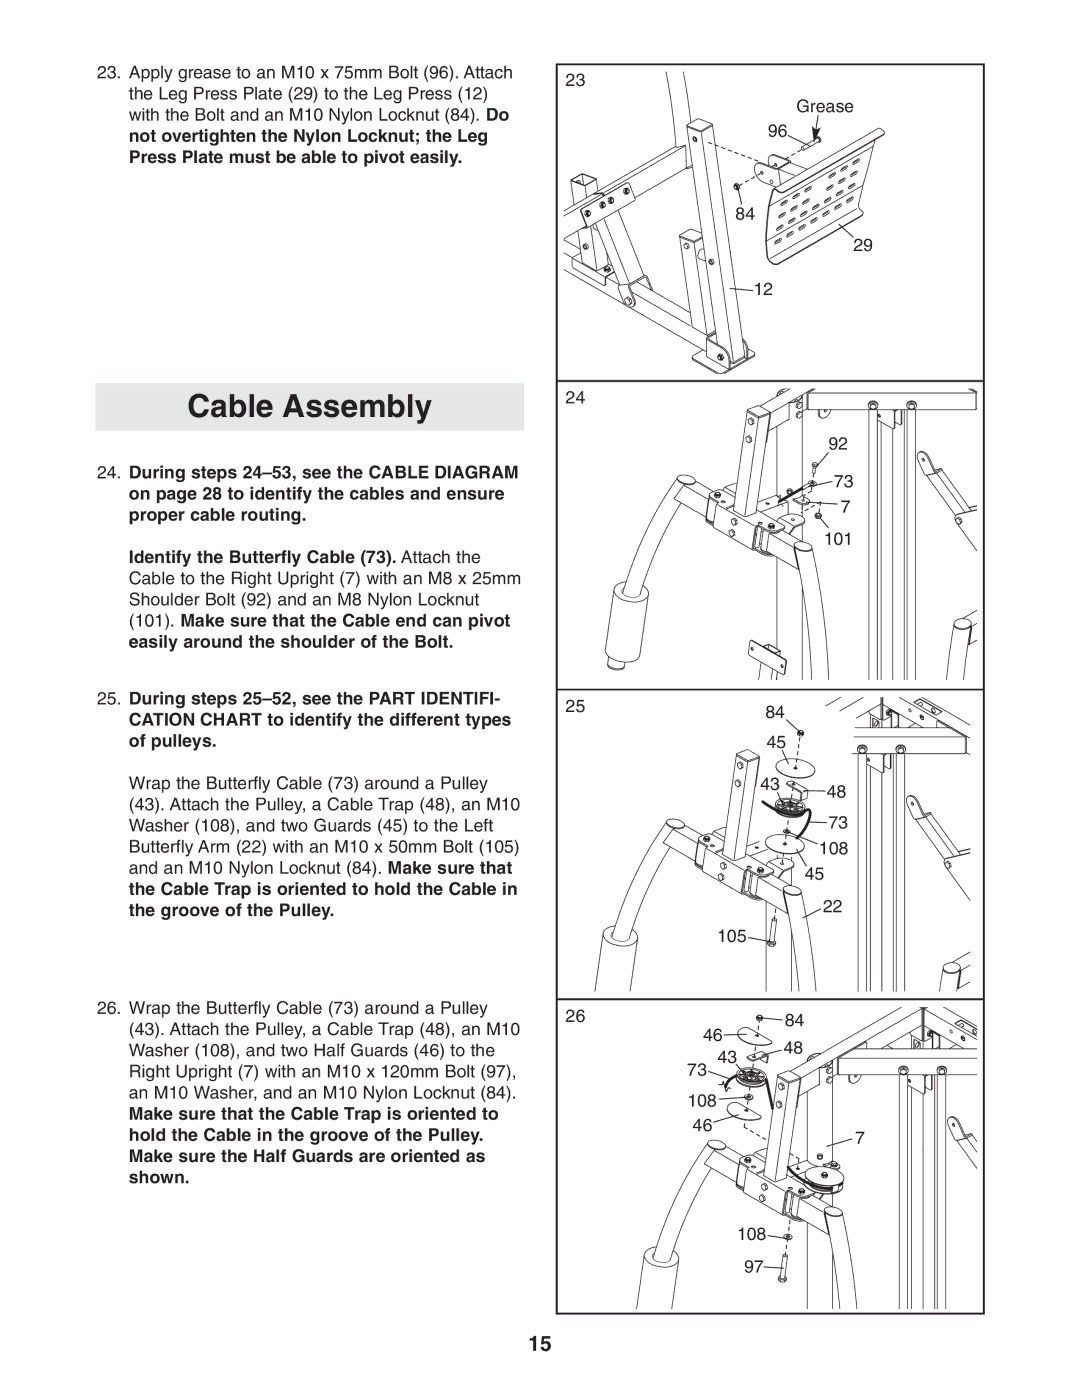
23.Apply grease to an M10 x 75mm Bolt (96). Attach the Leg Press Plate (29) to the Leg Press (12) with the Bolt and an M10 Nylon Locknut (84). Do not overtighten the Nylon Locknut; the Leg Press Plate must be able to pivot easily.
Cable Assembly
24.During steps
Identify the Butterfly Cable (73). Attach the Cable to the Right Upright (7) with an M8 x 25mm Shoulder Bolt (92) and an M8 Nylon Locknut
(101). Make sure that the Cable end can pivot easily around the shoulder of the Bolt.
25.During steps
Wrap the Butterfly Cable (73) around a Pulley
(43). Attach the Pulley, a Cable Trap (48), an M10 Washer (108), and two Guards (45) to the Left Butterfly Arm (22) with an M10 x 50mm Bolt (105) and an M10 Nylon Locknut (84). Make sure that the Cable Trap is oriented to hold the Cable in the groove of the Pulley.
26.Wrap the Butterfly Cable (73) around a Pulley
(43). Attach the Pulley, a Cable Trap (48), an M10 Washer (108), and two Half Guards (46) to the Right Upright (7) with an M10 x 120mm Bolt (97), an M10 Washer, and an M10 Nylon Locknut (84).
Make sure that the Cable Trap is oriented to hold the Cable in the groove of the Pulley. Make sure the Half Guards are oriented as shown.
23 |
|
|
|
|
| Grease | |
|
| 96 |
|
| 84 |
| |
|
|
| 29 |
|
| 12 |
|
24 |
|
|
|
|
|
| 92 |
|
|
| 73 |
|
|
| 7 |
|
|
| 101 |
25 |
| 84 |
|
|
|
| |
|
| 45 |
|
|
| 43 | 48 |
|
|
| |
|
|
| 73 |
|
|
| 108 |
|
|
| 45 |
|
|
| 22 |
| 105 |
| |
26 | 46 | 84 |
|
| 48 |
| |
| 43 |
| |
|
|
| |
| 73 |
|
|
| 108 |
|
|
| 46 |
| 7 |
|
|
| |
|
| 108 |
|
|
| 97 |
|
15