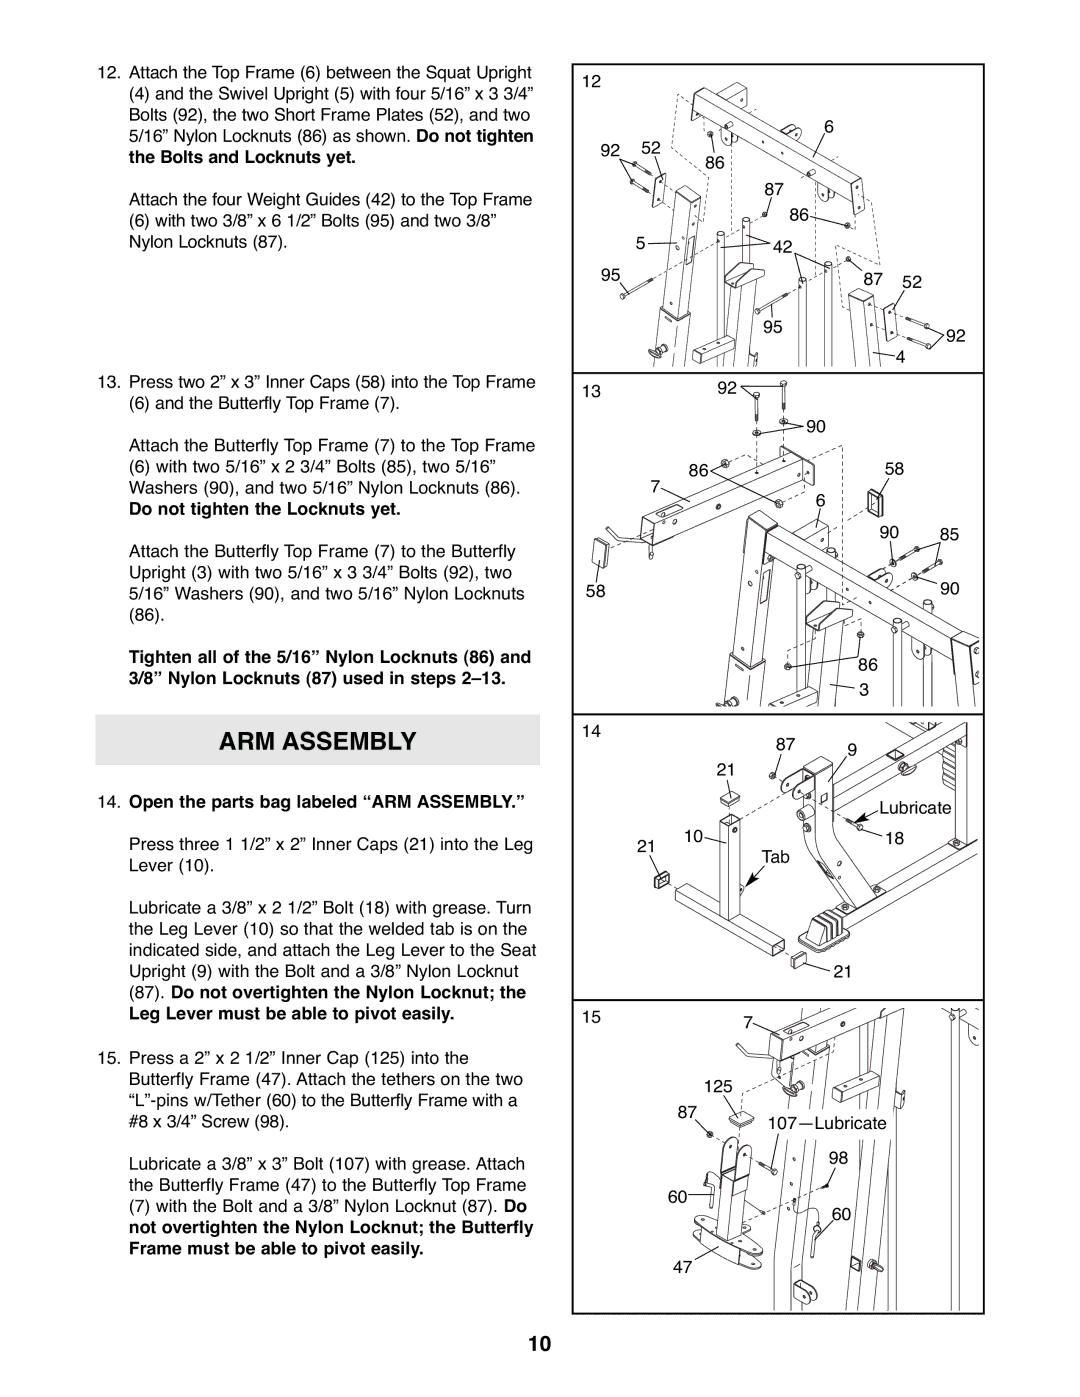
12.Attach the Top Frame (6) between the Squat Upright
(4) and the Swivel Upright (5) with four 5/16” x 3 3/4” Bolts (92), the two Short Frame Plates (52), and two 5/16” Nylon Locknuts (86) as shown. Do not tighten the Bolts and Locknuts yet.
Attach the four Weight Guides (42) to the Top Frame
(6)with two 3/8” x 6 1/2” Bolts (95) and two 3/8” Nylon Locknuts (87).
13.Press two 2” x 3” Inner Caps (58) into the Top Frame
(6) and the Butterfly Top Frame (7).
Attach the Butterfly Top Frame (7) to the Top Frame
(6)with two 5/16” x 2 3/4” Bolts (85), two 5/16” Washers (90), and two 5/16” Nylon Locknuts (86).
Do not tighten the Locknuts yet.
Attach the Butterfly Top Frame (7) to the Butterfly Upright (3) with two 5/16” x 3 3/4” Bolts (92), two 5/16” Washers (90), and two 5/16” Nylon Locknuts (86).
Tighten all of the 5/16” Nylon Locknuts (86) and 3/8” Nylon Locknuts (87) used in steps
ARM ASSEMBLY
14.Open the parts bag labeled “ARM ASSEMBLY.”
Press three 1 1/2” x 2” Inner Caps (21) into the Leg Lever (10).
Lubricate a 3/8” x 2 1/2” Bolt (18) with grease. Turn the Leg Lever (10) so that the welded tab is on the indicated side, and attach the Leg Lever to the Seat Upright (9) with the Bolt and a 3/8” Nylon Locknut
(87).Do not overtighten the Nylon Locknut; the Leg Lever must be able to pivot easily.
15.Press a 2” x 2 1/2” Inner Cap (125) into the Butterfly Frame (47). Attach the tethers on the two
Lubricate a 3/8” x 3” Bolt (107) with grease. Attach the Butterfly Frame (47) to the Butterfly Top Frame
(7)with the Bolt and a 3/8” Nylon Locknut (87). Do not overtighten the Nylon Locknut; the Butterfly Frame must be able to pivot easily.
10
12 |
|
|
|
|
|
|
|
|
| 6 |
|
92 | 52 | 86 |
|
| |
|
|
|
| ||
|
|
| 87 |
|
|
|
|
| 86 |
| |
| 5 |
| 42 |
|
|
95 |
|
|
| 87 | 52 |
|
|
| 95 |
| 92 |
|
|
|
|
| |
|
|
|
| 4 | |
13 |
|
| 92 |
|
|
|
|
|
| 90 |
|
| 7 | 86 |
| 58 | |
|
|
| 6 |
| |
|
|
|
|
| |
|
|
|
| 90 | 85 |
58 |
|
|
|
| 90 |
|
|
|
| 86 |
|
|
|
|
| 3 |
|
14 |
|
| 87 | 9 |
|
|
|
|
| ||
|
|
| 21 |
| |
|
|
|
|
| |
|
|
|
| Lubricate | |
| 21 | 10 | Tab | 18 | |
|
|
|
| ||
|
|
|
|
| |
|
|
|
| 21 |
|
15 |
|
| 7 |
|
|
|
|
|
|
| |
|
| 125 |
|
| |
|
| 87 |
| ||
|
|
|
| ||
|
|
|
| 98 |
|
|
| 60 |
| 60 |
|
|
|
|
|
| |
|
| 47 |
|
|
|
