Prepare the Burner

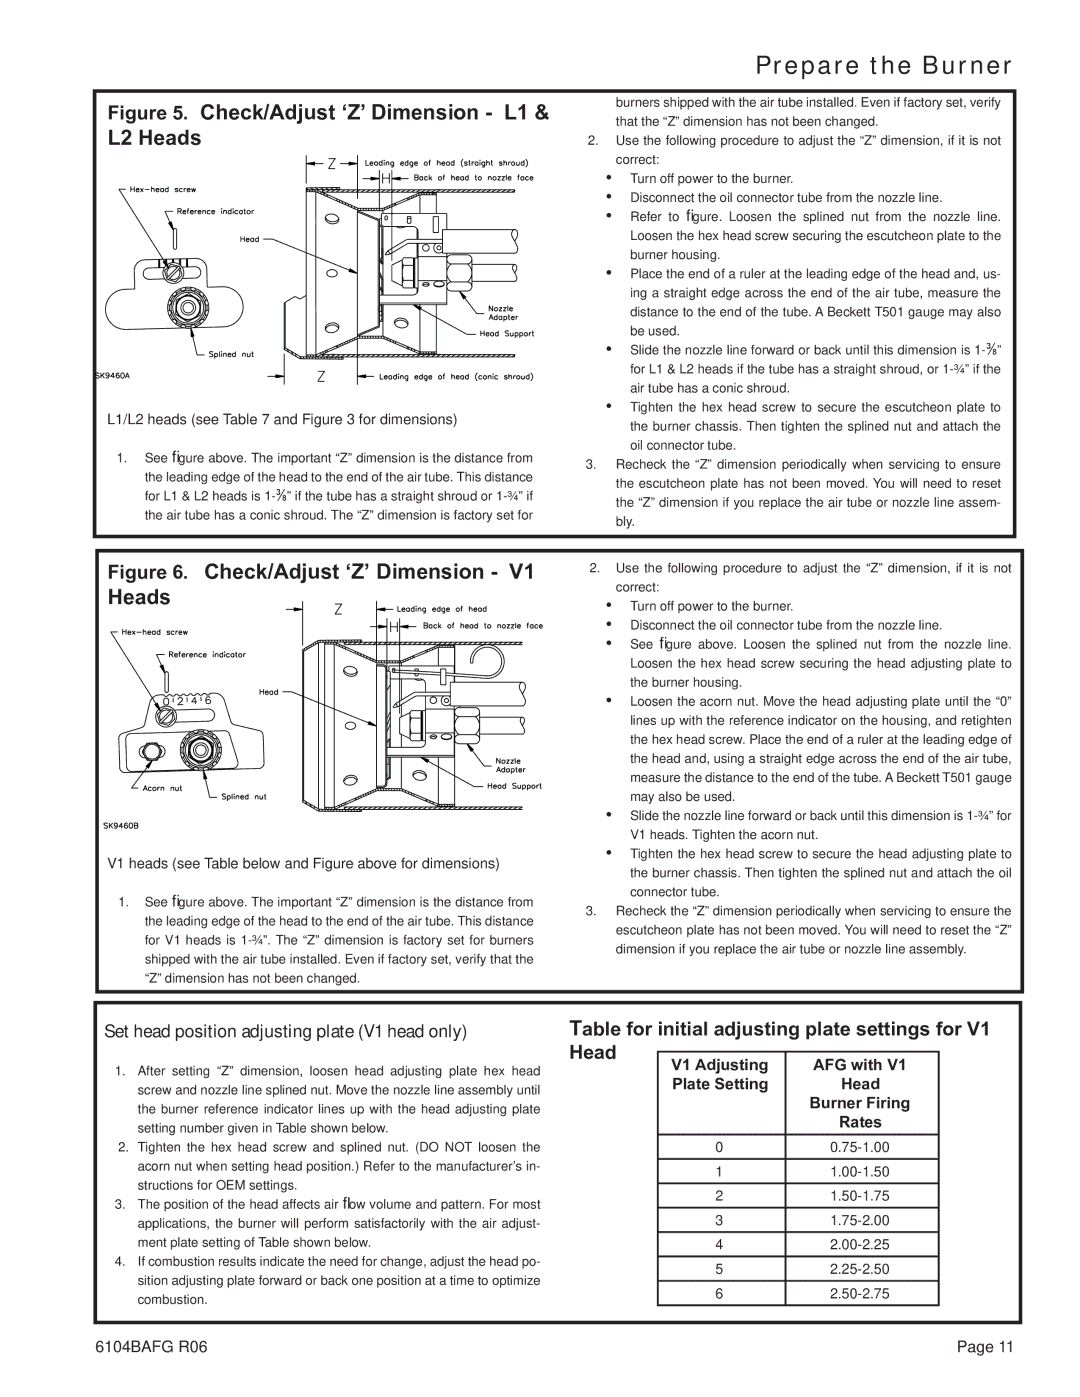
Figure 5. Check/Adjust ‘Z’ Dimension - L1 & L2 Heads

L1/L2 heads (see Table 7 and Figure 3 for dimensions)

1.See figure above. The important “Z” dimension is the distance from the leading edge of the head to the end of the air tube. This distance for L1 & L2 heads is 1-⅜” if the tube has a straight shroud or 1-¾” if the air tube has a conic shroud. The “Z” dimension is factory set for

burners shipped with the air tube installed. Even if factory set, verify that the “Z” dimension has not been changed.

2.Use the following procedure to adjust the “Z” dimension, if it is not correct:

yTurn off power to the burner.

yDisconnect the oil connector tube from the nozzle line.

yRefer to figure. Loosen the splined nut from the nozzle line. Loosen the hex head screw securing the escutcheon plate to the burner housing.

yPlace the end of a ruler at the leading edge of the head and, us- ing a straight edge across the end of the air tube, measure the distance to the end of the tube. A Beckett T501 gauge may also be used.

ySlide the nozzle line forward or back until this dimension is 1-⅜” for L1 & L2 heads if the tube has a straight shroud, or 1-¾” if the air tube has a conic shroud.

yTighten the hex head screw to secure the escutcheon plate to the burner chassis. Then tighten the splined nut and attach the oil connector tube.

3.Recheck the “Z” dimension periodically when servicing to ensure the escutcheon plate has not been moved. You will need to reset the “Z” dimension if you replace the air tube or nozzle line assem- bly.

Figure 6. Check/Adjust ‘Z’ Dimension - V1 Heads

V1 heads (see Table below and Figure above for dimensions)

1.See figure above. The important “Z” dimension is the distance from the leading edge of the head to the end of the air tube. This distance for V1 heads is 1-¾”. The “Z” dimension is factory set for burners shipped with the air tube installed. Even if factory set, verify that the “Z” dimension has not been changed.

2.Use the following procedure to adjust the “Z” dimension, if it is not correct:

yTurn off power to the burner.

yDisconnect the oil connector tube from the nozzle line.

ySee figure above. Loosen the splined nut from the nozzle line. Loosen the hex head screw securing the head adjusting plate to the burner housing.

yLoosen the acorn nut. Move the head adjusting plate until the “0” lines up with the reference indicator on the housing, and retighten the hex head screw. Place the end of a ruler at the leading edge of the head and, using a straight edge across the end of the air tube, measure the distance to the end of the tube. A Beckett T501 gauge may also be used.

ySlide the nozzle line forward or back until this dimension is 1-¾” for V1 heads. Tighten the acorn nut.

yTighten the hex head screw to secure the head adjusting plate to the burner chassis. Then tighten the splined nut and attach the oil connector tube.

3.Recheck the “Z” dimension periodically when servicing to ensure the escutcheon plate has not been moved. You will need to reset the “Z” dimension if you replace the air tube or nozzle line assembly.

Set head position adjusting plate (V1 head only)

Table for initial adjusting plate settings for V1


Head


1.

After setting “Z” dimension, loosen head adjusting plate hex head

V1 Adjusting

AFG with V1


screw and nozzle line splined nut. Move the nozzle line assembly until


Plate Setting

Head


the burner reference indicator lines up with the head adjusting plate


Burner Firing


setting number given in Table shown below.


Rates


2.

Tighten the hex head screw and splined nut. (DO NOT loosen the


0

0.75-1.00


acorn nut when setting head position.) Refer to the manufacturer’s in-


1

1.00-1.50


structions for OEM settings.


2

1.50-1.75


3.

The position of the head affects air flow volume and pattern. For most


applications, the burner will perform satisfactorily with the air adjust-


3

1.75-2.00


ment plate setting of Table shown below.


4

2.00-2.25


4.

If combustion results indicate the need for change, adjust the head po-


5

2.25-2.50


sition adjusting plate forward or back one position at a time to optimize


6

2.50-2.75


combustion.


6104BAFG R06

Page 11

Page 12
Image 12
Weil-McLain UO-5 CV, UO-4 CV, UO-3 CV manual Check/Adjust ‘Z’ Dimension L1 & L2 Heads

UO-3 CV, UO-4 CV, UO-5 CV specifications

Weil-McLain is a well-respected name in the heating industry, recognized for its high-quality and efficient boiler systems. Among its notable offerings are the UO-3 CV, UO-4 CV, and UO-5 CV models, all of which showcase advanced engineering and innovative technology tailored for residential and commercial applications.

The UO-3 CV boiler is designed for mid-sized heating requirements, boasting a strong output capacity that balances efficiency with performance. It features a compact size, suitable for smaller installations, without sacrificing power. The boiler is equipped with a durable cast iron heat exchanger that provides excellent thermal efficiency and longevity, ensuring reliable operation over the years. Its easy access for maintenance also makes it a popular choice among HVAC professionals.

Moving to the UO-4 CV model, this boiler builds on the success of the UO-3 with an increased output capacity, making it ideal for larger residential or light commercial spaces. The UO-4 CV incorporates Weil-McLain’s advanced combustion technology, which optimizes fuel use and significantly reduces emissions. This model maintains a compact design while enhancing overall performance through improved heat transfer and reduced standby losses. The UO-4 CV's user-friendly features, including easy-to-use controls and a diagnostic system, streamline operational efficiency.

The UO-5 CV further solidifies Weil-McLain's commitment to excellence with its highest output among the three. This boiler is particularly suited for extensive heating demands, making it popular among larger commercial installations. The UO-5 CV also employs cutting-edge technology, including advanced controls for precise temperature regulation and an efficient system designed to minimize energy consumption. Its robust construction ensures it can handle heavy use while remaining reliable, even in challenging environments.

In summary, the Weil-McLain UO series, including the UO-3 CV, UO-4 CV, and UO-5 CV, represents a perfect blend of efficiency, innovation, and reliability. All models utilize durable materials, advanced engineering, and state-of-the-art technologies that define Weil-McLain's reputation for quality in hydronic heating solutions. Whether for residential or commercial applications, these boilers serve as dependable sources of heat, catering to various needs while maintaining energy efficiency and lower emissions.