8

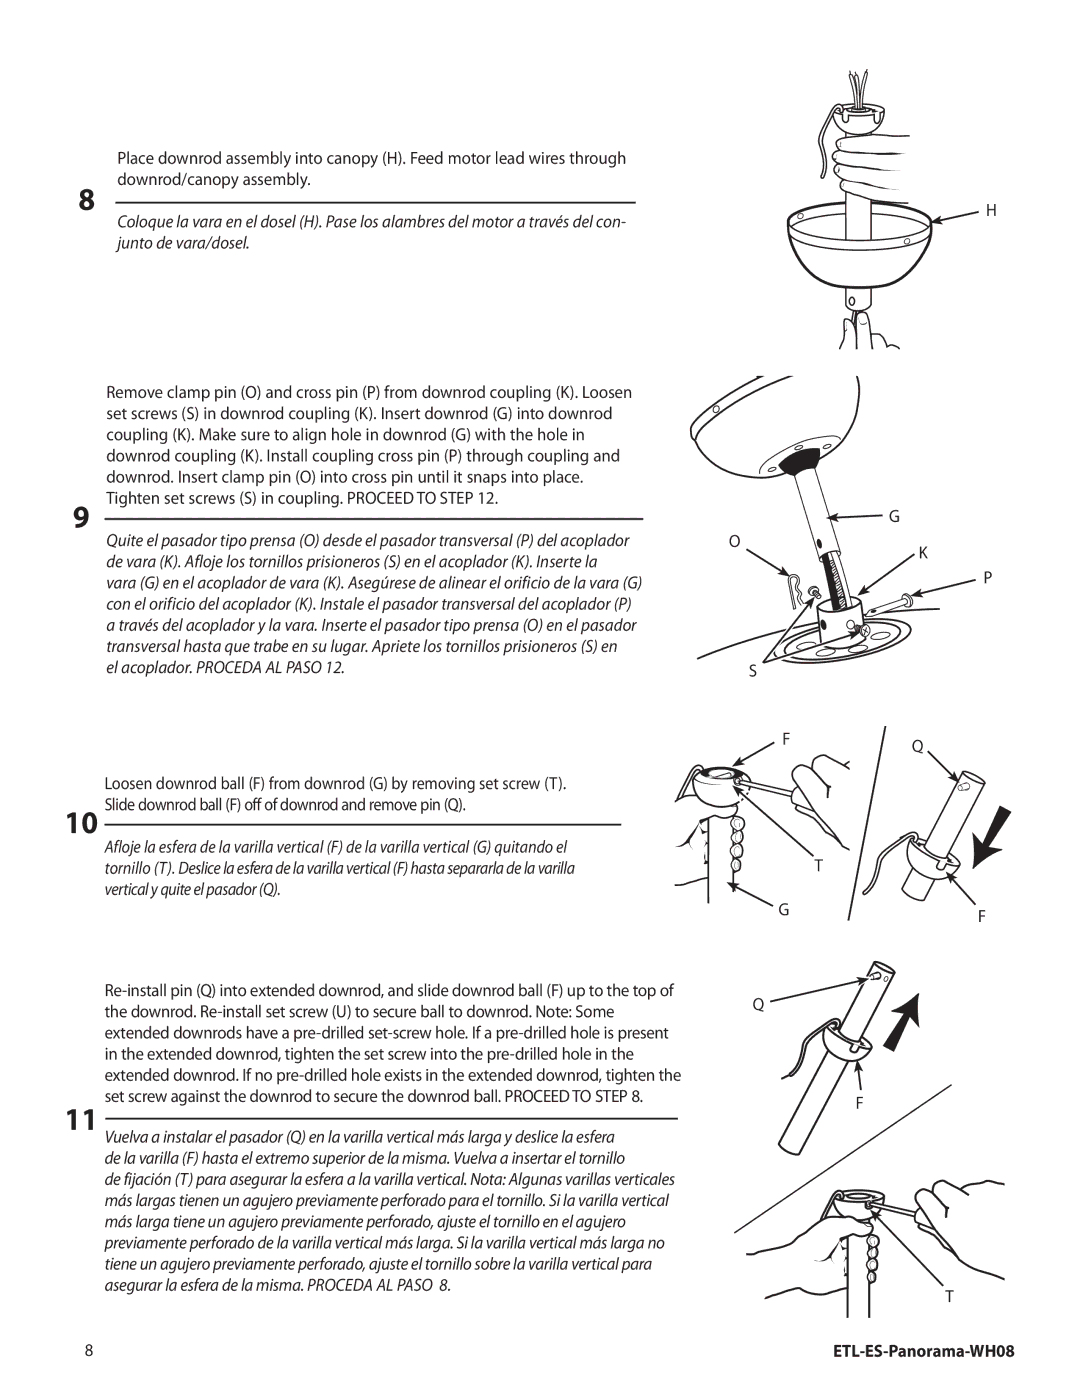
Place downrod assembly into canopy (H). Feed motor lead wires through downrod/canopy assembly.

Coloque la vara en el dosel (H). Pase los alambres del motor a través del con- junto de vara/dosel.

H

9

Remove clamp pin (O) and cross pin (P) from downrod coupling (K). Loosen set screws (S) in downrod coupling (K). Insert downrod (G) into downrod coupling (K). Make sure to align hole in downrod (G) with the hole in downrod coupling (K). Install coupling cross pin (P) through coupling and downrod. Insert clamp pin (O) into cross pin until it snaps into place. Tighten set screws (S) in coupling. PROCEED TO STEP 12.

Quite el pasador tipo prensa (O) desde el pasador transversal (P) del acoplador de vara (K). Afloje los tornillos prisioneros (S) en el acoplador (K). Inserte la vara (G) en el acoplador de vara (K). Asegúrese de alinear el orificio de la vara (G) con el orificio del acoplador (K). Instale el pasador transversal del acoplador (P) a través del acoplador y la vara. Inserte el pasador tipo prensa (O) en el pasador transversal hasta que trabe en su lugar. Apriete los tornillos prisioneros (S) en

el acoplador. PROCEDA AL PASO 12.

G

O K

P

S

FQ

10

11

8

Loosen downrod ball (F) from downrod (G) by removing set screw (T). Slide downrod ball (F) off of downrod and remove pin (Q).

Afloje la esfera de la varilla vertical (F) de la varilla vertical (G) quitando el tornillo (T). Deslice la esfera de la varilla vertical (F) hasta separarla de la varilla vertical y quite el pasador (Q).

Re-install pin (Q) into extended downrod, and slide downrod ball (F) up to the top of the downrod. Re-install set screw (U) to secure ball to downrod. Note: Some extended downrods have a pre-drilled set-screw hole. If a pre-drilled hole is present in the extended downrod, tighten the set screw into the pre-drilled hole in the extended downrod. If no pre-drilled hole exists in the extended downrod, tighten the set screw against the downrod to secure the downrod ball. PROCEED TO STEP 8.

Vuelva a instalar el pasador (Q) en la varilla vertical más larga y deslice la esfera de la varilla (F) hasta el extremo superior de la misma. Vuelva a insertar el tornillo

de fijación (T) para asegurar la esfera a la varilla vertical. Nota: Algunas varillas verticales más largas tienen un agujero previamente perforado para el tornillo. Si la varilla vertical más larga tiene un agujero previamente perforado, ajuste el tornillo en el agujero previamente perforado de la varilla vertical más larga. Si la varilla vertical más larga no tiene un agujero previamente perforado, ajuste el tornillo sobre la varilla vertical para asegurar la esfera de la misma. PROCEDA AL PASO 8.

T

GF

Q

F

T

ETL-ES-Panorama-WH08

Page 8
Image 8
Westinghouse WH08 installation instructions El acoplador. Proceda AL Paso

WH08 specifications

The Westinghouse WH08 is a compact and versatile mini portable generator designed to provide reliable power for various applications, including outdoor activities, home backup, and job sites. Known for its durability and efficiency, the WH08 stands out in the crowded generator market as a leader in portability and convenience.

Weighing around 48 pounds, the WH08 is lightweight and features a compact design, making it easy to transport and store. Its foldable handle adds to its convenience, as users can quickly pack it up for camping, tailgating, or in case of power outages. The sturdy rubber wheels further enhance its portability, allowing users to navigate different terrains with ease.

One of the main features of the Westinghouse WH08 is its powerful 420cc engine, which delivers a maximum output of 800 watts and a rated output of 700 watts. This energy output is sufficient for powering small appliances, lights, and other essential devices during emergencies or outdoor adventures. Additionally, the generator operates quietly, with a noise level of only 57 decibels, making it an excellent choice for use in residential areas or during camping trips.

The WH08 incorporates several advanced technologies that enhance its performance and usability. An essential feature is the eco-mode, which adjusts the engine speed based on the load requirements, resulting in fuel savings and reduced emissions. This eco-friendly design not only makes it more efficient but also lessens its impact on the environment.

Safety is another paramount consideration in the design of the WH08. It is equipped with overload protection, which safeguards the generator and connected devices from damage due to excessive power draw. The low oil shutdown feature automatically turns off the engine if oil levels drop too low, preventing potential engine damage and ensuring longevity.

The generator features a user-friendly control panel that includes multiple AC outlets and USB ports, allowing for versatile connectivity options. Whether needing to charge devices like smartphones or power tools, the WH08 can accommodate various needs.

In conclusion, the Westinghouse WH08 mini portable generator is an ideal choice for those seeking a lightweight, efficient, and reliable power source. With its powerful engine, eco-friendly technology, and user-friendly features, it meets the demands of various applications, from recreational activities to emergency power backup. This generator provides peace of mind during power outages and adds convenience to outdoor experiences.