hazard, the cord must be plugged tnto a mating
grouncilng type wall receptacle, grounded In accordance
with the National ElectrIcal Code and local codes and
ordlnarrces. If a mating wall receptacle IS not avallable, It
1s The personal responslblllty and obllgatlon of the customer
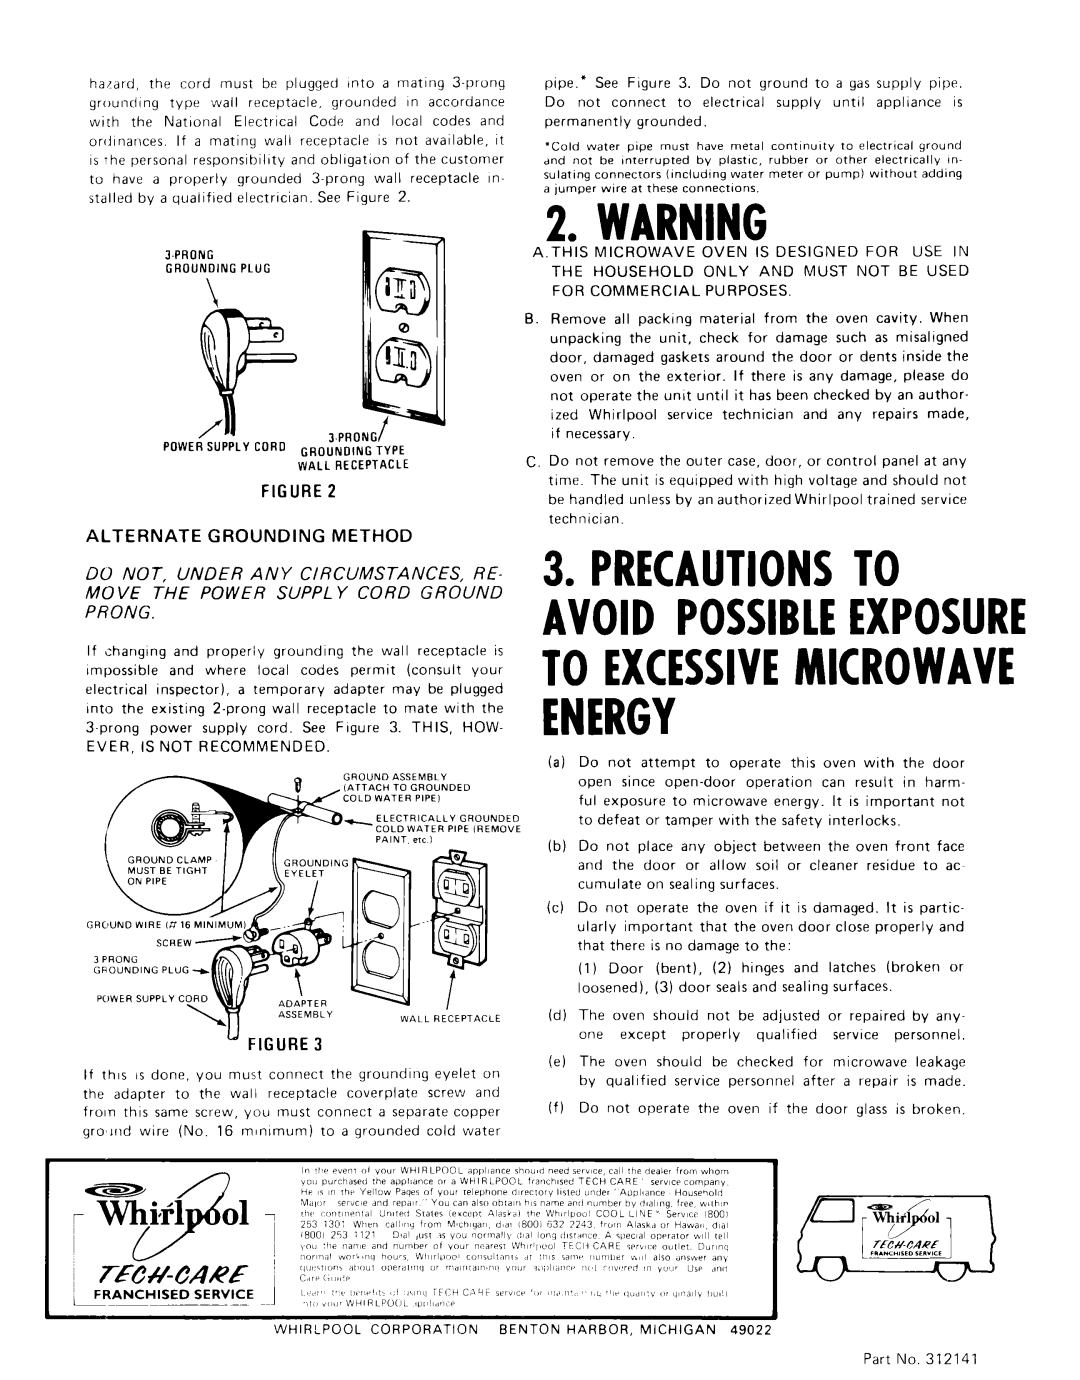
to have a properly grounded
3.PRONG
GROUNDING PLUG
3.PRONG/
POWER SUPPLY CORD GROUNDING TYPE WALL RECEPTACLE
FIGURE 2
ALTERNATE GROUNDING METHOD
DO NOT, UNDER ANY CIRCUMSTANCES, RE- MOVE THE POWER SUPPLY CORD GROUND PRONG.
If changing and properly grounding the wall receptacle is
Impossible and where local codes permit (consult your
electrical inspector), a temporary adapter may be plugged Into the existing
EVER, IS NOT RECOMMENDED.
GROUND ASSEMBLY
IATTACH TO GROUNDED
COLD WATER PIPE,
! GROUND CLAMP
GRC’VND | WIRE | I# 16 MINIMUM |
|
|
|
3 PRONG |
|
|
|
|
|
GROUNDING |
|
|
| ||
POWER SUPPLY CO_RD y | AD,\,,,, | - | / | ||
|
|
| |||
|
|
| ASSEMBLY | WALL | RECEPTACLE |
|
|
|
| ||
’FIGURE 3
If this IS done, you must connect the grounding eyelet on
the adapter to the wall receptacle coverplate screw and frown this same screw, you must connect a separate copper gromlnd wire (No. 16 mlnlmum) to a grounded cold water
pipe.* See Figure 3. Do not ground to a gas supply pipe.
Do | not connect | to | electrical | supply | until | appliance | is | |||||
permanently | grounded. |
|
|
|
|
|
|
|
| |||
‘Cold |
| water | pipe | must | have | meral | contlnulty |
| to | electrlcal | ground |
|
and | not | be | interrupted |
| by | plastic, | rubber |
| or other | electrlcally |
| I”- |
sulating |
| connectors | (Including | water | meter | or | pump) | without | adding |
| ||
a jumper | wire | at these connections. |
|
|
|
|
|
| ||||
2.WARNING
A.THIS MICROWAVE OVEN IS DESIGNED FOR USE IN
THE HOUSEHOLD ONLY AND MUST NOT BE USED
FOR COMMERCIAL PURPOSES.
B. Remove all packing material from the oven cavity. When unpacking the unit, check for damage such as misallgned door, damaged gaskets around the door or dents inside the oven or on the exterior. If there is any damage, please do not operate the unit until it has been checked by an author-
ized Whirlpool service technician and any repairs made, if necessary.
C. Do not remove the outer case, door, or control panel at any time. The unit is equipped with high voltage and should not be handled unless by an authorized Whirlpool trained service technlcian.
3.PRECAUTIONSTO AVOIDPOSSIBLEEXPOSURE TOEXCESSIVEMICROWAVE ENERGY
(a)Do not attempt to operate this oven with the door
open since
ful exposure to microwave energy. It is important not to defeat or tamper with the safety interlocks.
(b)Do not place any object between the oven front face and the door or allow soil or cleaner residue to act cumulate on sealing surfaces.
(c)Do not operate the oven if it is damaged. It is partic-
ularly important that the oven door close properly and that there is no damage to the:
(1)Door (bent), (2) hinges and latches (broken or loosened), (3) door seals and sealing surfaces.
(d)The oven should not be adjusted or repaired by any-
one except properly qualified service personnel.
(e)The oven should be checked for microwave leakage by quahfied service personnel after a repair is made.
(f)DO not operate the oven if the door glass is broken.
WHIRLPOOL CORPORATION BENTON HARBOR, MICHIGAN 49022
Part No. 312141
