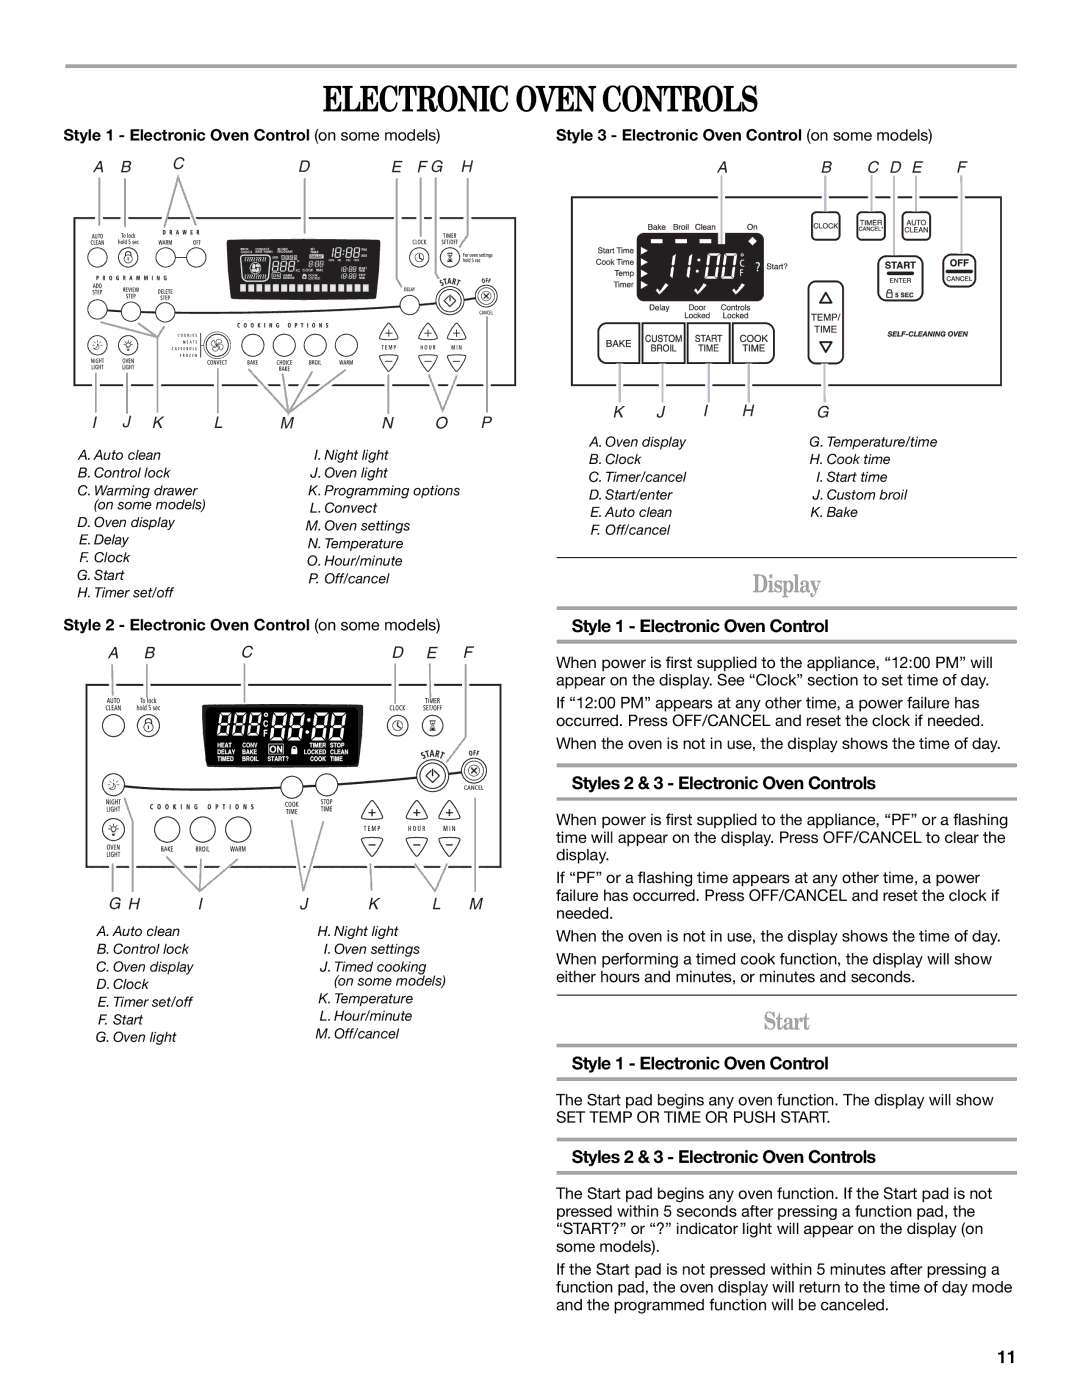
ELECTRONIC OVEN CONTROLS
Style 1 - Electronic Oven Control (on some models) | Style 3 - Electronic Oven Control (on some models) |
| |||||
A B | C | D | E F G H | A | B | C D E | F |
BROIL | CONVECT | REVIEW |
| SET | PM | |
CHOICE | BAKE WARM | PROGRAM |
| TIMER | AM | |
|
| STEP | 1 2 3 | 4 | DELAY | |
|
|
|
|
| MIN HR | SEC MIN |
|
|
|
| FC COOK TIME | START | |
|
|
|
| TIME | ||
|
| ON | WARM |
| DOOR | STOP |
|
| DRAWER |
| LOCKED | TIME | |
I | J K | L | M | N | O | P |
A. Auto clean |
|
| I. Night light |
|
| |
B. Control lock |
|
| J. Oven light |
|
| |
C. Warming drawer |
|
| K. Programming options |
| ||
(on some models) |
|
| L. Convect |
|
| |
D. Oven display |
|
| M. Oven settings |
|
| |
E. Delay |
|
| N. Temperature |
|
| |
F. Clock |
|
| O. Hour/minute |
|
| |
G. Start |
|
| P. Off/cancel |
|
| |
H. Timer set/off |
|
|
|
|
| |
Style 2 - Electronic Oven Control (on some models)
A BCD E F
G H | I | J | K | L | M |
A. Auto clean |
|
| H. Night light |
|
|
B. Control lock |
|
| I. Oven settings |
|
|
C. Oven display |
|
| J. Timed cooking |
|
|
D. Clock |
|
| (on some models) |
| |
E. Timer set/off |
|
| K. Temperature |
|
|
F. Start |
|
| L. Hour/minute |
|
|
G. Oven light |
|
| M. Off/cancel |
|
|
K | J | I | H | G |
A. Oven display |
|
| G. Temperature/time | |
B. Clock |
|
|
| H. Cook time |
C. Timer/cancel |
|
| I. Start time | |
D. Start/enter |
|
| J. Custom broil | |
E. Auto clean |
|
| K. Bake | |
F. Off/cancel |
|
|
| |
Display
Style 1 - Electronic Oven Control
When power is first supplied to the appliance, “12:00 PM” will appear on the display. See “Clock” section to set time of day.
If “12:00 PM” appears at any other time, a power failure has occurred. Press OFF/CANCEL and reset the clock if needed.
When the oven is not in use, the display shows the time of day.
Styles 2 & 3 - Electronic Oven Controls
When power is first supplied to the appliance, “PF” or a flashing time will appear on the display. Press OFF/CANCEL to clear the display.
If “PF” or a flashing time appears at any other time, a power failure has occurred. Press OFF/CANCEL and reset the clock if needed.
When the oven is not in use, the display shows the time of day.
When performing a timed cook function, the display will show either hours and minutes, or minutes and seconds.
Start
Style 1 - Electronic Oven Control
The Start pad begins any oven function. The display will show
SET TEMP OR TIME OR PUSH START.
Styles 2 & 3 - Electronic Oven Controls
The Start pad begins any oven function. If the Start pad is not pressed within 5 seconds after pressing a function pad, the “START?” or “?” indicator light will appear on the display (on some models).
If the Start pad is not pressed within 5 minutes after pressing a function pad, the oven display will return to the time of day mode and the programmed function will be canceled.
11
