MakeGasConnection

1.Remove the red cap from the gas pipe.

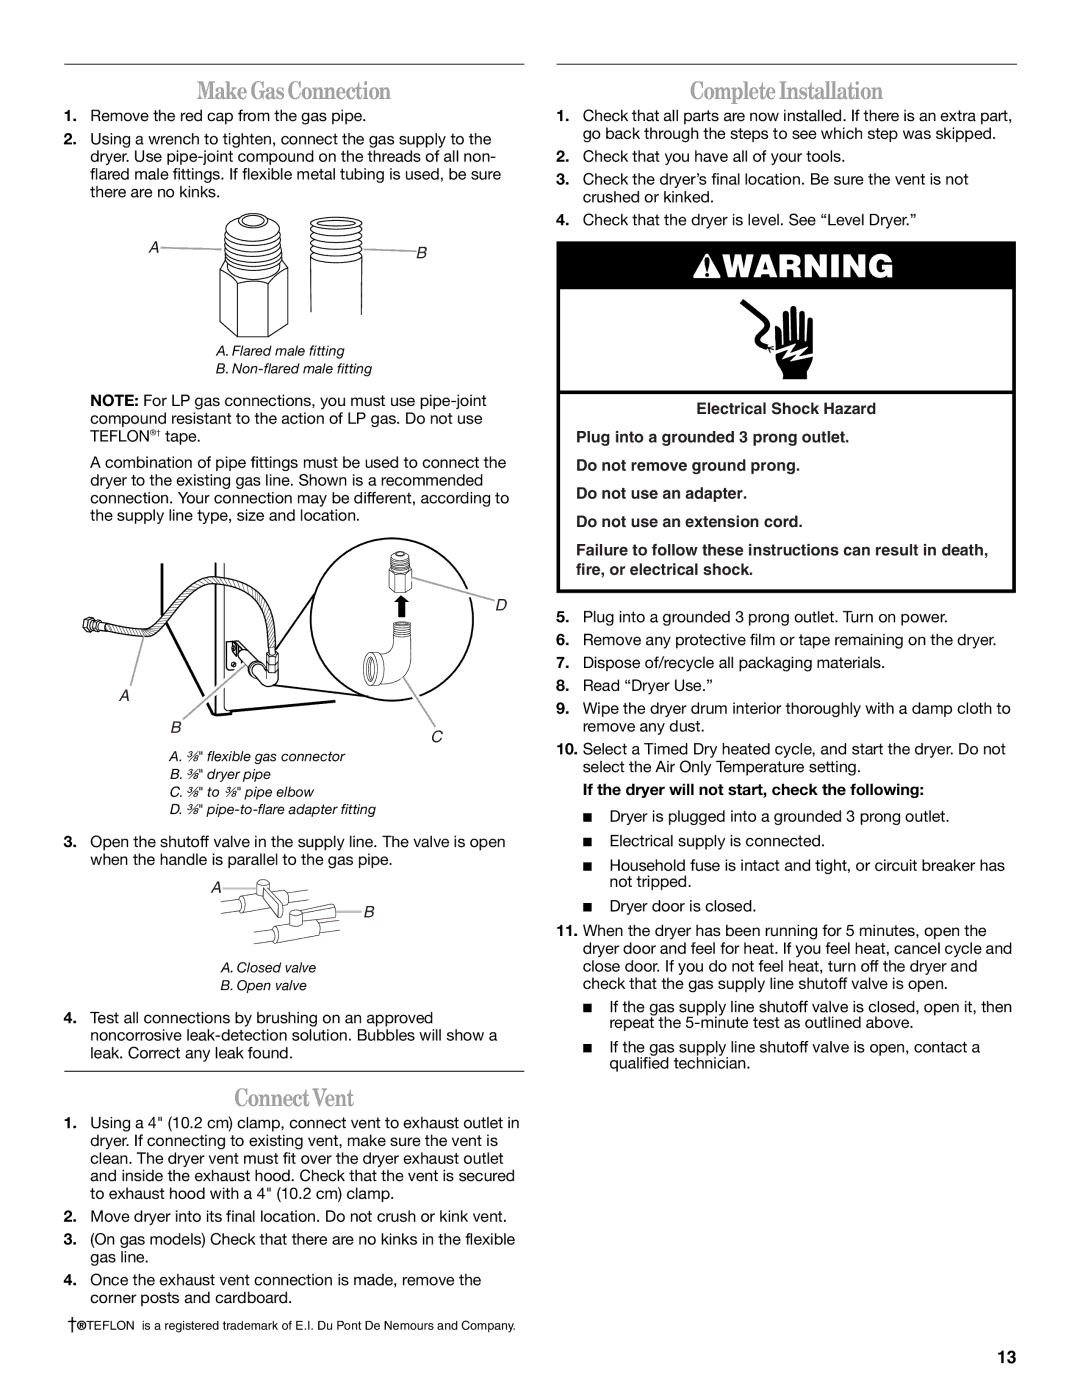
2.Using a wrench to tighten, connect the gas supply to the dryer. Use pipe-joint compound on the threads of all non- flared male fittings. If flexible metal tubing is used, be sure there are no kinks.

A B

A. Flared male fitting

B. Non-flared male fitting

NOTE: For LP gas connections, you must use pipe-joint compound resistant to the action of LP gas. Do not use TEFLON®† tape.

A combination of pipe fittings must be used to connect the dryer to the existing gas line. Shown is a recommended connection. Your connection may be different, according to the supply line type, size and location.

CompleteInstallation

1.Check that all parts are now installed. If there is an extra part, go back through the steps to see which step was skipped.

2.Check that you have all of your tools.

3.Check the dryer’s final location. Be sure the vent is not crushed or kinked.

4.Check that the dryer is level. See “Level Dryer.”

WARNING

Electrical Shock Hazard

Plug into a grounded 3 prong outlet.

Do not remove ground prong.

Do not use an adapter.

Do not use an extension cord.

Failure to follow these instructions can result in death, fire, or electrical shock.

A

B

D

C

5.

Plug into a grounded 3 prong outlet. Turn on power.

6.

Remove any protective film or tape remaining on the dryer.

7.

Dispose of/recycle all packaging materials.

8.

Read “Dryer Use.”

9.

Wipe the dryer drum interior thoroughly with a damp cloth to


remove any dust.

10.

Select a Timed Dry heated cycle, and start the dryer. Do not

A. ³⁄₈" flexible gas connector

B. ³⁄₈" dryer pipe

C. ³⁄₈" to ³⁄₈" pipe elbow

D.³⁄₈" pipe-to-flare adapter fitting

3.Open the shutoff valve in the supply line. The valve is open when the handle is parallel to the gas pipe.

A

B

A. Closed valve

B. Open valve

4.Test all connections by brushing on an approved noncorrosive leak-detection solution. Bubbles will show a leak. Correct any leak found.

ConnectVent

1.Using a 4" (10.2 cm) clamp, connect vent to exhaust outlet in dryer. If connecting to existing vent, make sure the vent is clean. The dryer vent must fit over the dryer exhaust outlet and inside the exhaust hood. Check that the vent is secured to exhaust hood with a 4" (10.2 cm) clamp.

2.Move dryer into its final location. Do not crush or kink vent.

3.(On gas models) Check that there are no kinks in the flexible gas line.

4.Once the exhaust vent connection is made, remove the corner posts and cardboard.

®TEFLON is a registered trademark of E.I. Du Pont De Nemours and Company.

select the Air Only Temperature setting.

If the dryer will not start, check the following:

Dryer is plugged into a grounded 3 prong outlet.

Electrical supply is connected.

Household fuse is intact and tight, or circuit breaker has

not tripped.

Dryer door is closed.

11. When the dryer has been running for 5 minutes, open the

dryer door and feel for heat. If you feel heat, cancel cycle and

close door. If you do not feel heat, turn off the dryer and

check that the gas supply line shutoff valve is open.

If the gas supply line shutoff valve is closed, open it, then

repeat the 5-minute test as outlined above.

If the gas supply line shutoff valve is open, contact a

qualified technician.

13

Page 13
Image 13
Whirlpool ELECTRONIC GAS DRYER manual MakeGasConnection, CompleteInstallation, ConnectVent

ELECTRONIC GAS DRYER specifications

The Whirlpool Electronic Gas Dryer is an innovative household appliance designed to streamline your laundry experience while ensuring optimal performance and efficiency. Packed with advanced features and cutting-edge technologies, this gas dryer caters to the needs of modern consumers who prioritize convenience, energy efficiency, and superior fabric care.

One of the standout features of the Whirlpool Electronic Gas Dryer is its precise drying technology, which includes moisture sensing capability. This intelligent system detects the moisture level in your clothes, automatically adjusting drying time accordingly. This not only helps prevent overdrying, which can damage fabrics and reduce lifespan, but also conserves energy by reducing unnecessary drying cycles.

Another significant aspect of this dryer is its variety of drying cycles. From Delicate and Heavy Duty to Quick Dry settings, the Whirlpool Electronic Gas Dryer offers customizable options for various fabric types and load sizes. This flexibility is enhanced by the inclusion of specialty cycles, such as Sanitize and Steam Refresh, which address specific care needs for items like bedding and athletic wear.

Energy efficiency is a key consideration in the design of the Whirlpool Electronic Gas Dryer. With an Energy Star certification, it meets stringent energy efficiency guidelines, helping homeowners save on utility bills while reducing their ecological footprint. This dryer uses gas as its primary heat source, which is typically more cost-effective and environmentally friendly compared to electric alternatives.

User-friendly controls make operating the Whirlpool Electronic Gas Dryer a breeze. The intuitive digital display allows for easy selection of drying cycles and settings, while the end-of-cycle signal alerts you when your laundry is ready. Additionally, the front-loading design and large capacity drum can accommodate substantial loads, making it ideal for busy households.

The durable construction of the Whirlpool Electronic Gas Dryer ensures long-lasting performance. High-quality materials and robust components contribute to its reliability, while the sleek design adds a modern touch to any laundry room. Overall, the Whirlpool Electronic Gas Dryer combines the latest technologies with thoughtful features, providing an effective solution for tackling laundry day challenges with ease and efficiency.