AccuSimmer® Burners*

AccuSimmer® burners are located in the right front position and left rear position on 36" (91.4 cm) models or in the right front position on 30" (76.2 cm) models. The AccuSimmer® burners offer a lower Btu/h flame for delicate sauces or melting chocolate.

*Btu/h rating will vary when using LP gas.

Power Failure

The ignition feature will not operate during a power failure.

In case of prolonged power failure, the surface burners can be lit manually. Hold a lit match near a burner and turn knob counterclockwise. After burner lights, turn knob to setting.

SurfaceBurners

IMPORTANT: Do not obstruct the flow of combustion and ventilation air around the burner grate edges.

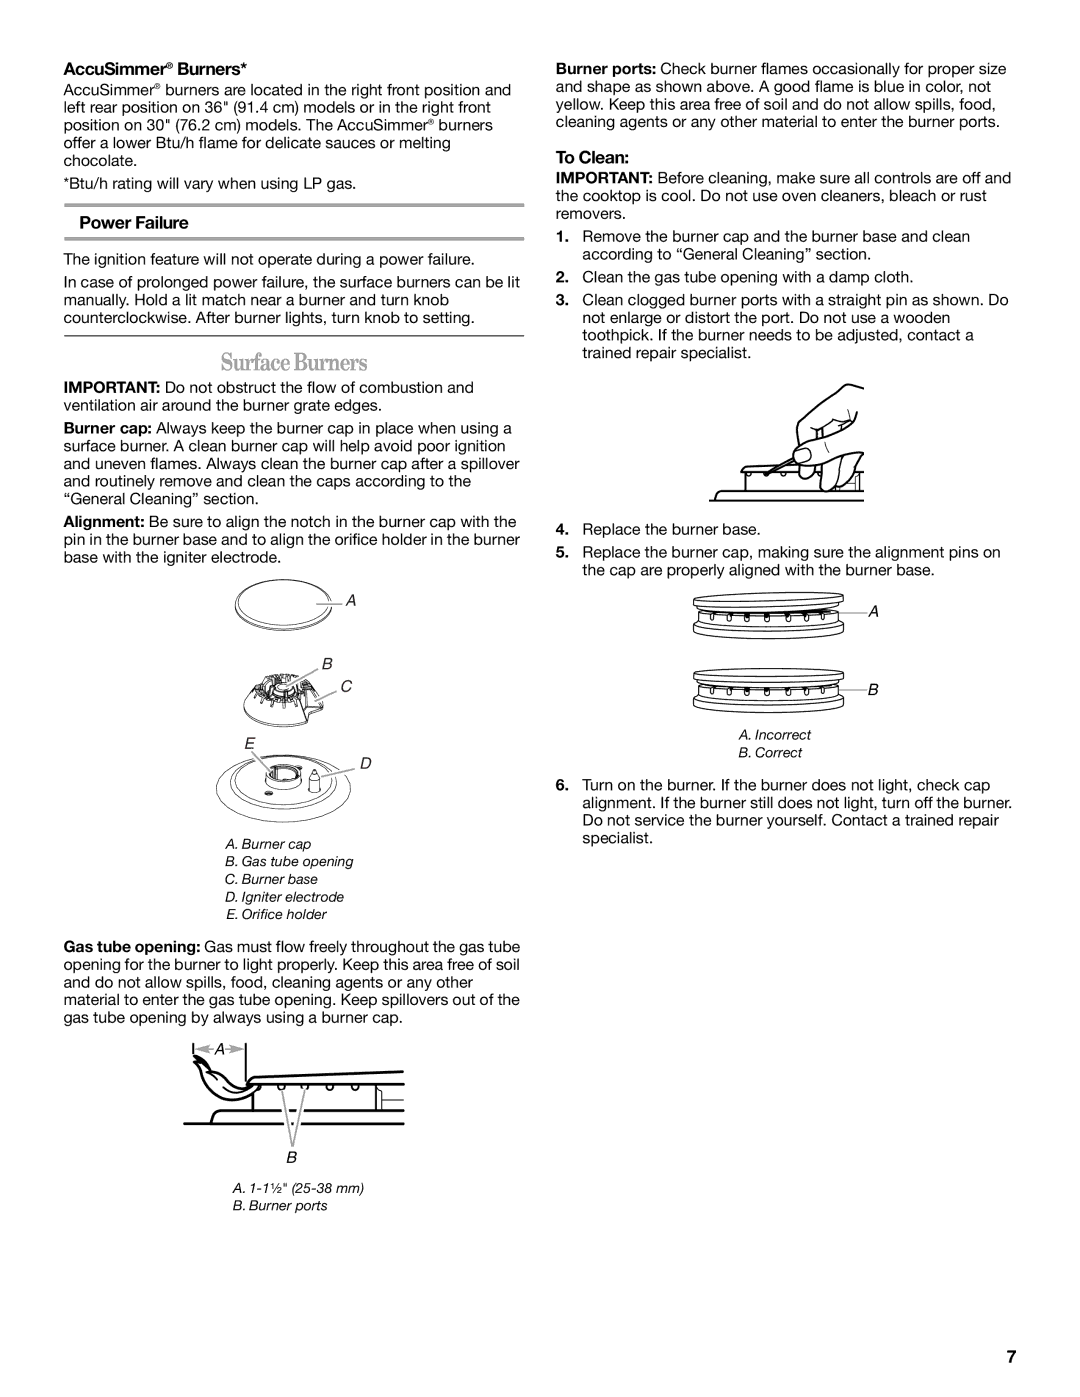
Burner cap: Always keep the burner cap in place when using a surface burner. A clean burner cap will help avoid poor ignition and uneven flames. Always clean the burner cap after a spillover and routinely remove and clean the caps according to the “General Cleaning” section.

Alignment: Be sure to align the notch in the burner cap with the pin in the burner base and to align the orifice holder in the burner base with the igniter electrode.

A

B

C

E

D

A. Burner cap

B. Gas tube opening

C. Burner base

D. Igniter electrode

E. Orifice holder

Gas tube opening: Gas must flow freely throughout the gas tube opening for the burner to light properly. Keep this area free of soil and do not allow spills, food, cleaning agents or any other material to enter the gas tube opening. Keep spillovers out of the gas tube opening by always using a burner cap.

A

B

A.1-1¹⁄₂" (25-38 mm)

B.Burner ports

Burner ports: Check burner flames occasionally for proper size and shape as shown above. A good flame is blue in color, not yellow. Keep this area free of soil and do not allow spills, food, cleaning agents or any other material to enter the burner ports.

To Clean:

IMPORTANT: Before cleaning, make sure all controls are off and the cooktop is cool. Do not use oven cleaners, bleach or rust removers.

1.Remove the burner cap and the burner base and clean according to “General Cleaning” section.

2.Clean the gas tube opening with a damp cloth.

3.Clean clogged burner ports with a straight pin as shown. Do not enlarge or distort the port. Do not use a wooden toothpick. If the burner needs to be adjusted, contact a trained repair specialist.

4.Replace the burner base.

5.Replace the burner cap, making sure the alignment pins on the cap are properly aligned with the burner base.

A

B

A.Incorrect

B.Correct

6.Turn on the burner. If the burner does not light, check cap alignment. If the burner still does not light, turn off the burner. Do not service the burner yourself. Contact a trained repair specialist.

7

Page 7
Image 7
Whirlpool W5CG3024XS, G7CG3064XS, W5CG3024XB, W5CG3024XW, W5CG3625XB, G7CG3665 manual SurfaceBurners, Power Failure, To Clean

G7CG3665, W5CG3024XS, W5CG3625XB, W5CG3024XW, W5CG3625 specifications

Whirlpool has consistently been at the forefront of kitchen innovation, offering a range of high-performance cooking appliances. Among its notable products are the Whirlpool G7CG3064XS, G7CG3064, W5CG3024, W5CG3024XB, and W5CG3625. Each model is designed with both functionality and style in mind, catering to the diverse needs of modern home cooks.

The Whirlpool G7CG3064XS stands out with its sleek stainless steel finish and robust construction, making it a popular choice for contemporary kitchens. One of its main features is the 6.4 cu. ft. capacity oven, which provides ample space for cooking multiple dishes simultaneously. The model also includes advanced cooking technologies such as Smart Oven Cook & Control, allowing users to monitor and adjust cooking temperatures remotely via a smartphone app. Additionally, the five burners on the cooktop offer versatile cooking options, ranging from simmering sauces to high-heat boiling.

Building on similar principles, the Whirlpool G7CG3064 provides an efficient and user-friendly cooking experience. It features a powerful convection oven which ensures even cooking results by circulating hot air throughout the oven cavity. The temperature probe is another valuable feature, enabling home chefs to achieve perfect doneness by measuring the internal temperature of dishes like roasts and casseroles.

The W5CG3024 and W5CG3024XB bring their own unique advantages, with a focus on simple operation and practicality. Both models feature a 4.8 cu. ft. oven, catering to those with space constraints while still delivering reliable cooking performance. The cooktop includes sealed burners for easy cleaning, and the models are designed to maintain consistent heat, crucial for delicate tasks like baking.

Meanwhile, the W5CG3625 is built with a larger 5.8 cu. ft. capacity oven, appealing to larger households or those who frequently entertain. It includes additional features such as a printed stainless steel finish that resists fingerprints, ensuring the appliance maintains a polished look. Furthermore, its versatile burner configuration allows for multi-course meals to be prepared simultaneously.

Together, these Whirlpool models represent a blend of style, innovation, and practicality tailored to meet the evolving needs of consumers. With features designed for efficiency, ease of use, and performance, these appliances promise to enhance the cooking experience in any kitchen.