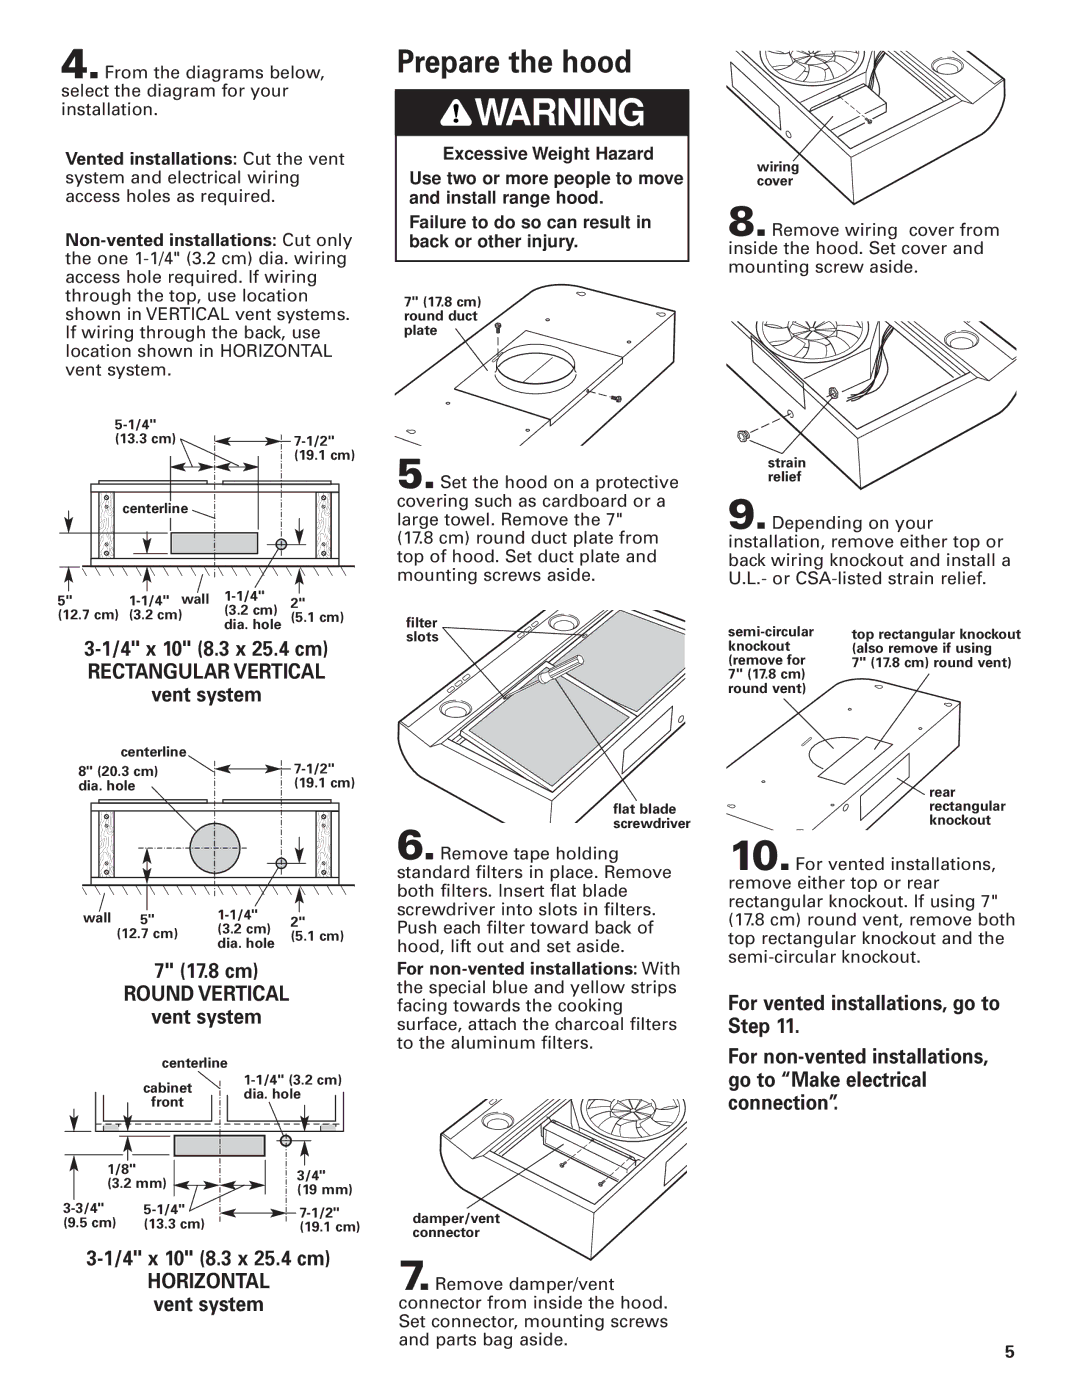
4.From the diagrams below, select the diagram for your installation.

Vented installations: Cut the vent system and electrical wiring access holes as required.

Non-vented installations: Cut only the one 1-1/4" (3.2 cm) dia. wiring access hole required. If wiring through the top, use location shown in VERTICAL vent systems. If wiring through the back, use location shown in HORIZONTAL vent system.

5-1/4"


(13.3 cm)

7-1/2"


(19.1 cm)

centerline


Prepare the hood

WARNING

Excessive Weight Hazard

Use two or more people to move and install range hood.

Failure to do so can result in back or other injury.

7" (17.8 cm) round duct plate

5.Set the hood on a protective covering such as cardboard or a large towel. Remove the 7"

(17.8 cm) round duct plate from top of hood. Set duct plate and mounting screws aside.

wiring cover

8.Remove wiring cover from inside the hood. Set cover and mounting screw aside.

strain relief

9.Depending on your installation, remove either top or back wiring knockout and install a U.L.- or CSA-listed strain relief.

5"

1-1/4"

wall 1-1/4"

2"

(12.7 cm)

(3.2 cm)

(3.2 cm)

dia. hole

(5.1 cm)


3-1/4" x 10" (8.3 x 25.4 cm)

RECTANGULAR VERTICAL

vent system

centerline


8" (20.3 cm)


7-1/2"


dia. hole


(19.1 cm)

filter slots

flat blade screwdriver

semi-circular knockout (remove for 7" (17.8 cm) round vent)

top rectangular knockout (also remove if using

7" (17.8 cm) round vent)

rear rectangular knockout


wall


1-1/4"


5"

2"


(12.7 cm)

(3.2 cm)

(5.1 cm)


dia. hole


7" (17.8 cm)

ROUND VERTICAL

vent system

centerline


cabinet

1-1/4" (3.2 cm)

dia. hole

front


1/8"


3/4"


(3.2 mm)


(19 mm)


3-3/4"

5-1/4"


7-1/2"


(9.5 cm)

(13.3 cm)


(19.1 cm)


3-1/4" x 10" (8.3 x 25.4 cm)

HORIZONTAL vent system

6.Remove tape holding standard filters in place. Remove both filters. Insert flat blade screwdriver into slots in filters. Push each filter toward back of hood, lift out and set aside.

For non-vented installations: With the special blue and yellow strips facing towards the cooking surface, attach the charcoal filters to the aluminum filters.

damper/vent connector

7.Remove damper/vent connector from inside the hood. Set connector, mounting screws and parts bag aside.

10.For vented installations, remove either top or rear rectangular knockout. If using 7" (17.8 cm) round vent, remove both top rectangular knockout and the semi-circular knockout.

For vented installations, go to Step 11.

For non-vented installations, go to “Make electrical connection”.

5

Page 5
Image 5
Whirlpool GZ5730, GZ5736 installation instructions Prepare the hood, 4 x 10 8.3 x 25.4 cm, Vent system, 17.8 cm

GZ5730, GZ5736 specifications

The Whirlpool GZ5736 and GZ5730 are part of Whirlpool's innovative lineup of refrigerators designed to enhance kitchen convenience while promoting energy efficiency and modern aesthetics. Both models are engineered with advanced technologies that focus on user experience, ensuring that food storage becomes a seamless part of daily life.

One of the prominent features of the GZ5736 and GZ5730 is their Adaptive Defrost system. This groundbreaking technology monitors the usage patterns of the refrigerator, allowing it to run the defrost cycle only when necessary, thus conserving energy and maintaining optimal food preservation conditions. This not only prolongs the lifespan of the appliance but also results in lower energy bills.

Another significant aspect of these models is their improved cooling system. Equipped with a multi-air flow system, these refrigerators ensure consistent temperature distribution throughout the fridge and freezer compartments. This helps maintain the freshness of groceries while minimizing temperature fluctuations that could lead to spoilage.

The GZ5736 and GZ5730 models boast spacious storage solutions. They feature adjustable shelves that allow users to customize their space according to their needs. This flexibility accommodates larger items, such as tall bottles or bulk grocery purchases, ensuring that every inch of space is utilized efficiently. The door bins are designed for easy access, providing quick retrieval of frequently used items like condiments and beverages.

Both refrigerators also come with an innovative humidity-controlled crisper drawer. This unique feature helps keep fruits and vegetables fresh longer by regulating humidity levels, creating an ideal environment for produce storage.

In terms of energy efficiency, the Whirlpool GZ5736 and GZ5730 exceed ENERGY STAR guidelines, embodying Whirlpool's commitment to sustainability. Users can feel confident that they are making a responsible choice without compromising on performance.

Additionally, these models come equipped with intuitive LED lighting, illuminating the refrigerator's interior and allowing for easy visibility of contents, even in dim light. This enhances the overall user experience by making it convenient to locate items quickly.

In summary, the Whirlpool GZ5736 and GZ5730 refrigerators combine advanced technology, energy efficiency, and user-friendly features to provide exceptional food storage solutions. With their sleek design, innovative cooling systems, and customizable space, they are ideal choices for modern households looking to blend practicality with style.