Use flat-bottomed cookware for best heat conduction and energy efficiency. Cookware with rounded, warped, ribbed or dented bottoms could cause uneven heating and poor cooking results.

Determine flatness by placing the straight edge of a ruler across the bottom of the cookware. While you rotate the ruler, no space or light should be visible between it and the cookware.

Cookware designed with slightly indented bottoms or small expansion channels can be used.

Make sure the bottoms of pots and pans are clean and dry before using them. Residue and water can leave deposits when heated.

Do not cook foods directly on the cooktop.

Hot Surface Indicator Light (under ceramic glass)

The hot surface indicator light will glow as long as any surface cooking area is too hot to touch, even after the surface cooking area(s) is turned off.

Coil Elements and Burner Bowls

(on some models)

Coil elements should be level for optimal cooking results. Burner bowls, when clean, reflect heat back to the cookware. They also help catch spills.

Cookware should not extend more than 1" (2.5 cm) over the coil element. If cookware is uneven or too large, it can produce excess heat causing the burner bowl to change color. For more information, see the “General Cleaning” section.

NOTE: Before removing or replacing coil elements and burner bowls, make sure they are cool and the control knobs are in the Off position.

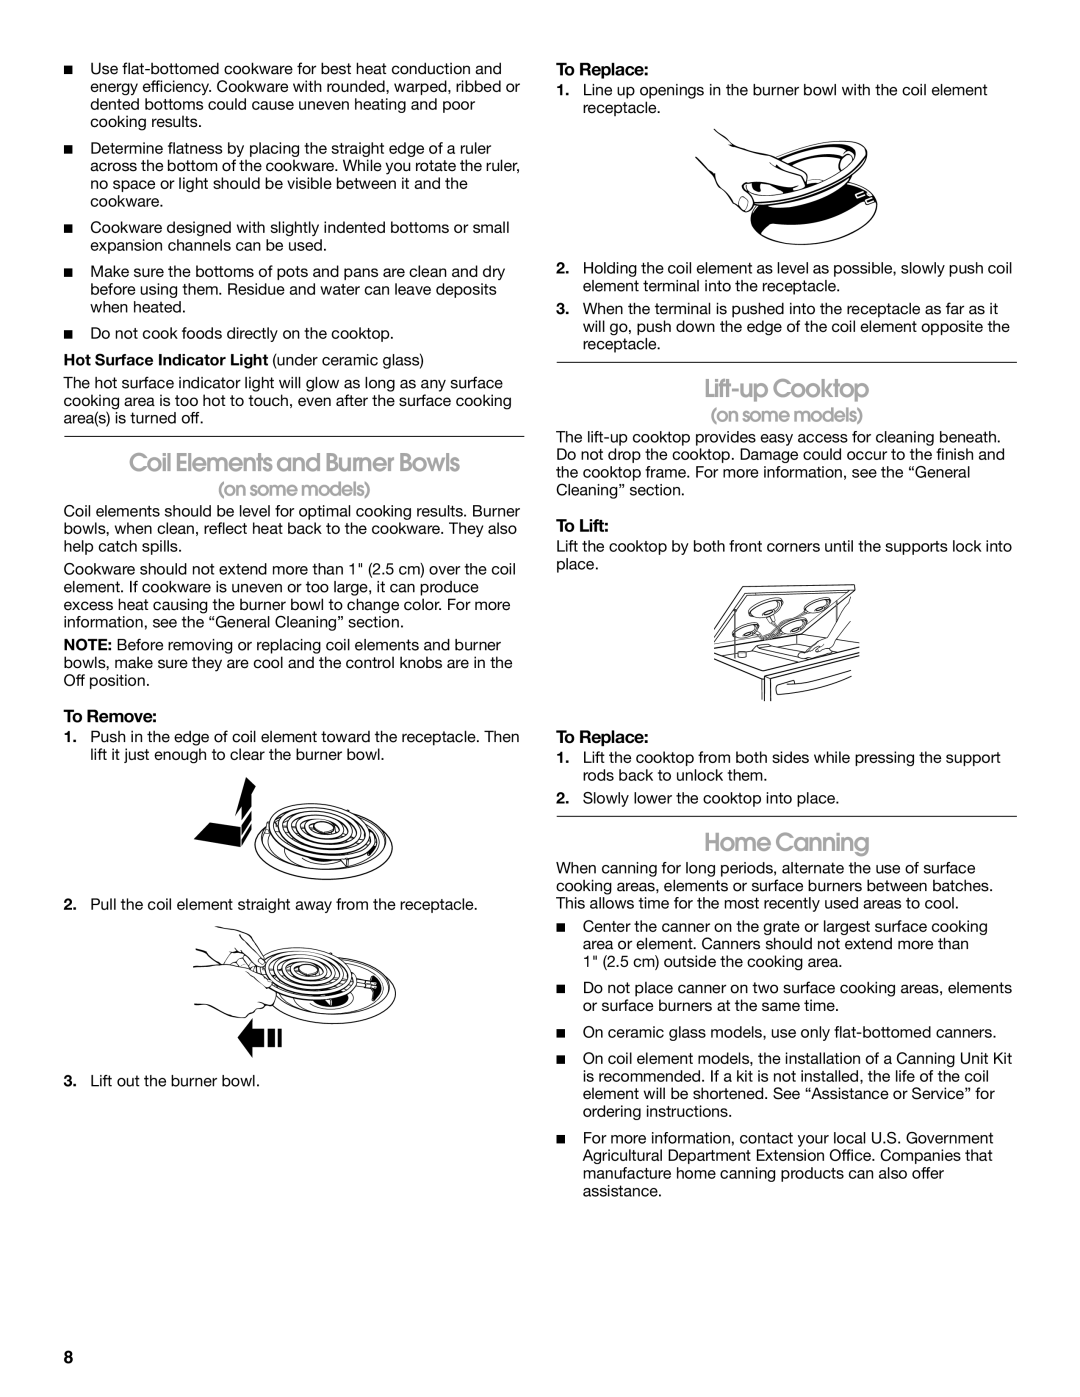
To Remove:

1.Push in the edge of coil element toward the receptacle. Then lift it just enough to clear the burner bowl.

2.Pull the coil element straight away from the receptacle.

3.Lift out the burner bowl.

To Replace:

1.Line up openings in the burner bowl with the coil element receptacle.

2.Holding the coil element as level as possible, slowly push coil element terminal into the receptacle.

3.When the terminal is pushed into the receptacle as far as it will go, push down the edge of the coil element opposite the receptacle.

Lift-up Cooktop

(on some models)

The lift-up cooktop provides easy access for cleaning beneath. Do not drop the cooktop. Damage could occur to the finish and the cooktop frame. For more information, see the “General Cleaning” section.

To Lift:

Lift the cooktop by both front corners until the supports lock into place.

To Replace:

1.Lift the cooktop from both sides while pressing the support rods back to unlock them.

2.Slowly lower the cooktop into place.

Home Canning

When canning for long periods, alternate the use of surface cooking areas, elements or surface burners between batches. This allows time for the most recently used areas to cool.

Center the canner on the grate or largest surface cooking area or element. Canners should not extend more than 1" (2.5 cm) outside the cooking area.

Do not place canner on two surface cooking areas, elements or surface burners at the same time.

On ceramic glass models, use only flat-bottomed canners.

On coil element models, the installation of a Canning Unit Kit is recommended. If a kit is not installed, the life of the coil element will be shortened. See “Assistance or Service” for ordering instructions.

For more information, contact your local U.S. Government Agricultural Department Extension Office. Companies that manufacture home canning products can also offer assistance.

8

Page 8
Image 8
Whirlpool TES325MQ1 manual Coil Elements and Burner Bowls, Lift-up Cooktop, Home Canning

TES325MQ1 specifications

The Whirlpool TES325MQ1 is a prominent model in the realm of compact refrigerators, designed to meet the diverse needs of consumers who prioritize space without sacrificing performance or style. This model is particularly well-suited for apartments, dorm rooms, or as an auxiliary cooling option in larger homes.

One of the key features of the TES325MQ1 is its energy efficiency. It boasts an Energy Star certification, which indicates that it consumes less electricity compared to traditional models. This not only helps reduce the environmental footprint but also translates to cost savings on monthly utility bills.

Storage capacity is another significant aspect of the TES325MQ1. With its well-organized interior, it provides ample space for food and beverages. The adjustable shelves allow users to customize their storage options based on their needs. The included crisper drawers keep fruits and vegetables fresh, showcasing Whirlpool's commitment to food preservation.

Having a user-friendly control panel is a notable characteristic of this model. The easy-to-read temperature controls ensure that users can adjust settings effortlessly, maintaining the optimal climate for their stored items. Additionally, the refrigerator features integrated LED lighting, which offers excellent visibility while being more energy-efficient than traditional lighting.

Another highlight of the Whirlpool TES325MQ1 is its sleek design. Available in a modern finish, it easily fits into various decor styles, enhancing the aesthetic appeal of any room. The compact dimensions allow for versatile placement options, making it convenient for consumers seeking functionality in limited spaces.

In terms of technology, the TES325MQ1 includes advanced cooling systems to maintain consistent temperatures, ensuring that food remains fresh for longer periods. The model is also designed with quiet operation in mind, making it perfect for use in environments where noise can be a concern, such as bedrooms or study areas.

Whirlpool also emphasizes durability, and the TES325MQ1 is no exception. Constructed with high-quality materials, it promises longevity and reliable performance. Overall, the Whirlpool TES325MQ1 stands out for its combination of efficiency, storage versatility, modern design, and advanced technology, making it a compelling choice for anyone in need of a compact refrigerator solution.