Check Operation of Oven/Broil Burner

1.Open broiler door.

2.Push in and turn the oven control knob to “350˚F.” The oven pilot should now be larger with the flame burning against a small metal bulb. The oven burner should light in 20–40 sec- onds; this delay is normal. The oven valve requires a certain time before it will open and allow gas to flow.

To avoid damaging the hot surface ignitor, do not insert any object into the openings of the protective shield that sur- rounds the ignitor or clean that area.


OFF￿

140￿


170￿


200￿


BROIL


250￿


350￿


300￿


450￿


350￿

400￿


OVEN￿

TEMP￿


￿


3.Check the oven burner for proper flame. The flame should be ¹⁄₂" (13 mm) long, with inner cone of bluish-green, and outer mantle of dark blue, and should be clean and soft in charac- ter. No yellow tips (not enough air), blowing or lifting (too much air) of flame should occur.

If the flame needs adjusting:

1.Turn the oven off. Wait for the oven burner to cool down.

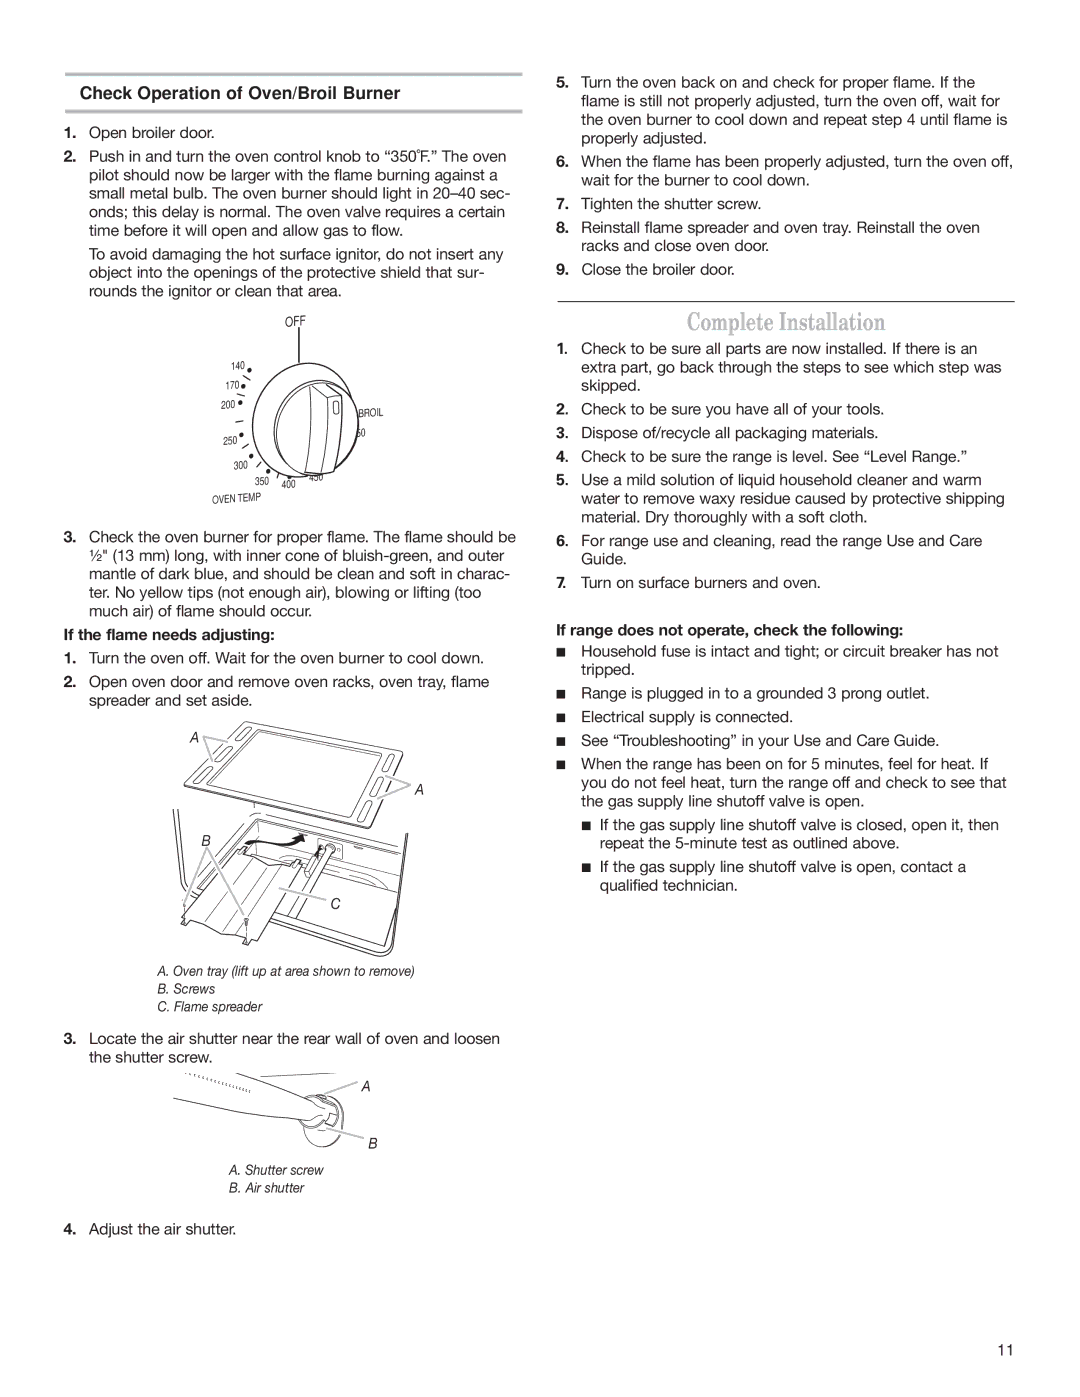
2.Open oven door and remove oven racks, oven tray, flame spreader and set aside.

A

A

B

C

A. Oven tray (lift up at area shown to remove)

B.Screws

C.Flame spreader

3.Locate the air shutter near the rear wall of oven and loosen the shutter screw.

A

B

A. Shutter screw

B. Air shutter

4.Adjust the air shutter.

5.Turn the oven back on and check for proper flame. If the flame is still not properly adjusted, turn the oven off, wait for the oven burner to cool down and repeat step 4 until flame is properly adjusted.

6.When the flame has been properly adjusted, turn the oven off, wait for the burner to cool down.

7.Tighten the shutter screw.

8.Reinstall flame spreader and oven tray. Reinstall the oven racks and close oven door.

9.Close the broiler door.

Complete Installation

1.Check to be sure all parts are now installed. If there is an extra part, go back through the steps to see which step was skipped.

2.Check to be sure you have all of your tools.

3.Dispose of/recycle all packaging materials.

4.Check to be sure the range is level. See “Level Range.”

5.Use a mild solution of liquid household cleaner and warm water to remove waxy residue caused by protective shipping material. Dry thoroughly with a soft cloth.

6.For range use and cleaning, read the range Use and Care Guide.

7.Turn on surface burners and oven.

If range does not operate, check the following:

Household fuse is intact and tight; or circuit breaker has not tripped.

Range is plugged in to a grounded 3 prong outlet.

Electrical supply is connected.

See “Troubleshooting” in your Use and Care Guide.

When the range has been on for 5 minutes, feel for heat. If you do not feel heat, turn the range off and check to see that the gas supply line shutoff valve is open.

If the gas supply line shutoff valve is closed, open it, then repeat the 5-minute test as outlined above.

If the gas supply line shutoff valve is open, contact a qualified technician.

11

Page 11
Image 11
Whirlpool W10130752A Complete Installation, Check Operation of Oven/Broil Burner, If the flame needs adjusting

W10130752A specifications

The Whirlpool W10130752A is a versatile and innovative appliance designed to enhance the efficiency and functionality of modern kitchens. As a refrigerator water filter, it plays a critical role in providing clean and safe drinking water by effectively reducing harmful contaminants.

One of the standout features of the W10130752A is its advanced filtration technology. This water filter utilizes a unique activated carbon block to significantly reduce chlorine taste and odor, alongside removing particulates and sediments. By providing improved water quality, it ensures that every glass of water and ice is fresh and pleasant. Additionally, its effective filtration system complies with various environmental standards, assuring consumers of its reliability and safety.

Another notable characteristic of the Whirlpool W10130752A is its compatibility with a wide range of Whirlpool refrigerator models. This universality simplifies the replacement process, allowing users to easily find a suitable filter for their specific appliance. Installation is straightforward and typically requires no tools, making it a user-friendly choice for homeowners.

The filter is also designed with an impressive lifespan. It typically lasts for six months or approximately 200 gallons of water, providing cost-effective and long-lasting service for families and individuals alike. Regular replacement is necessary to maintain optimal performance, and the filter conveniently features a built-in reminder that alerts users when a replacement is due.

In terms of overall efficiency, the Whirlpool W10130752A not only ensures cleaner drinking water but also contributes to enhancing the longevity of the refrigerator by preventing buildup of contaminants that could affect its internal components. This thoughtful design caters to consumer convenience, emphasizing the brand's commitment to quality and client satisfaction.

In conclusion, the Whirlpool W10130752A stands out due to its comprehensive filtration capabilities, ease of installation, compatibility with various models, and user-friendly reminders for replacement. It exemplifies the brand's dedication to enhancing everyday life through dependable appliances that prioritize health and convenience in the home. Investing in this water filter guarantees cleaner, fresher water, making it an essential component of any modern kitchen.