2.Abra la puerta del asador y saque la charola para asar. El regulador de la presión de gas está ubicado en la esquina posterior derecha del compartimiento del asador.

A

A. Regulador de la presión de gas

IMPORTANTE: No quite el regulador de la presión de gas.

NOTA: No quite el resorte que está debajo de la tapa.

3.Saque la tapa del regulador de la presión de gas usando un destornillador de hoja plana.

4.Vuelva a colocar la tapa y apriétela con el destornillador de hoja plana.

A

A. Tapa de bronce

quemadores superiores, que están en la bolsa con material

impreso incluida con la estufa. Cuatro tornillos de gas natural están marcados con “1,42”.

7.Saque los tornillos del orificio de gas LP de la válvula usando una llave de combinación de 3/8" (9,5 mm).

8.Instale los tornillos del orificio de gas natural en las válvulas.

B

A. Tornillos de los orificios

A

B.Válvulas

9.Coloque los tornillos de los orificios de gas LP en la bolsa de piezas para usarlos en el futuro y guárdela en la bolsa con material impreso.

10.Baje lentamente la superficie de cocción hasta que encaje en su posición.

11.Vuelva a colocar las parrillas.

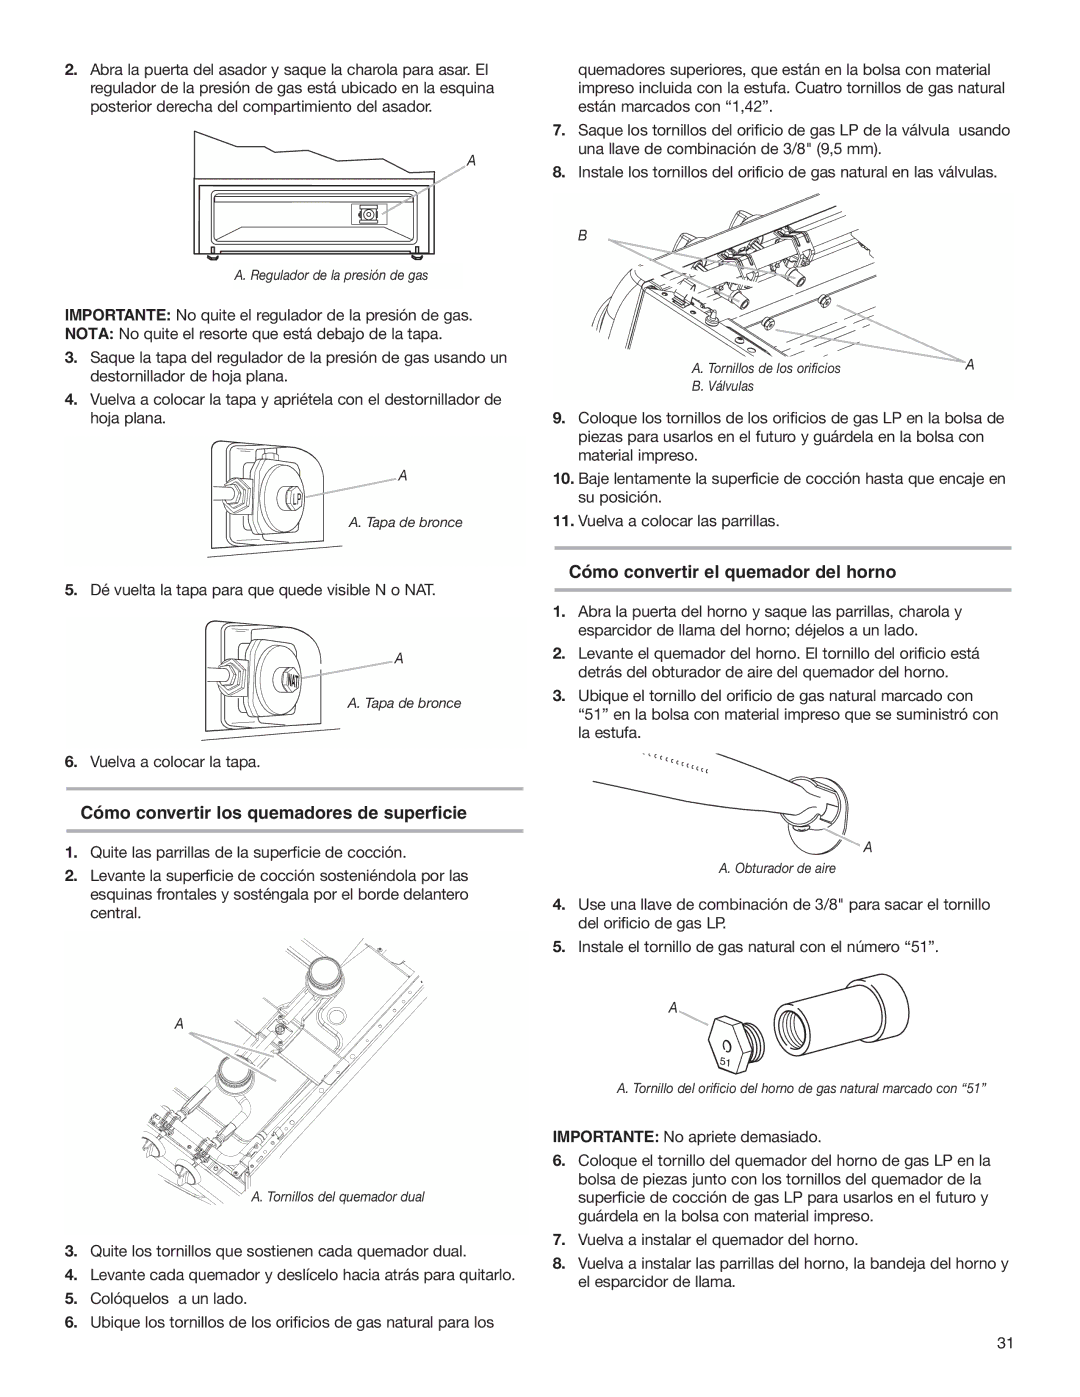
5.Dé vuelta la tapa para que quede visible N o NAT.

A

A. Tapa de bronce

6.Vuelva a colocar la tapa.

Cómo convertir los quemadores de superficie

1.Quite las parrillas de la superficie de cocción.

2.Levante la superficie de cocción sosteniéndola por las esquinas frontales y sosténgala por el borde delantero central.

A

Cómo convertir el quemador del horno

1.Abra la puerta del horno y saque las parrillas, charola y esparcidor de llama del horno; déjelos a un lado.

2.Levante el quemador del horno. El tornillo del orificio está detrás del obturador de aire del quemador del horno.

3.Ubique el tornillo del orificio de gas natural marcado con “51” en la bolsa con material impreso que se suministró con la estufa.

A

A. Obturador de aire

4.Use una llave de combinación de 3/8" para sacar el tornillo del orificio de gas LP.

5.Instale el tornillo de gas natural con el número “51”.

A

51

A. Tornillo del orificio del horno de gas natural marcado con “51”

A. Tornillos del quemador dual

3.Quite los tornillos que sostienen cada quemador dual.

4.Levante cada quemador y deslícelo hacia atrás para quitarlo.

5.Colóquelos a un lado.

6.Ubique los tornillos de los orificios de gas natural para los

IMPORTANTE: No apriete demasiado.

6.Coloque el tornillo del quemador del horno de gas LP en la bolsa de piezas junto con los tornillos del quemador de la superficie de cocción de gas LP para usarlos en el futuro y guárdela en la bolsa con material impreso.

7.Vuelva a instalar el quemador del horno.

8.Vuelva a instalar las parrillas del horno, la bandeja del horno y el esparcidor de llama.

31

Page 31
Image 31
Whirlpool W10173324B installation instructions Tapa de bronce

W10173324B specifications

The Whirlpool W10173324B is a meticulously crafted appliance designed to elevate your laundry experience, combining functionality with innovative technology. This washer is part of Whirlpool's commitment to providing reliable, efficient, and user-friendly laundry solutions.

One of the standout features of the W10173324B is its advanced washing technologies. It employs an Adaptive Wash technology that automatically senses and adapts to each load's needs, ensuring optimal cleaning performance while conserving water and energy. This feature not only enhances the washing experience but also helps in maintaining the quality of fabrics over time.

With a focus on user convenience, the W10173324B comes equipped with a large capacity drum, allowing users to handle bigger loads in fewer cycles. This is particularly beneficial for busy households, as it saves both time and effort. The 4.5 cubic feet capacity ensures that you can wash more clothes, including bulky items like comforters, with ease.

The washer also features a variety of wash cycles and options tailored to different fabric types and stain levels. From delicate items to heavily soiled work clothes, the W10173324B has you covered. The presence of a stubborn stain cycle showcases Whirlpool's dedication to tackling tough stains, providing specialized cleaning for those harder-to-remove marks.

Energy efficiency is another hallmark of the W10173324B. It is designed with eco-friendly features, such as a high-efficiency wash system that uses less water while delivering superior cleaning performance. This not only reduces water consumption but also leads to significant savings on utility bills over time.

Ease of use is paramount, and the W10173324B features a straightforward control panel that makes selecting wash settings simple. Additionally, the appliance comes with a delay start option, allowing users to schedule their laundry at a more convenient time.

In terms of durability, the W10173324B is built from high-quality materials, ensuring it can withstand regular use without compromising performance. The design is sleek and modern, fitting seamlessly into a variety of laundry room aesthetics.

In conclusion, the Whirlpool W10173324B stands out as a top choice for anyone seeking an efficient, versatile, and easy-to-use washing machine. With its combination of cutting-edge technology, user-friendly features, and energy efficiency, it undoubtedly meets the needs of modern households. Whether you're dealing with everyday laundry or specialized cleaning challenges, this washer is equipped to deliver outstanding results.