Water Supply Requirements

Gather the required tools and parts before starting installation. Read and follow the instructions provided with any tools listed here.

TOOLS NEEDED:

Flat-blade screwdriver

¹⁄₄" Nut driver

⁷⁄₁₆" and ¹⁄₂" Open-end or two

¹⁄₄" Drill bit


adjustable wrenches

Cordless drill


NOTE: Your refrigerator dealer has a kit available with a ¹⁄₄"

(6.35 mm) saddle-type shutoff valve, a union, and copper tubing. Before purchasing, make sure a saddle-type valve complies with your local plumbing codes. Do not use a piercing-type or ³⁄₁₆"

(4.76 mm) saddle valve which reduces water flow and clogs more easily.

IMPORTANT:

All installations must meet local plumbing code requirements.

Use copper tubing and check for leaks. Install copper tubing only in areas where the household temperatures will remain above freezing.

Water Pressure

A cold water supply with water pressure of between 30 and 120 psi (207 and 827 kPa) is required to operate the water dispenser and ice maker. If you have questions about your water pressure, call a licensed, qualified plumber.

If your refrigerator has a water dispenser: After installation is complete, use the water dispenser to check the water pressure.

With the water filter removed, dispense 1 cup (237 mL) of water. If 1 cup of water is dispensed in 8 seconds or less, the water pressure to the refrigerator meets the minimum requirement.

If it takes longer than 8 seconds to dispense 1 cup of water, the water pressure to the refrigerator is lower than recommended. See “Problem Solver” for suggestions.

Reverse Osmosis Water Supply

IMPORTANT: The pressure of the water supply coming out of a reverse osmosis system going to the water inlet valve of the refrigerator needs to be between 30 and 120 psi (207 and

827 kPa).

If a reverse osmosis water filtration system is connected to your cold water supply, the water pressure to the reverse osmosis system needs to be a minimum of 40 to 60 psi (276 to 414 kPa).

If the water pressure to the reverse osmosis system is less than

40 to 60 psi (276 to 414 kPa):

Check to see whether the sediment filter in the reverse osmosis system is blocked. Replace the filter if necessary.

Allow the storage tank on the reverse osmosis system to refill after heavy usage.

If your refrigerator has a water filter, it may further reduce the water pressure when used in conjunction with a reverse osmosis system. Remove the water filter. See “Water Filtration System” in the User Instructions, User Guide, or Use & Care Guide.

If you have questions about your water pressure, call a licensed, qualified plumber.

Connect the Water Supply

Read all directions before you begin.

IMPORTANT: If you turn the refrigerator on before the water line is connected, turn the ice maker OFF.

Connect to Water Line

1.Unplug refrigerator or disconnect power.

2.Turn OFF main water supply. Turn ON nearest faucet long enough to clear line of water.

3.Locate a ½" to 1¹⁄₄" (1.25 cm to 3.18 cm) vertical cold water pipe near the refrigerator.

IMPORTANT:

Make sure it is a cold water pipe.

Horizontal pipe will work, but drill on the top side of the pipe, not the bottom. This will help keep water away from the drill and normal sediment from collecting in the valve.

4.Determine the length of copper tubing you need. Measure from the connection on the lower left rear of refrigerator to the water pipe. Add 7 ft (2.1 m) to allow for cleaning. Use ¹⁄₄"

(6.35 mm) O.D. (outside diameter) copper tubing. Be sure both ends of copper tubing are cut square.

5.Using a cordless drill, drill a ¹⁄₄" hole in the cold water pipe you have selected.


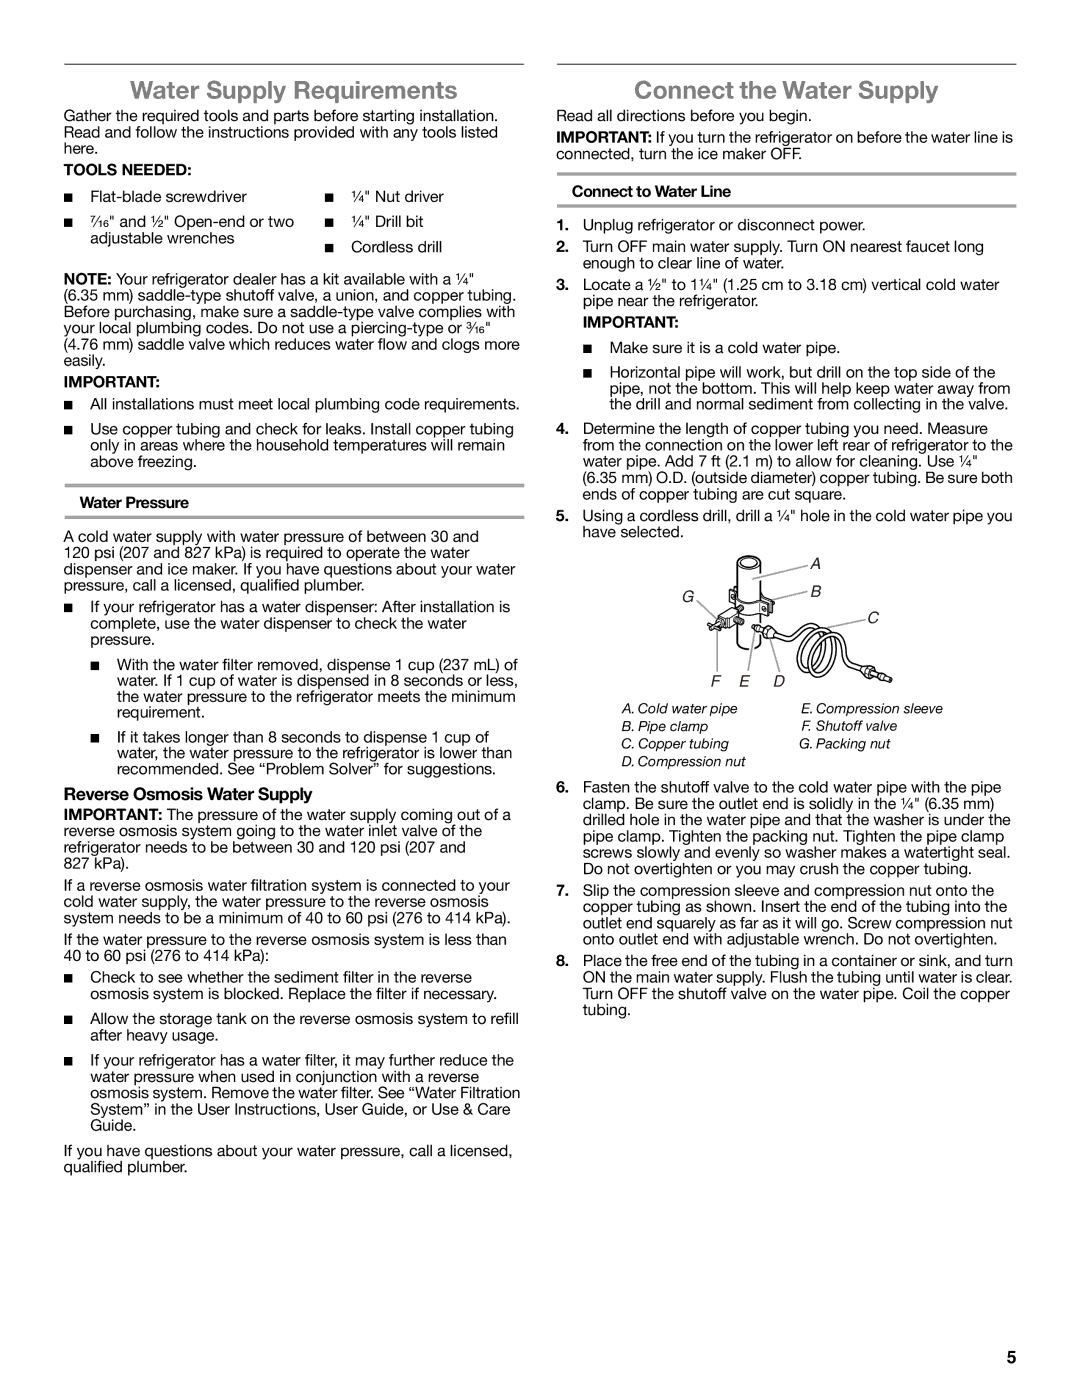
A

G

B


C

F E

D

A. Cold water pipe

E. Compression sleeve

B. Pipe clamp

F. Shutoff valve

C. Copper tubing

G. Packing nut

D. Compression nut


6.Fasten the shutoff valve to the cold water pipe with the pipe clamp. Be sure the outlet end is solidly in the ¹⁄₄" (6.35 mm) drilled hole in the water pipe and that the washer is under the pipe clamp. Tighten the packing nut. Tighten the pipe clamp screws slowly and evenly so washer makes a watertight seal. Do not overtighten or you may crush the copper tubing.

7.Slip the compression sleeve and compression nut onto the copper tubing as shown. Insert the end of the tubing into the outlet end squarely as far as it will go. Screw compression nut onto outlet end with adjustable wrench. Do not overtighten.

8.Place the free end of the tubing in a container or sink, and turn ON the main water supply. Flush the tubing until water is clear. Turn OFF the shutoff valve on the water pipe. Coil the copper tubing.

5

Page 5
Image 5
Whirlpool W10551728A Water Supply Requirements, Connect the Water Supply, Reverse Osmosis Water Supply, Tools Needed

W10551728A specifications

The Whirlpool W10551728A is a versatile and powerful appliance designed to meet the demands of modern households. This refrigerator model stands out due to its exceptional blend of innovation, efficiency, and style, offering consumers a dependable solution for food storage.

One of the main features of the W10551728A is its spacious interior, which offers ample storage options to accommodate a variety of food items. The refrigerator is designed with adjustable shelving, allowing users to customize the layout to suit their storage needs. This flexibility ensures that both large and small items can be easily organized and accessed.

In terms of technologies, the Whirlpool W10551728A incorporates adaptive cooling features that help maintain optimal temperatures, ensuring longer freshness for perishable goods. The refrigerator includes a temperature management system that automatically adjusts the internal climate based on the contents it holds. This not only enhances food preservation but also improves energy efficiency.

The Energy Star certification of the W10551728A underscores its eco-friendly design, making it a great choice for environmentally conscious consumers. The appliance is engineered to minimize energy consumption without compromising performance, thus saving on utility bills while contributing to a reduction in carbon footprint.

Another notable characteristic of the Whirlpool W10551728A is its user-friendly interface, which includes intuitive controls for adjusting temperature settings and activating special features. The sleek design is complemented by an exterior that is both stylish and easy to clean, helping the appliance blend seamlessly into any kitchen décor.

Additionally, the refrigerator features humidity-controlled crisper drawers designed to keep fruits and vegetables fresher for longer. By regulating humidity, these drawers prevent moisture loss, extending the shelf life of produce.

The Whirlpool W10551728A also boasts a reliable warranty, providing consumers peace of mind regarding the durability and longevity of their investment. With its combination of functionality, efficiency, and modern aesthetics, the W10551728A stands as an excellent choice for families seeking a robust and dependable refrigerator. Whether for storing groceries, preparing meals, or entertaining guests, this appliance ensures that your kitchen remains organized and efficient.