Manuals
/
Whirlpool
/
Kitchen Appliance
/
Refrigerator
Whirlpool
WWC359BLS
manual
Reverse Door Swing optional, Final Steps, Top Hinge, Bottom Hinge
Models:
WWC359BLS
1
5
29
29
Download
29 pages
34.78 Kb
1
2
3
4
5
6
7
8
Troubleshooting
Install
Warranty
Diagnóstico De Problemas
Utilisationdelacommande
Adjusting Controls
Cleaning
If You Need Replacement Parts
Assistance Ou Service
Clean Before Using
Page 5
Image 5
Page 4
Page 6
Page 5
Image 5
Page 4
Page 6
Contents
WINE CELLAR
WWC359BLS
CAVE À VIN
BODEGA
TABLE OF CONTENTS
WINE CELLARSAFETY
IMPORTANT SAFETY INSTRUCTIONS
DANGER WARNING
ProperDisposalofYourOld RefrigeratedAppliance
INSTALLATION INSTRUCTIONS
LocationRequirements
ElectricalRequirements
UnpacktheWine Cellar
Clean Before Using
Wine CellarDoor
Remove the Packaging
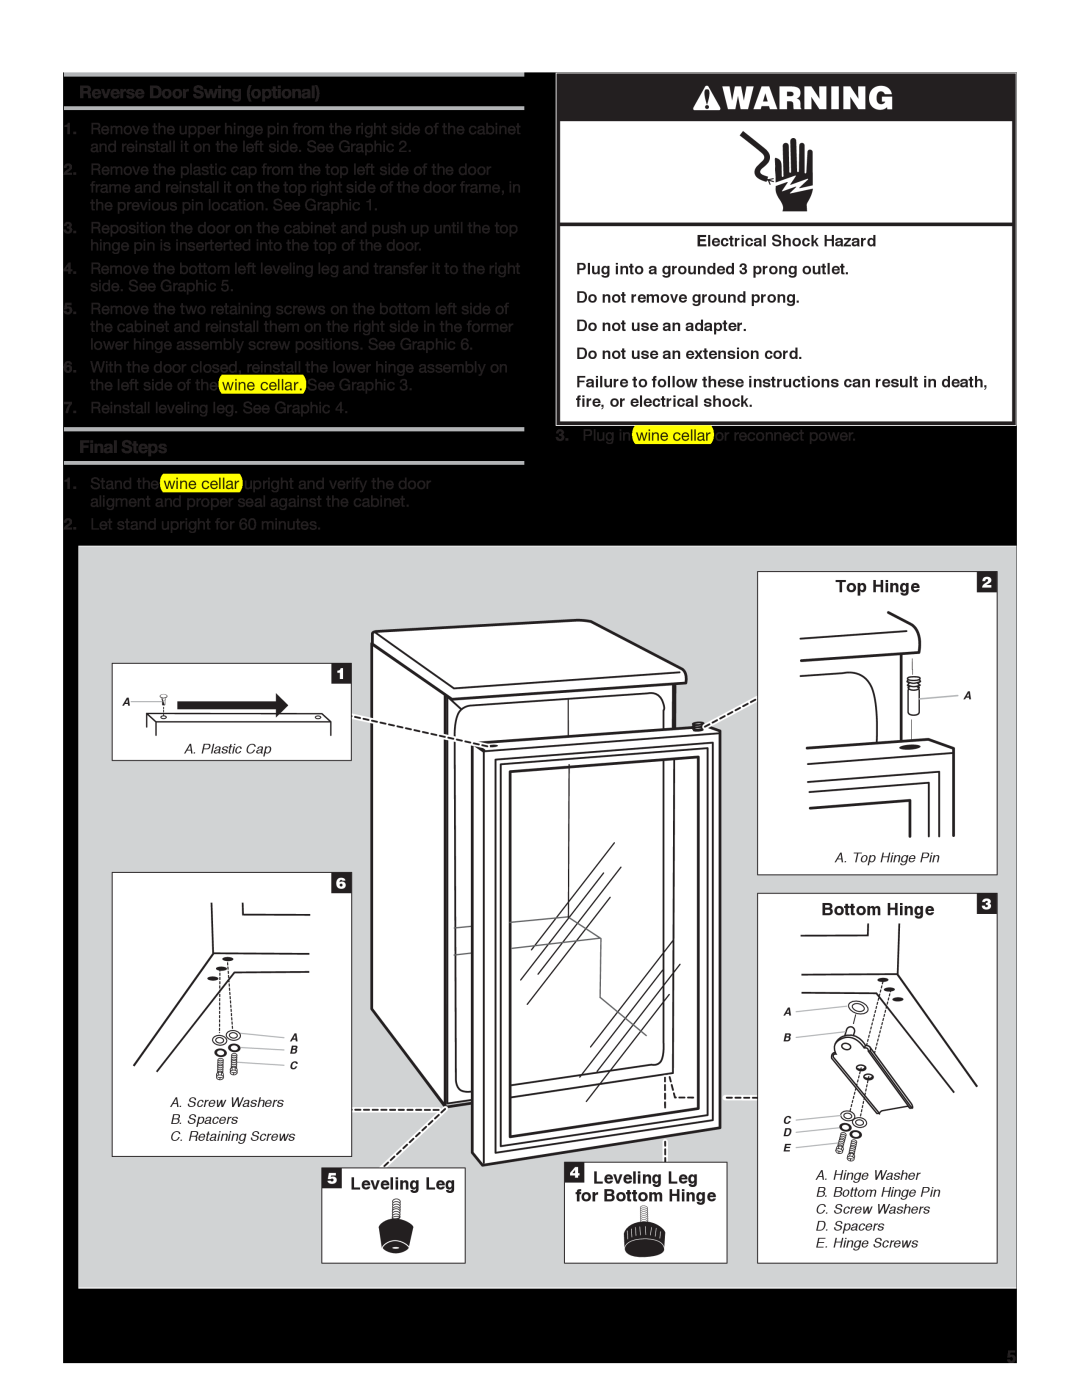
Final Steps
Reverse Door Swing optional
Top Hinge
Bottom Hinge
Adjusting Controls
UsingtheControl
WINE CELLARUSE
DoorClosing
To clean your wine cellar
Cleaning
WINE CELLARCARE
Lock
VacationandMovingCare
TROUBLESHOOTING
Vacations
Moving
If You Need Replacement Parts
ASSISTANCE ORSERVICE
The door is difficult to open
The door will not close completely
ITEMS WARRANTOR WILL NOT PAY FOR
WARRANTY
ONE YEAR LIMITED WARRANTY
DANGER AVERTISSEMENT
SÉCURITÉ DU RÉFRIGÉRATEUR POUR BOISSONS
AVERTISSEMENT
IMPORTANTES INSTRUCTIONS DE SÉCURITÉ
Exigencesdemplacement
INSTRUCTIONS D’INSTALLATION
Méthode recommandée de mise à la terre
Spécifications électriques
Nettoyage avant utilisation
Porte du réfrigérateur pour boissons
Dépose - Porte et charnières
Étapes finales
nivellement
Pied de
4Pied de nivellement pour charnière inférieure
Charnière supérieure
Ajustement des commandes
Utilisationdelacommande
UTILISATION DU
BOISSONS
Verrouillage
Dépose et réinstallation des clayettes
Clayettespourboissons
Nettoyage
déménagement
DÉPANNAGE
Vacances
Déménagement
Il existe une accumulation dhumidité à lintérieur
ASSISTANCE OU SERVICE
La porte est difficile à ouvrir
La porte ne ferme pas complètement
LE GARANT NE PRENDRA PAS EN CHARGE
GARANTIE
GARANTIE LIMITÉE DE UN AN
SEGURIDAD DEL REFRIGERADOR DE BEBIDAS
ÍNDICE
PELIGRO ADVERTENCIA
INSTRUCCIONES IMPORTANTES DE SEGURIDAD
ADVERTENCIA
INSTRUCCIONES DE INSTALACIÓN
de bebidas viejo
Requisitos del emplazamiento
Desembalaje del refrigerador de bebidas
Puerta del refrigerador de bebidas
Desembalaje
Desmontaje de la puerta y las bisagras
Pasos finales
Inversión de la abertura de la puerta opcional
5 Pata niveladora
4Pata niveladora
USO DEL REFRIGERADOR
DE BEBIDAS
Cierre de la puerta
Sonidos Normales
Cerradura
CUIDADO DEL REFRIGERADOR
Repisas
Limpieza
Cuidado en vacaciones y mudanzas
DIAGNÓSTICO DE PROBLEMAS
Vacaciones
Mudanzas
Dificultad para abrir la puerta
ASISTENCIA O SERVICIO
La puerta no cierra completamente
Si necesita piezas de repuesto
EL GARANTE NO CUBRE LO SIGUIENTE
GARANTÍA
GARANTÍA LIMITADA DE UN AÑO
WBC127BLS
Top
Page
Image
Contents