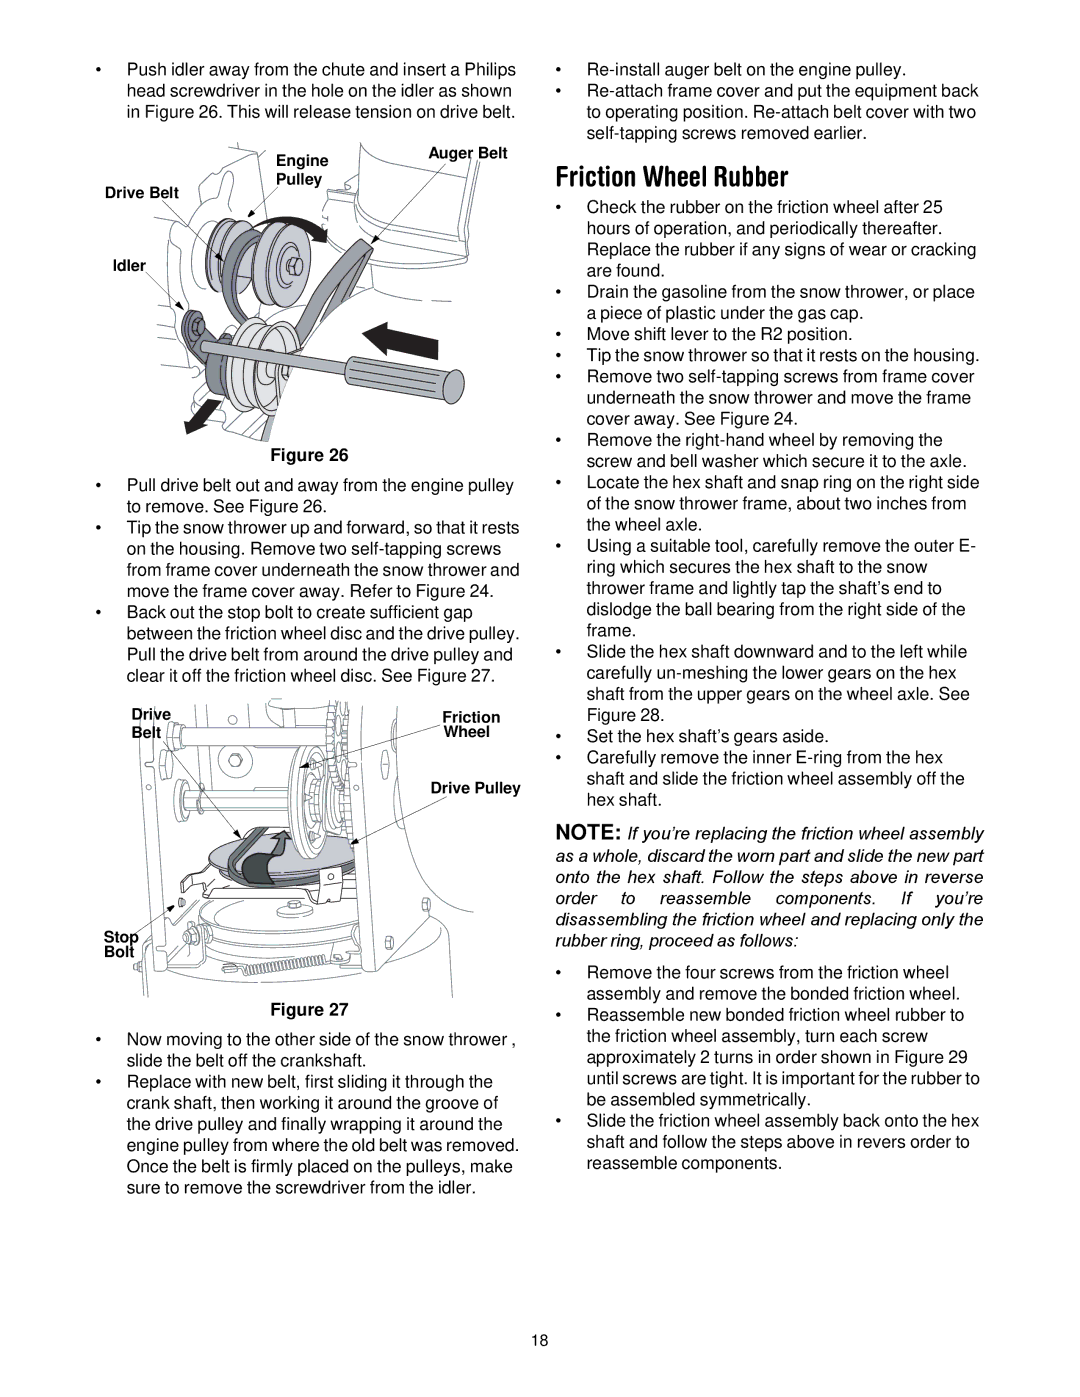
Push idler away from the chute and insert a Philips head screwdriver in the hole on the idler as shown in Figure 26. This will release tension on drive belt.

Engine

Auger Belt


Pulley


Drive Belt

Idler

Figure 26

Pull drive belt out and away from the engine pulley to remove. See Figure 26.

Tip the snow thrower up and forward, so that it rests on the housing. Remove two self-tapping screws from frame cover underneath the snow thrower and move the frame cover away. Refer to Figure 24.

Back out the stop bolt to create sufficient gap between the friction wheel disc and the drive pulley. Pull the drive belt from around the drive pulley and clear it off the friction wheel disc. See Figure 27.

Drive

Friction

Belt

Wheel


Drive Pulley

Stop

Bolt

Figure 27

Now moving to the other side of the snow thrower , slide the belt off the crankshaft.

Replace with new belt, first sliding it through the crank shaft, then working it around the groove of the drive pulley and finally wrapping it around the engine pulley from where the old belt was removed. Once the belt is firmly placed on the pulleys, make sure to remove the screwdriver from the idler.

Re-install auger belt on the engine pulley.

Re-attach frame cover and put the equipment back to operating position. Re-attach belt cover with two self-tapping screws removed earlier.

Friction Wheel Rubber

Check the rubber on the friction wheel after 25 hours of operation, and periodically thereafter. Replace the rubber if any signs of wear or cracking are found.

Drain the gasoline from the snow thrower, or place a piece of plastic under the gas cap.

Move shift lever to the R2 position.

Tip the snow thrower so that it rests on the housing.

Remove two self-tapping screws from frame cover underneath the snow thrower and move the frame cover away. See Figure 24.

Remove the right-hand wheel by removing the screw and bell washer which secure it to the axle.

Locate the hex shaft and snap ring on the right side of the snow thrower frame, about two inches from the wheel axle.

Using a suitable tool, carefully remove the outer E- ring which secures the hex shaft to the snow thrower frame and lightly tap the shaft’s end to dislodge the ball bearing from the right side of the frame.

Slide the hex shaft downward and to the left while carefully un-meshing the lower gears on the hex shaft from the upper gears on the wheel axle. See Figure 28.

Set the hex shaft’s gears aside.

Carefully remove the inner E-ring from the hex shaft and slide the friction wheel assembly off the hex shaft.

NOTE: If you’re replacing the friction wheel assembly as a whole, discard the worn part and slide the new part onto the hex shaft. Follow the steps above in reverse order to reassemble components. If you’re disassembling the friction wheel and replacing only the rubber ring, proceed as follows:

Remove the four screws from the friction wheel assembly and remove the bonded friction wheel.

Reassemble new bonded friction wheel rubber to the friction wheel assembly, turn each screw approximately 2 turns in order shown in Figure 29 until screws are tight. It is important for the rubber to be assembled symmetrically.

Slide the friction wheel assembly back onto the hex shaft and follow the steps above in revers order to reassemble components.

18

Page 18
Image 18
White Outdoor 772C0715 manual Friction Wheel Rubber

772C0715 specifications

The White Outdoor 772C0715 is a notable powerhouse in the realm of outdoor lawn equipment, specifically designed for those who seek efficiency and convenience in their gardening tasks. Built with robust engineering and user-friendly features, this model stands out in the market.

One of the core aspects that define the White Outdoor 772C0715 is its powerful engine. It typically comes equipped with a reliable gas engine that delivers smooth operation and ample power to handle a variety of yard maintenance tasks. The engine's design focuses on providing exceptional torque, allowing users to tackle thick grass and challenging terrain without sacrificing performance.

The cutting deck on the 772C0715 is designed for precision and efficiency. Featuring a wide cutting path, it ensures that the user can cover large areas in a short amount of time. This model often incorporates adjustable cutting heights, which enables users to customize their mowing experience according to the specific needs of their lawn. Whether it’s a manicured garden or a more rugged area, the versatility in cutting height helps achieve the desired results.

Another significant feature is its user-friendly controls. The 772C0715 often integrates intuitive controls that allow users, regardless of their experience level, to operate the machine with ease. Simple functions for starting, stopping, and adjusting settings can significantly enhance the overall mowing experience.

Moreover, the design of the 772C0715 emphasizes comfort during operation. Many models come with ergonomic handles that reduce strain on the operator, especially during prolonged use. The lightweight construction further aids in maneuverability, allowing users to navigate around obstacles without difficulty.

The White Outdoor 772C0715 also showcases advanced durability through its construction materials. Engineered to withstand the test of time, its components resist wear and tear, making it a sound investment for homeowners and professional landscapers alike.

In sum, the White Outdoor 772C0715 encapsulates practicality and performance in lawn care. With a powerful engine, adjustable cutting deck, user-friendly controls, and durable construction, it is designed to meet the demands of various gardening tasks while providing comfort and ease of use for every operator. Whether you are a seasoned gardener or just starting, the 772C0715 proves to be a valuable addition to any outdoor tool collection.