Page
Important Notice For the United Kingdom
Special Message Section
Important Safety Instructions
Statements Regarding the Wireless LAN Card
FCC Information U.S.A
English
Introduction
Trademarks & Copyrights
Important Precautions
Interference
Handling Rechargeable Battery
Iii
Table of Contents
Other Settings
Troubleshooting
Error Messages
Screen Transition Diagrams
Getting Started
Items Supplied with the Disklavier
Names of Parts and Their Functions
Media Center
Getting Started Eject button
Center
Front Output jacks
Getting Started Left side
Central Signal Processor
Power Supply Unit
Getting Started Right side
Charge indicator amber
Pocket Controller
Getting Started Rear
Cradle
LINE1/2 volume controls
Monitor Speakers
Installing the Media Center
Setting Up the Disklavier
Screw the supplied screws into the nuts
Attach the hanger to the bottom
Installing the Monitor Speaker for the Mark IV Series only
Screw the thumbscrews to secure the Monitor Speaker
Wiring the Disklavier
Monitor speaker Left Right
Sensor
Put the rechargeable battery into the battery compartment
Preparing the Pocket Controller
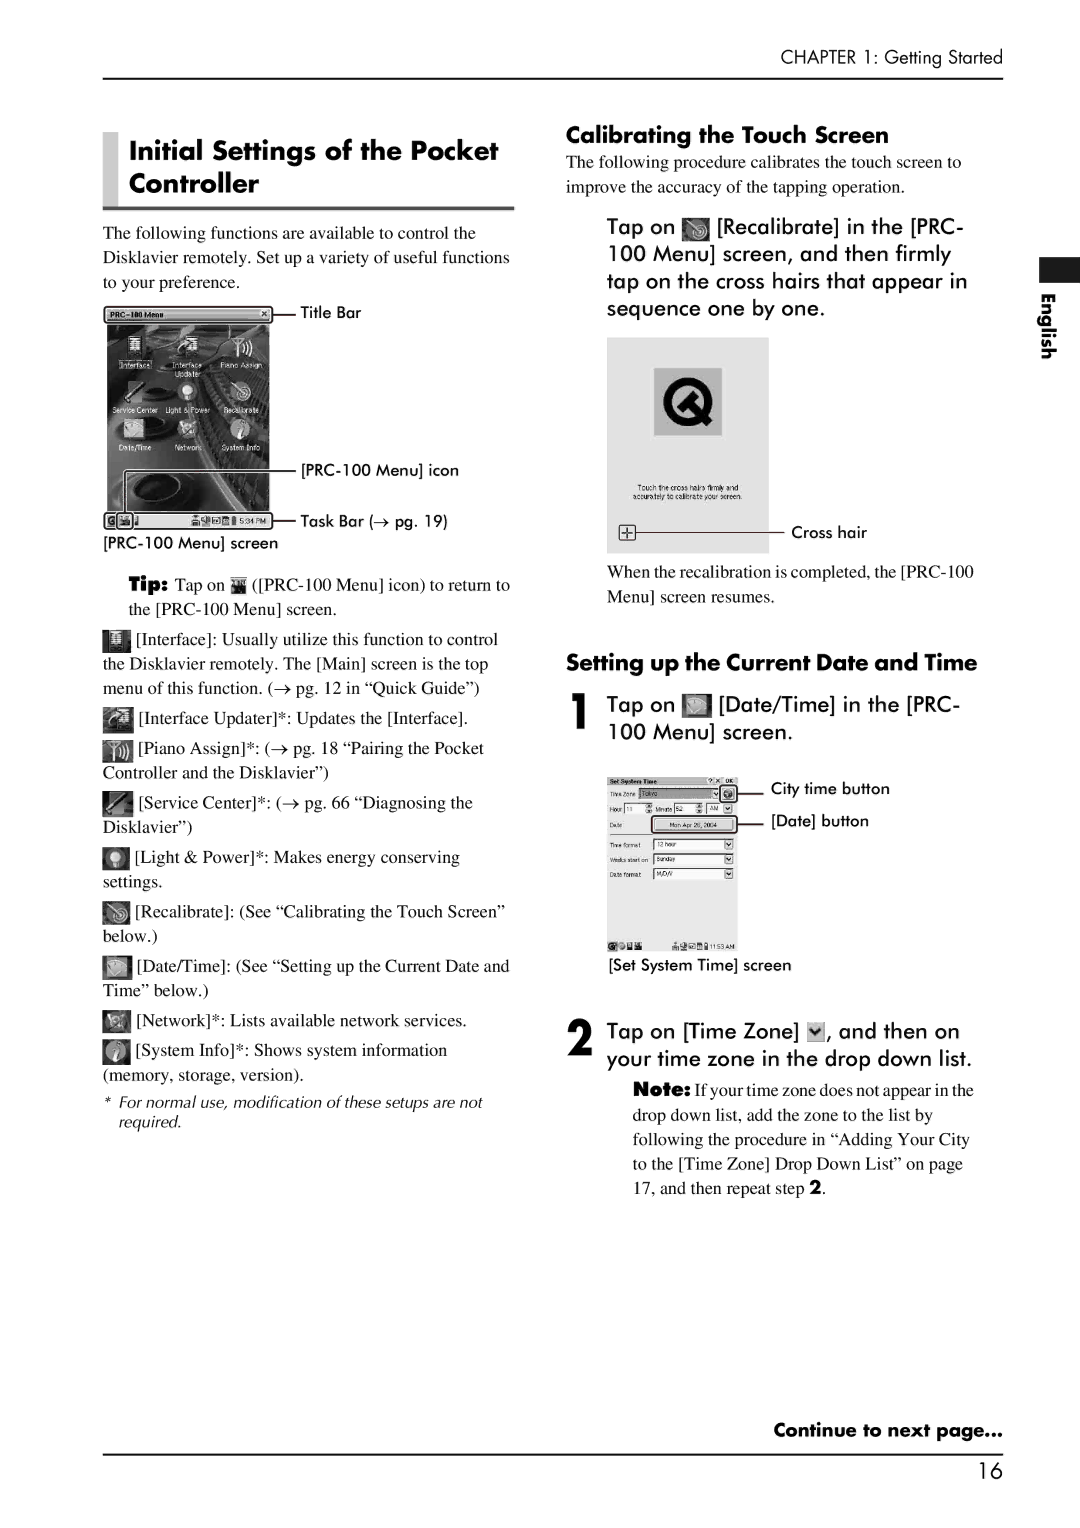
Initial Settings of the Pocket Controller
Setting up the Current Date and Time
Calibrating the Touch Screen
Tap on Date/Time in the PRC Menu screen
10Reboot the Pocket Controller
Rebooting the Pocket Controller
Adding Your City to the Time Zone Drop Down List
To correct the city selection, tap on
Resetting the Pocket Controller
Pairing the Pocket Controller and the Disklavier
Basic Precautions for Using Floppy Disks and CDs
Handling Floppy Disks
Write Protection
Description of the Task Bar
Available File Format Structure of Data Removable Media
Getting Started
Song Playback Features
To cancel the transposition, set the value to
Changing the Playback Tempo
Playing Back Songs in a Different Key Transposition
To cancel repeat mode, tap on in step
Repeating Song Playback
Repeating a Specific Section of a Song A-B Repeat
Tap on Song screen Tap on the desired repeat mode, Then on
Tap on at the end of the section you want to repeat point B
Playing Back Only Desired Piano Part
To clear the registered point, tap on
Tap on the desired part to change its setting play or mute
Utilizing the Play Lists
Tap on to clear the Balance control screen
Adding the Desired Song to the Play Lists
To cancel this operation, tap on
Temporarily Changing the Voice of a Track
Tap on After the completion Message appears
Playing Back the Desired Songs in the Desired Order
Tap on Voice
Tap on the desired voice name
Mix/Move/Copy Track
Editing Tracks
Tapscreen.on once on the Song
Tap on the desired edit track option Button
Delete Track
Transpose Track
Checking and Modifying the Song Information
Tap on / to adjust the transposition value, and then tap on
Checking the Song Information Song-Info Screen
Checking and Modifying the Song Information Song-Tag screen
Modify the information
Entering Characters
Presetting Playback Control Options for Each Song
Tap on the title of the desired option
SmartKey Playback
Key notation
Follow and play the prompt key
Selecting the Part to Be Guided
Video Synchronized Playback
Piano Playing Features
Tap on / to adjust the value of the desired option
Playing the Disklavier along with the Internal Metronome
Tap on in the Main screen Tapmetronome.onto start
Tappart.on the voice name of the desired
Adding Expressive Effect to Your Play
To complete
Adding Chords to a Melody Line Harmony Mode
Setting up Harmony Mode
Applying Reverb Effects to the Digital Piano
Playing the Disklavier in Harmony Mode
Tap on in the Main screen Then on
Recording
Recording a New Song
Press to stop recording
To play back the recorded song, press
Quick Recording
Titling a Song at the Start of Recording
Press REC on the Media Center
Press User to start recording
Setting Up the Camcorder and the Disklavier
Video Synchronized Recording
Press to start, and then immediately pause recording
Hook up a camcorder to the I/O Center
To cancel the adjustment, press
Tap on to turn the video synchronization on
Pressvalue. select button to set
Starting Video Synchronized Recording
CD Synchronized Recording
Recording Ensemble Parts
Start playing the Disklavier Press to stop recording
Ensemble Part Recording and Track Structure
Tap on the track number to be overwritten in the track list
To cancel recording, tap on
Tapvoice.on Voice, and then the desired
Overdubbing an Existing
Part
Tap on Twice
Overdubbing a Piano Part
Making a New Recording
To cancel recording, tap on English
Overwriting a Part on an Existing Song
To cancel Quantize function, select OFF
Quantize Function
Changing the Default Tempo
Tap on / of Tempo to adjust the tempo
Time Mode
Metronome Mode
Creating a Song Library
Creating an Album in the Library
To clear the Function Menu screen, tap on
To name the new album, see
Renaming an Album
Making Copies of Songs or Albums
Copy the selected song or album
Copying a Song
Copying an Album
SEQ Piano1 format conversion
Deleting Songs or Albums
To cancel deletion, tap on
Rearranging the Order of Songs/Albums
Other Settings
Using Timer Play
Skipping the Blank Part at the Beginning of a Song
Inactivating the Key Movement During Playback
Taplist. on the desired row in the timer
10Tap on to complete the setting
To delete all timer program settings, tap
Tap on Day, and then press to select the desired day
Tuning the Tone Generator MasterTune
To cancel tuning, tap on
Taptype.on the desired vocal harmony
10Tap on to activate Vocal Harmony mode
11Tap on to clear the Vocal Harmony screen
Preparing for Use of Foot Controls/Switches
Setting Up the Disklavier for Foot Controls/Switches
Connect a foot control/switch to the Foot CNTRL1/2 jack
Select the detailed setting
Tap on to complete the setting
Operating an Optional Foot Switch FC4/FC5
When Pitch Bend is selected
When Play/Stop is selected for Function
Analog MIDI-YM
Hooking Up AV Equipment
Output+PianoTG
Digital Out
Lyric Screen
Hook up a TV or a monitor display to the I/O Center
Start playback of a song with lyrics on the Disklavier
Converting Midi Data to a Standard Form Strip XP
Changing the Background Picture of the Lyric Screen
Making Backups and Restoring the Song Library
Making Backups
Restoring the Song Library
Tap on After the completion Message appears, and then
Making an Install Floppy Disk
Restoring the Contents in the Demo Album
Formatting a Floppy Disk
Resetting the Disklavier
Tap on To start resetting
Assigning a Specific Function to the ONE Touch Button
Diagnosing the Disklavier
Piano Voice List
Instrument Voice Name Group
Ensemble Part Playback Voice List
Group Name Voice Voice Name Number
XG-Marimba
Other Settings
Brass
Group Name Voice Voice Name Number
Effects
399 XG-HollwRls Synth 433 XG-Banjo
SFX Voice
Vocal Harmony Type List
Drum Voice List
English Continue to next
Vocal Harmony Type Mode ChromaticXG Voice & Inst Vocoder
Hooking Up a Midi Device
Hooking Up a Midi Device
Setting Up the Disklavier for Midi Data Reception Midi
Delay
Port
Piano Rcv Ch
Transmit
Part Esbl Out
Out Ch
Local
Split
Trans L
Troubleshooting
Disklavier does not recognize an USB flash memory
Disklavier does not read a CD-R/-RW
Some notes drop out during playback
PianoSmart playback cannot be performed
Error Messages
Situation Error Messages Description
Screen Transition Diagrams
Main screens
Rec screens English
Song screens
Setup menu screens
Song playback option buttons English
Setup option screens
English
Glossary
Quiet Mode TG Master Tune
Sound Muting Mode
Reverb
Tone Generator
Specifications
General
Features
Specifications
Specifications are subject to change without prior notice
Appendix
Appendix
Preamble
Page
Continue to next Appendix
No Warranty
Continue to next
Page
Continue to next Appendix
Page
Appendix Continue to next
Notification
Continue to next Appendix
Page
Appendix